Alina Portfolio - A Modern Next.js Portfolio Template Documentation
1. Introduction
Welcome to the documentation for Alina Portfolio, your modern solution for showcasing creative and development work. Alina Portfolio isn't just a static template; it's a sleek, production-ready Next.js application designed to help you present your projects with both style and efficiency.
What makes Alina Portfolio stand out is its integrated, full front-end content management system (CMS). This powerful feature means you can easily update almost every aspect of your website – from project details and images to your personal bio and contact information – directly from a user-friendly dashboard. No coding required for content updates!
Whether you're a developer seeking a robust, high-performance foundation for your online presence or a creative professional looking for a simple yet sophisticated way to manage your portfolio without touching code, Alina Portfolio delivers a flexible and intuitive experience. Get ready to elevate your online showcase with ease.

2. Theme Requirements
To ensure Alina Portfolio runs optimally and delivers the best performance, your development and hosting environment should meet certain specifications. Since Alina Portfolio is a Next.js application and not a traditional WordPress theme, its requirements are based on the JavaScript ecosystem.
Node.js Version
Node.js is the runtime environment that powers Next.js applications. It's essential to have a compatible version installed.
- Minimum Requirement: Node.js v15 or higher.
- Recommendation: We strongly recommend using the latest Long Term Support (LTS) version of Node.js for stability and security. You can download it from the official Node.js website.
Package Manager
A package manager is used to install and manage the project's dependencies (libraries, frameworks, etc.).
- Recommended: pnpm
- `pnpm` is generally faster and more efficient with disk space. You can install it globally via npm: `npm install -g pnpm`.
- Alternatives: npm (Node Package Manager) or yarn are also fully supported. The installation commands in this documentation will primarily use `pnpm`, but you can substitute with `npm` or `yarn` as per your preference.
Hosting Environment
Alina Portfolio is designed for Static Site Generation (SSG), which means it pre-renders your site into static HTML, CSS, and JavaScript files. This makes it incredibly versatile for deployment.
- Type of Hosting: You can deploy Alina Portfolio on any static hosting provider.
- Recommended Platforms:
- Vercel : The creators of Next.js, Vercel offers an extremely streamlined deployment experience for Next.js applications with automatic scaling and CI/CD.
- Netlify : Another excellent choice for static sites, providing easy deployments, custom domains, and integrated functions.
- GitHub Pages : A free option for hosting static sites directly from a GitHub repository.
- AWS S3 + CloudFront : For more advanced users needing highly scalable and robust static hosting.
- Any Web Server : You can also manually upload the generated static files (from the
out/directory after runningpnpm run build) to any traditional web server (Apache, Nginx, etc.).
Build Process
While the deployed site is static, the build process for generating these files requires a server environment (or your local machine) capable of running Node.js.
- Build Environment: Ensure your deployment platform or CI/CD pipeline supports Node.js and can run the `pnpm run build` command to generate the static `out/` directory.
Essential Project Dependencies
Alina Portfolio relies on several modern libraries and frameworks for its functionality and styling. These are automatically installed when you run `pnpm install`. Key dependencies include:
- Next.js 15 (App Router) : The core React framework for building the application.
- React & React DOM : For building the user interface.
- TypeScript : For type-safe development.
- Tailwind CSS : For utility-first styling.
- ShadCN UI : For UI components built with Radix UI and Tailwind CSS.
- GSAP : For advanced animations.
- Lucide Icons : For vector icons.
By ensuring your environment meets these requirements, you'll set a strong foundation for a smooth development and deployment experience with Alina Portfolio.
3. Getting Started (For Developers)
This section guides developers through the initial setup and running of the Alina Portfolio template on their local machine.
Installation
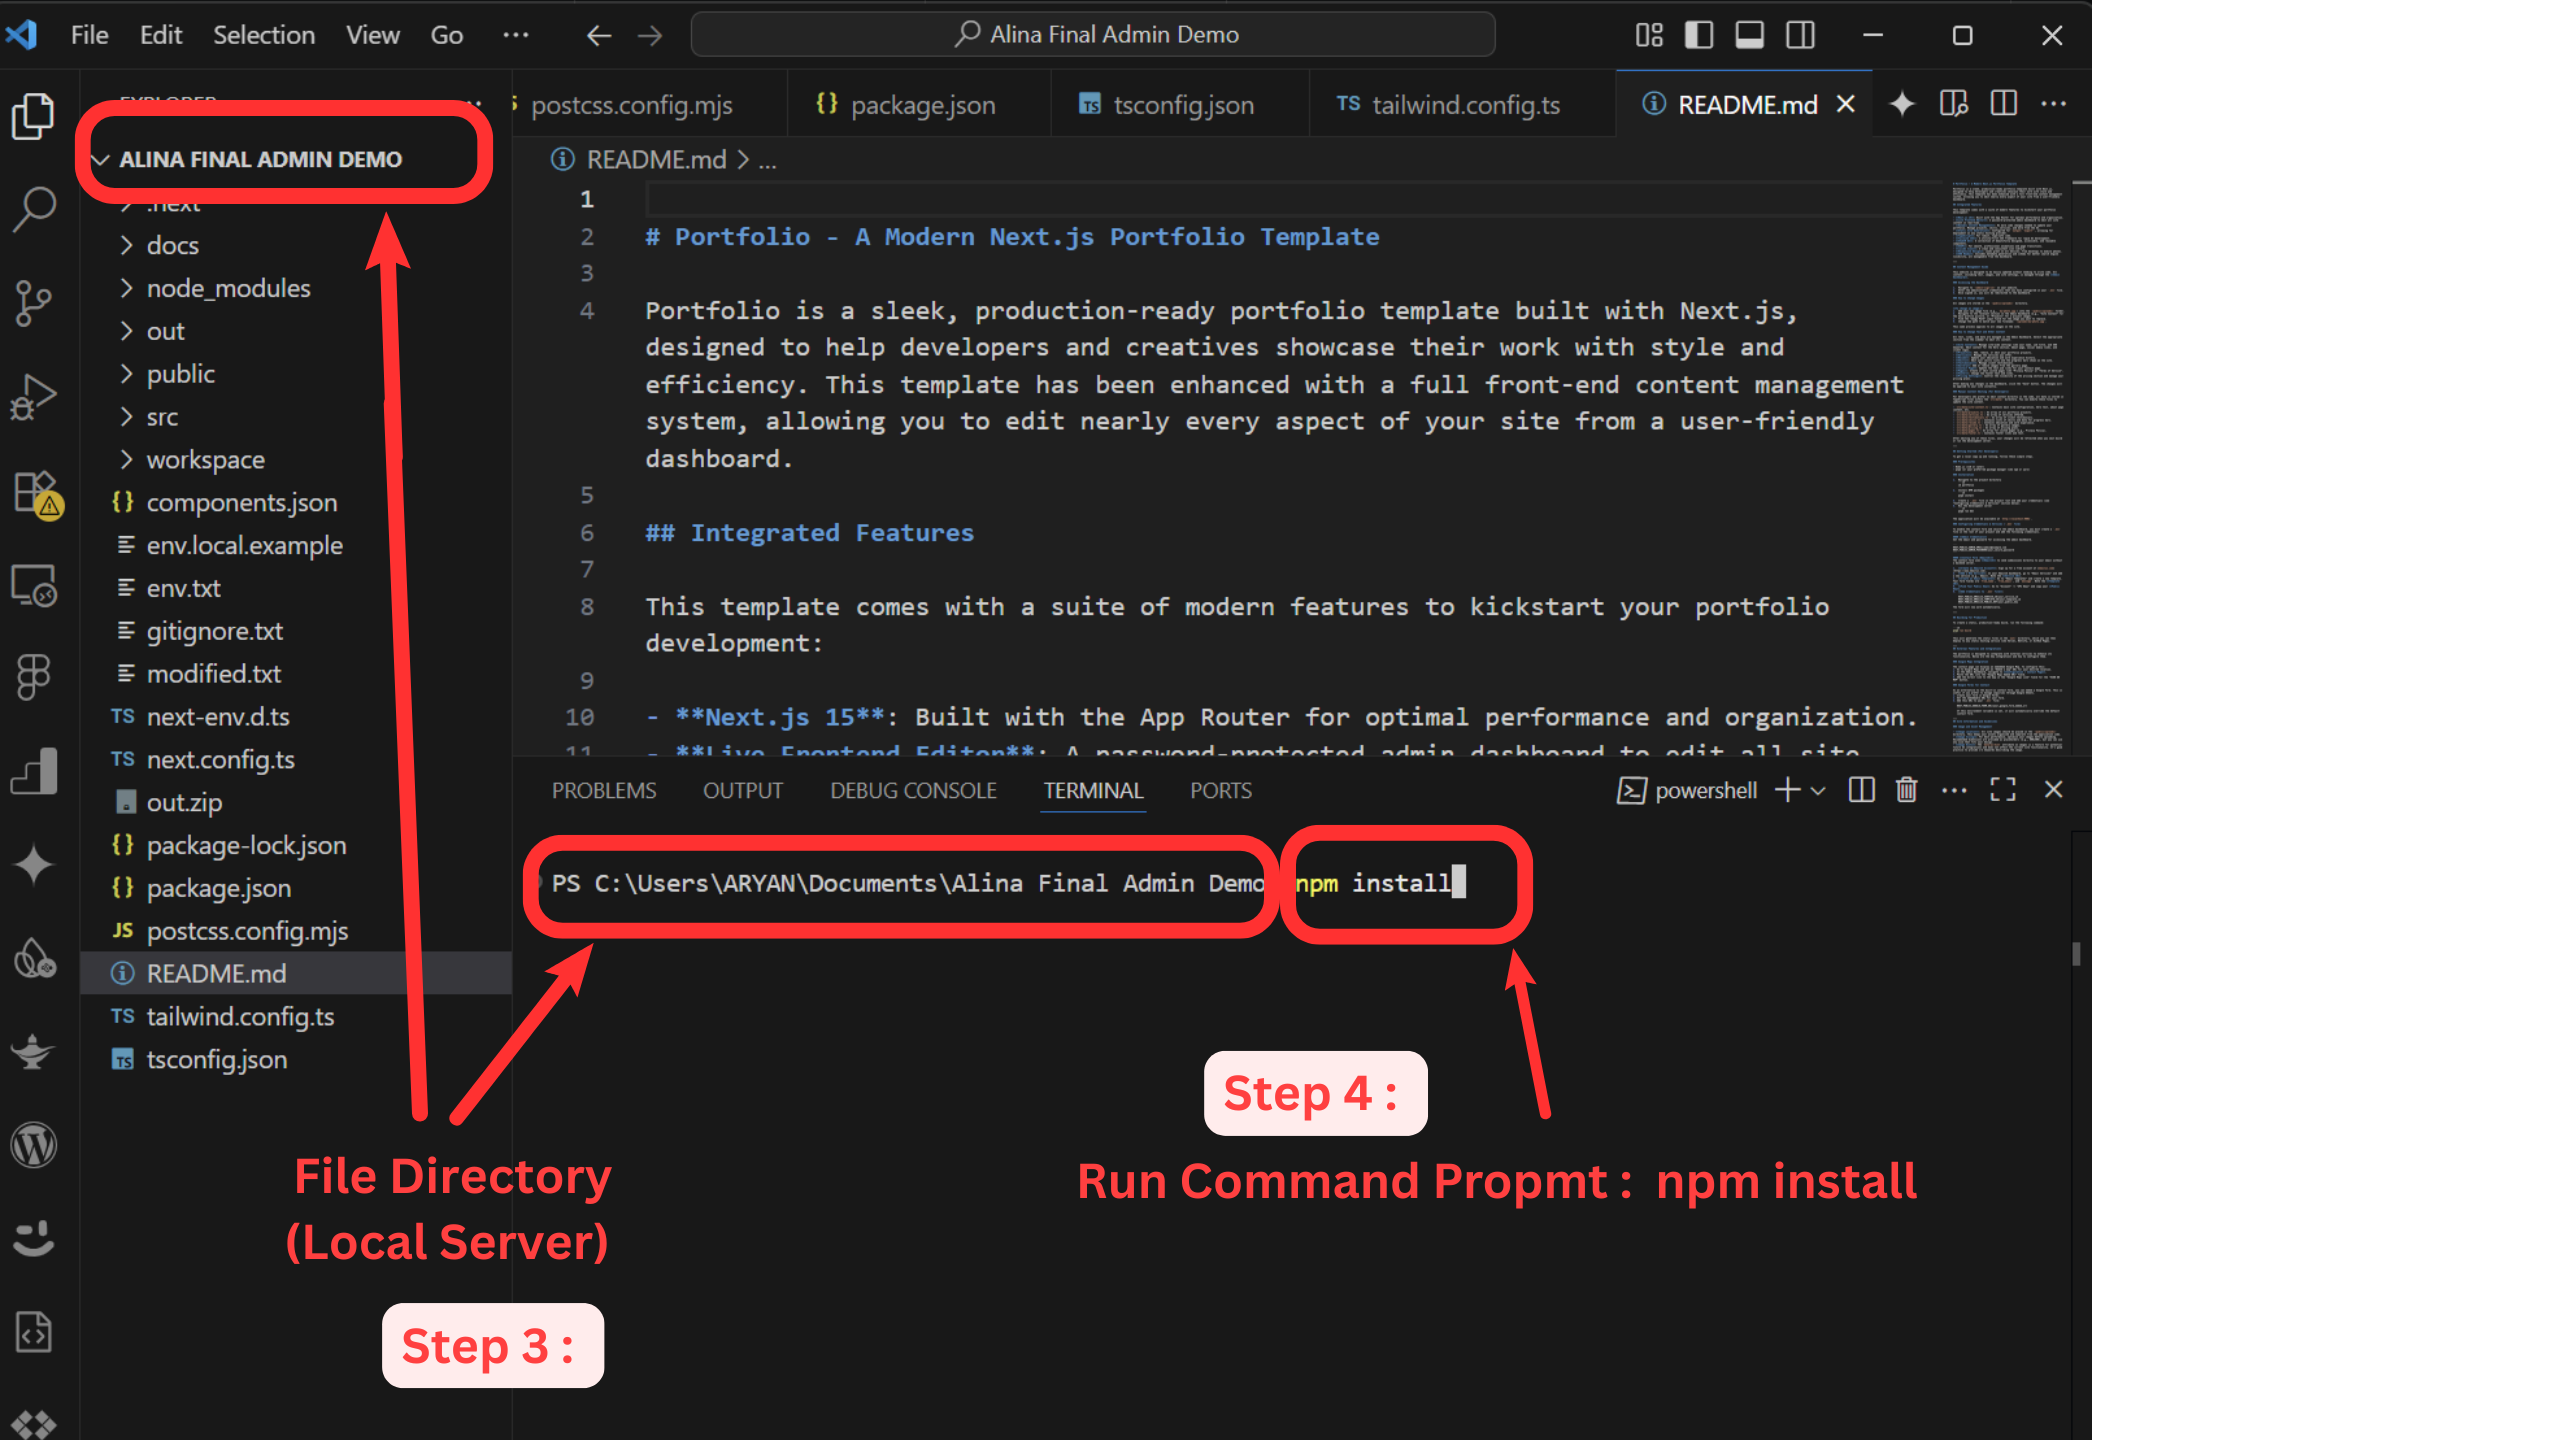
Follow these steps to get your local copy up and running:
- Navigate to Project: Open your terminal or command prompt and change your current directory to the cloned portfolio project folder:
cd alina-portfolio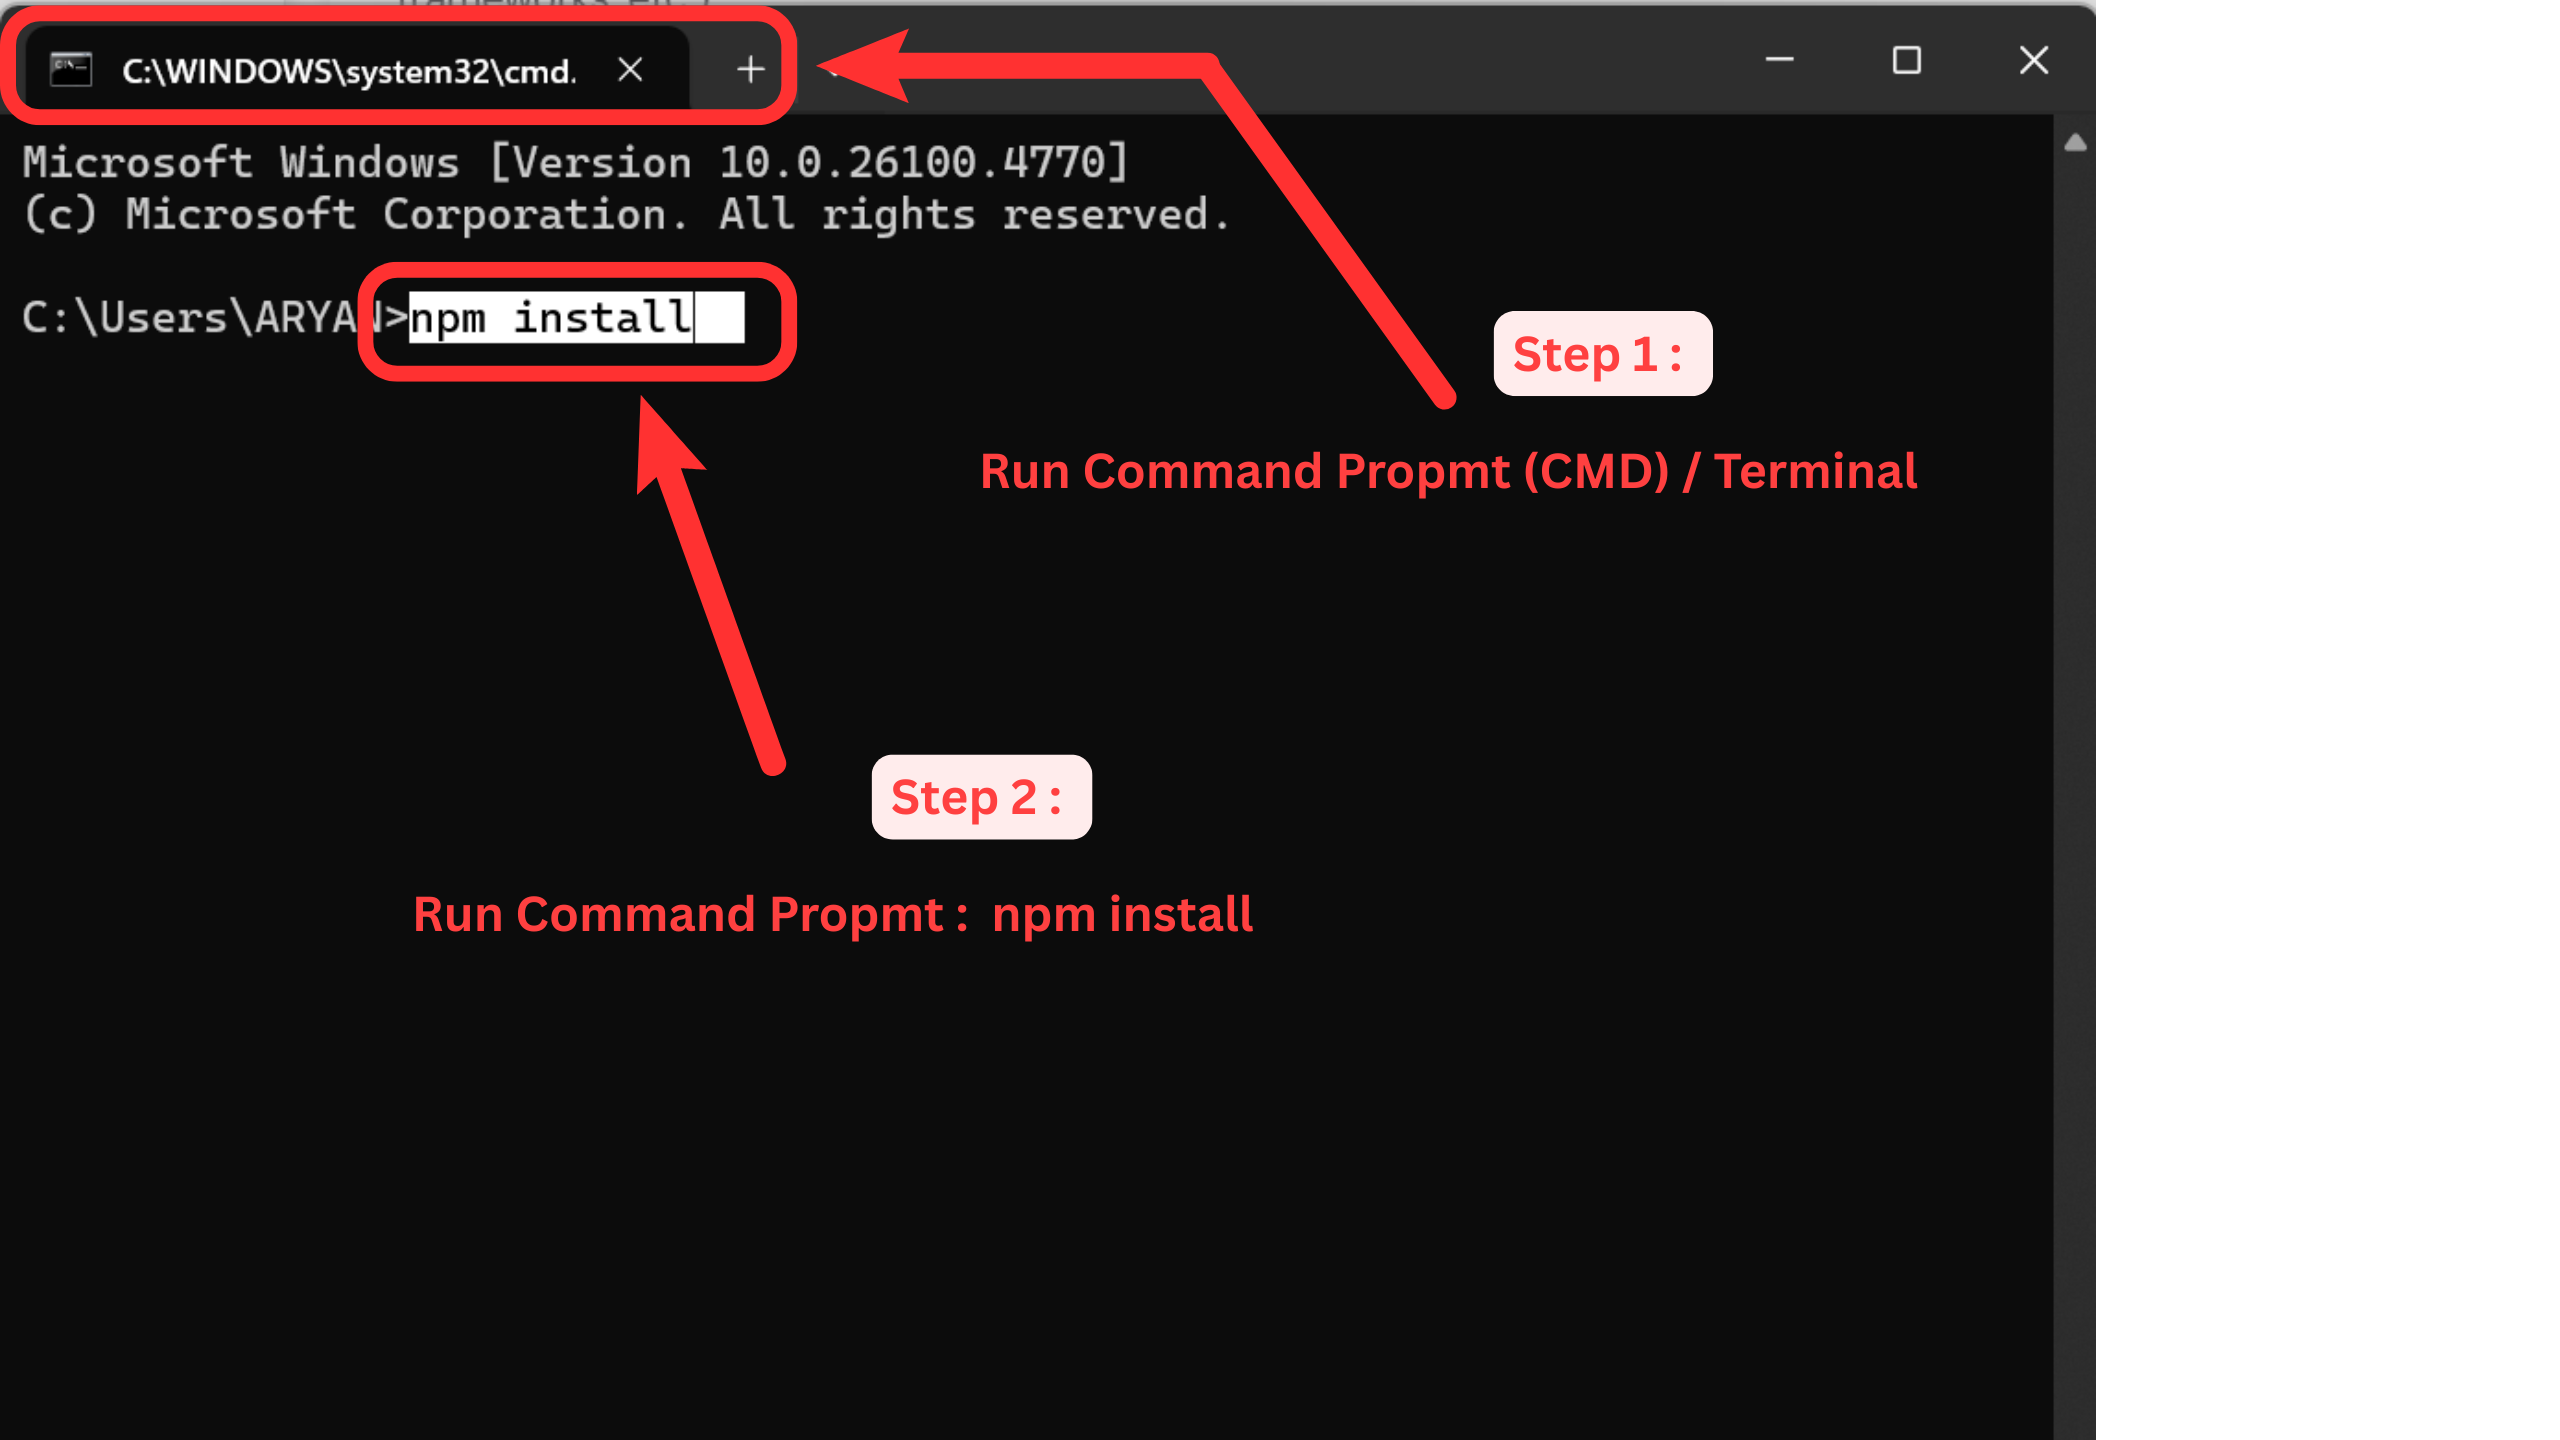
- Install Packages: Use pnpm (or your preferred package manager) to install all necessary dependencies:
pnpm install # or npm install # or yarn install
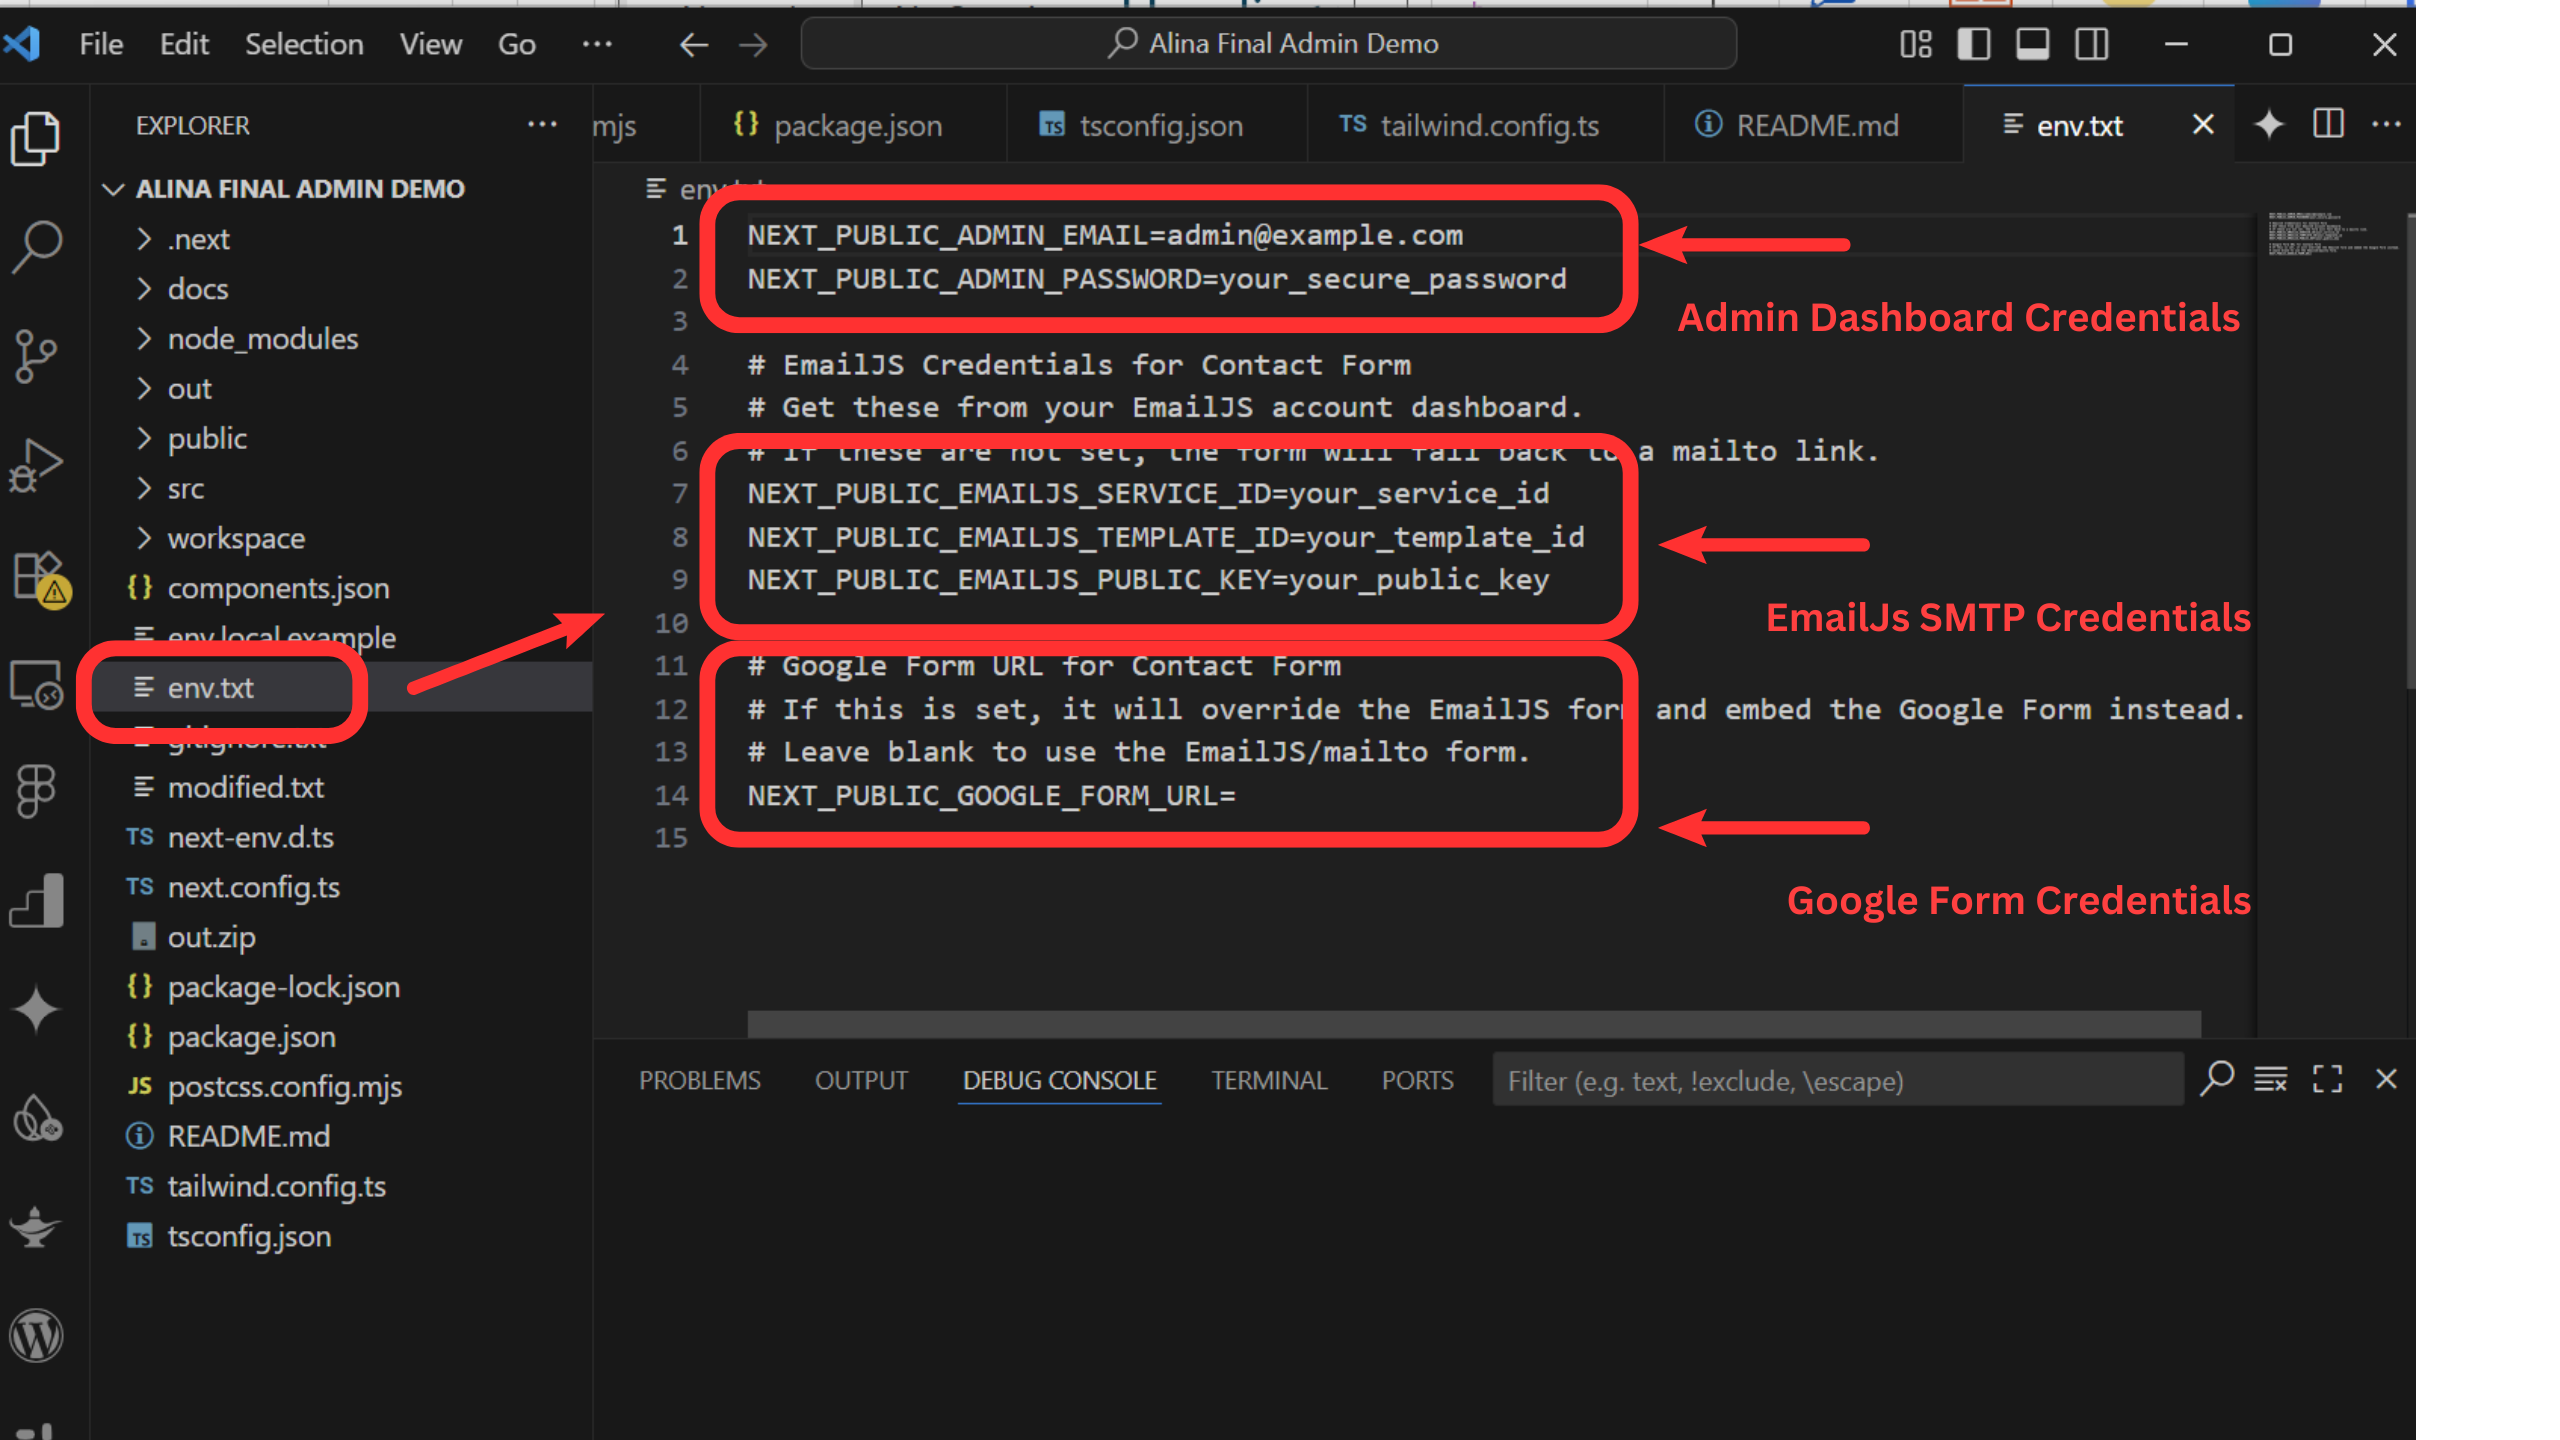
- Create `.env`: In the root of your project directory, create a new file named `.env`. This file will store your configuration credentials. Refer to the "Configuring Credentials & Services" section below for details.
- Run Development Server: Once packages are installed and the `.env` file is set up, start the development server:
pnpm run dev # or npm run dev # or yarn dev
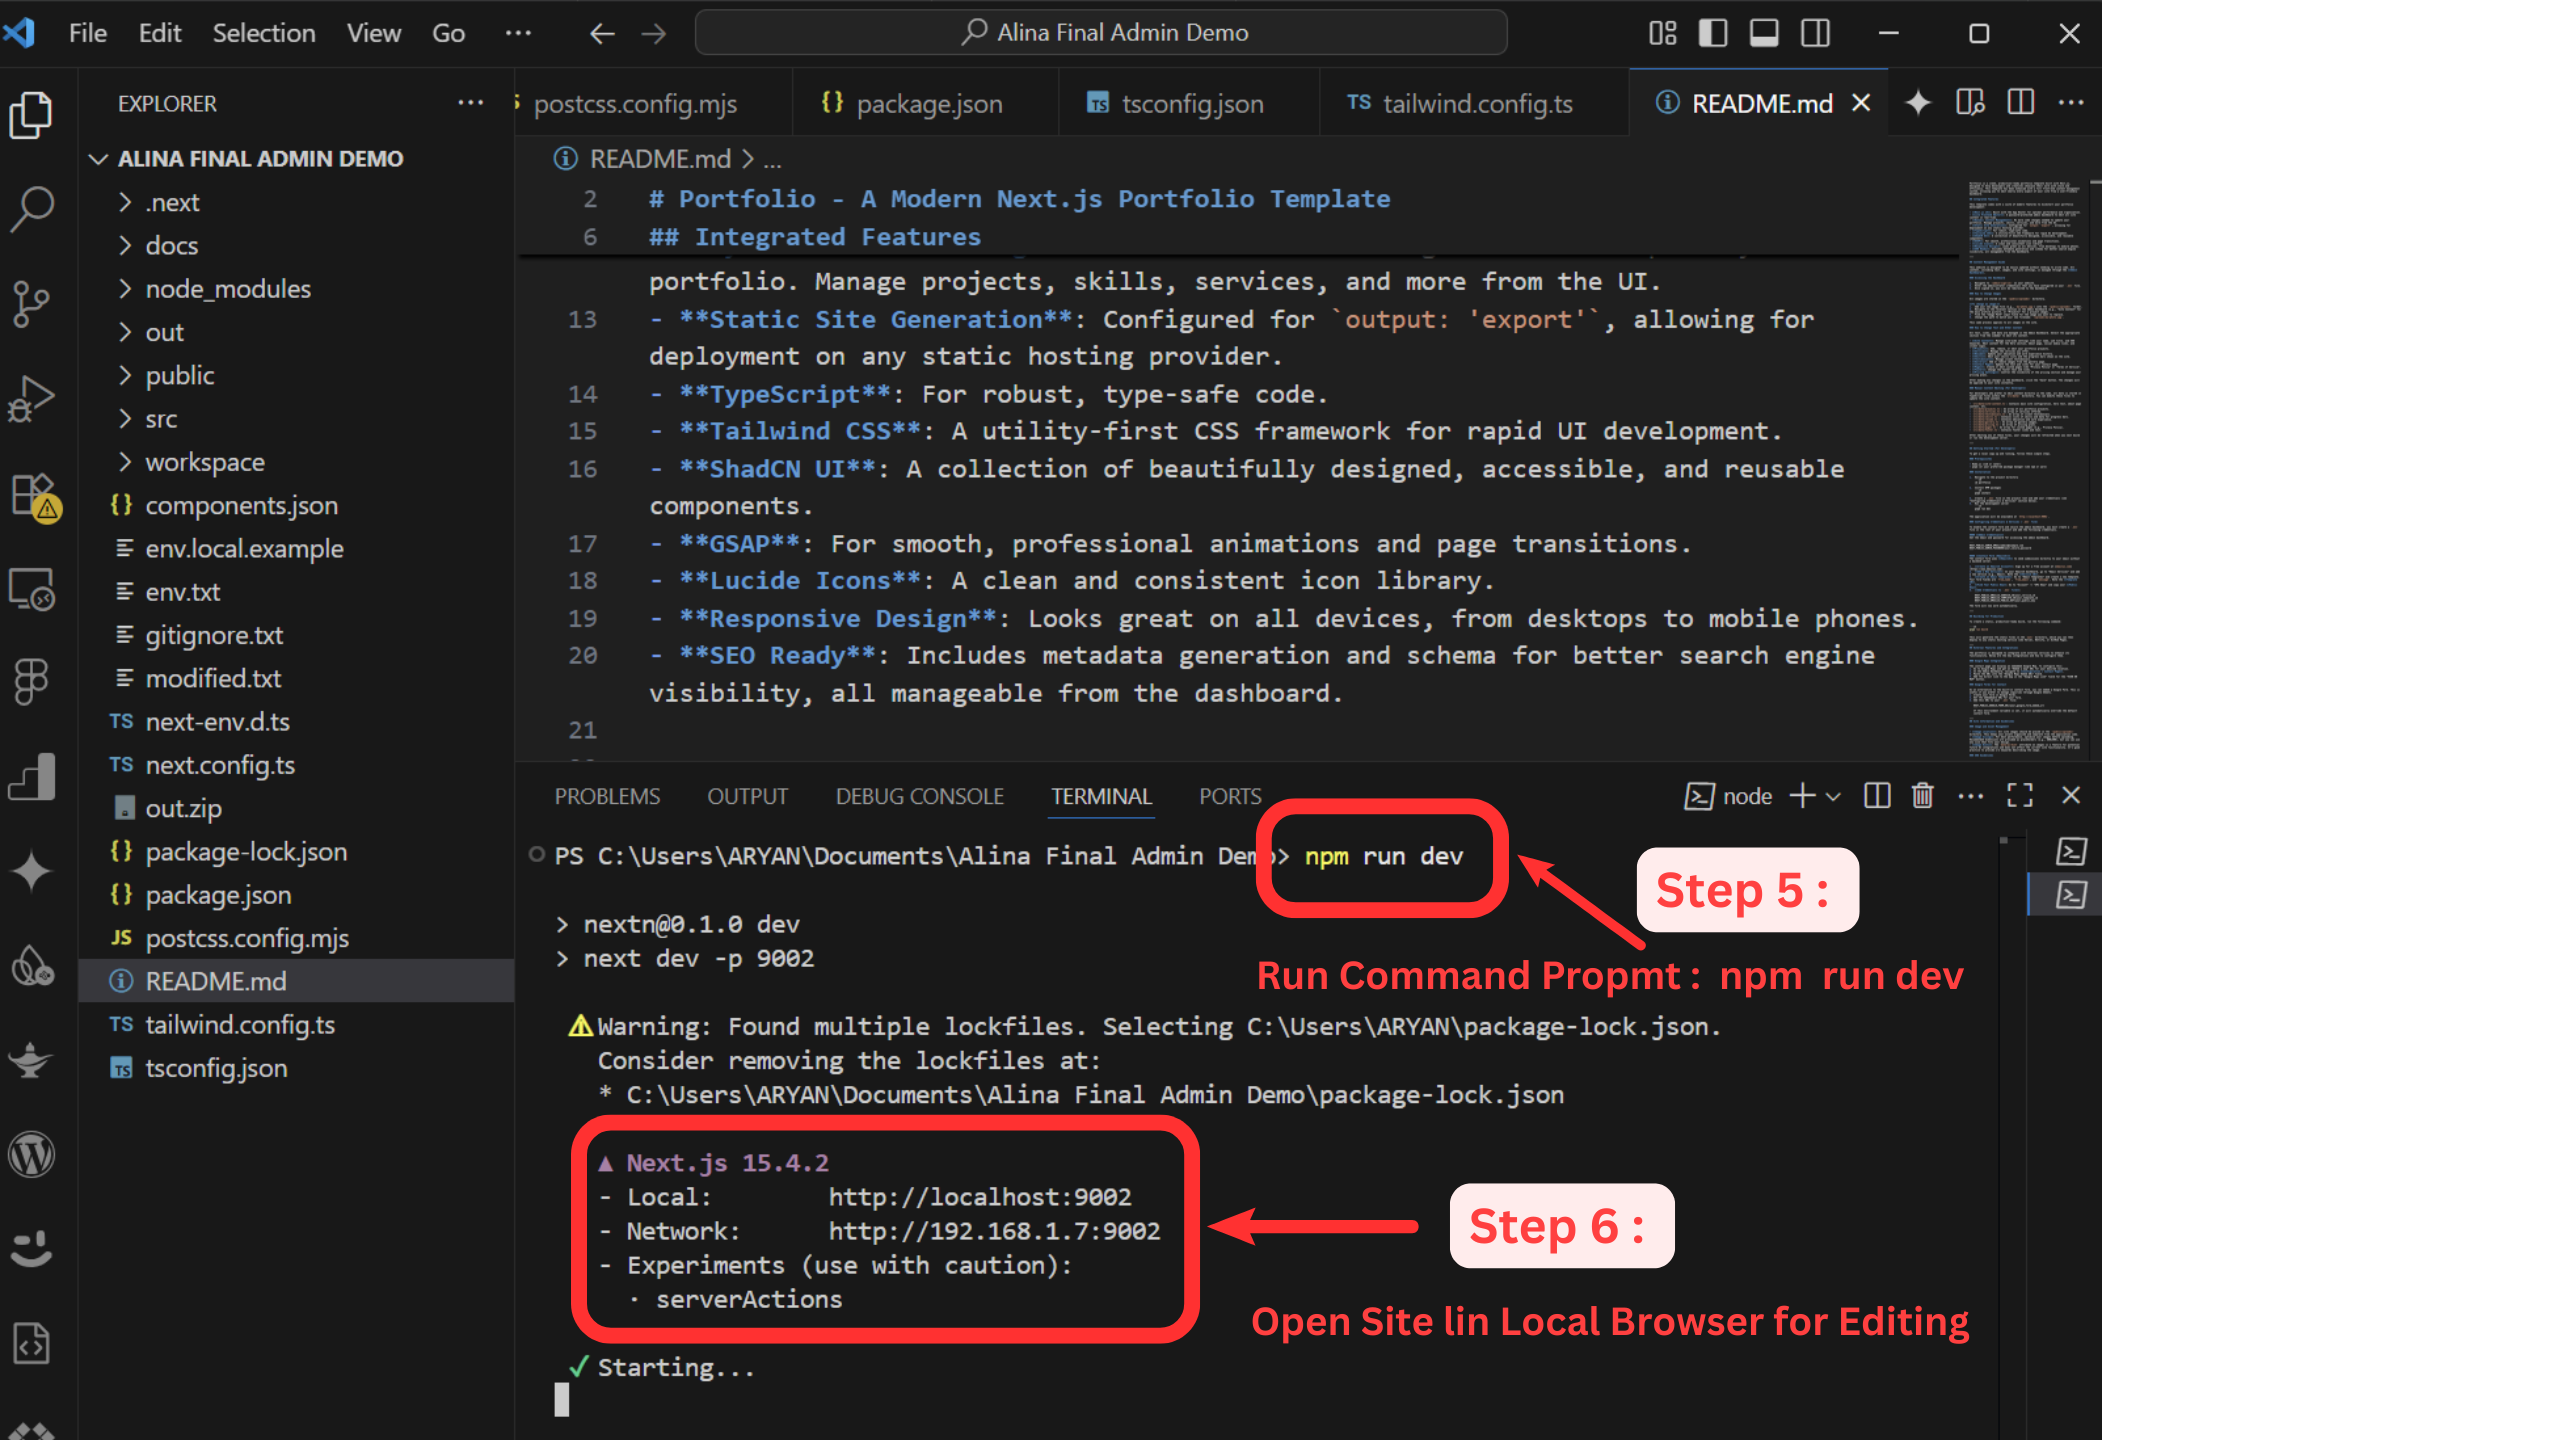
The application will now be accessible in your web browser at `http://localhost:9002`.
- Replace `admin@example.com` with your desired administrator email.
- Replace `your_secure_password` with a unique and robust password.
- Create an EmailJS Account: Sign up for a free account at emailjs.com.
- Add Service & Template: In your EmailJS dashboard, navigate to "Email Services" and add a new service (e.g., Gmail). Then go to "Email Templates" and create a new template with fields like `from_name`, `from_email`, and `message`. Note down the Service ID and Template ID.
- Get Public Key: In your EmailJS dashboard, go to "Account" -> "API Keys" and copy your Public Key.
- Add to `.env`: Add the following lines to your `.env` file, replacing the placeholders with your actual IDs and keys:
NEXT_PUBLIC_EMAILJS_SERVICE_ID=your_service_id NEXT_PUBLIC_EMAILJS_TEMPLATE_ID=your_template_id NEXT_PUBLIC_EMAILJS_PUBLIC_KEY=your_public_key
Configuring Credentials & Services (`.env` file)
The `.env` file is crucial for enabling the contact form functionality and securing your admin dashboard. Create this file in the root of your project and add the following variables:
Admin Credentials
These credentials are required to access the administrative dashboard. Choose a strong, secure password.
NEXT_PUBLIC_ADMIN_EMAIL=admin@example.com NEXT_PUBLIC_ADMIN_PASSWORD=your_secure_passwordContact Form (EmailJS)
The built-in contact form utilizes EmailJS to send email submissions directly to your inbox without requiring a backend server.
Once these variables are correctly configured, the contact form on your website will function automatically.
4. Content Management Guide
The primary advantage of the Alina Portfolio template is its ease of content updating without any coding. All site content, including text, images, and various settings, is managed directly through the Admin Dashboard.
Accessing the Dashboard
To access the content management dashboard:
- Open your web browser and navigate to the following URL on your website: `your-website-url.com/admin-sign-in/`
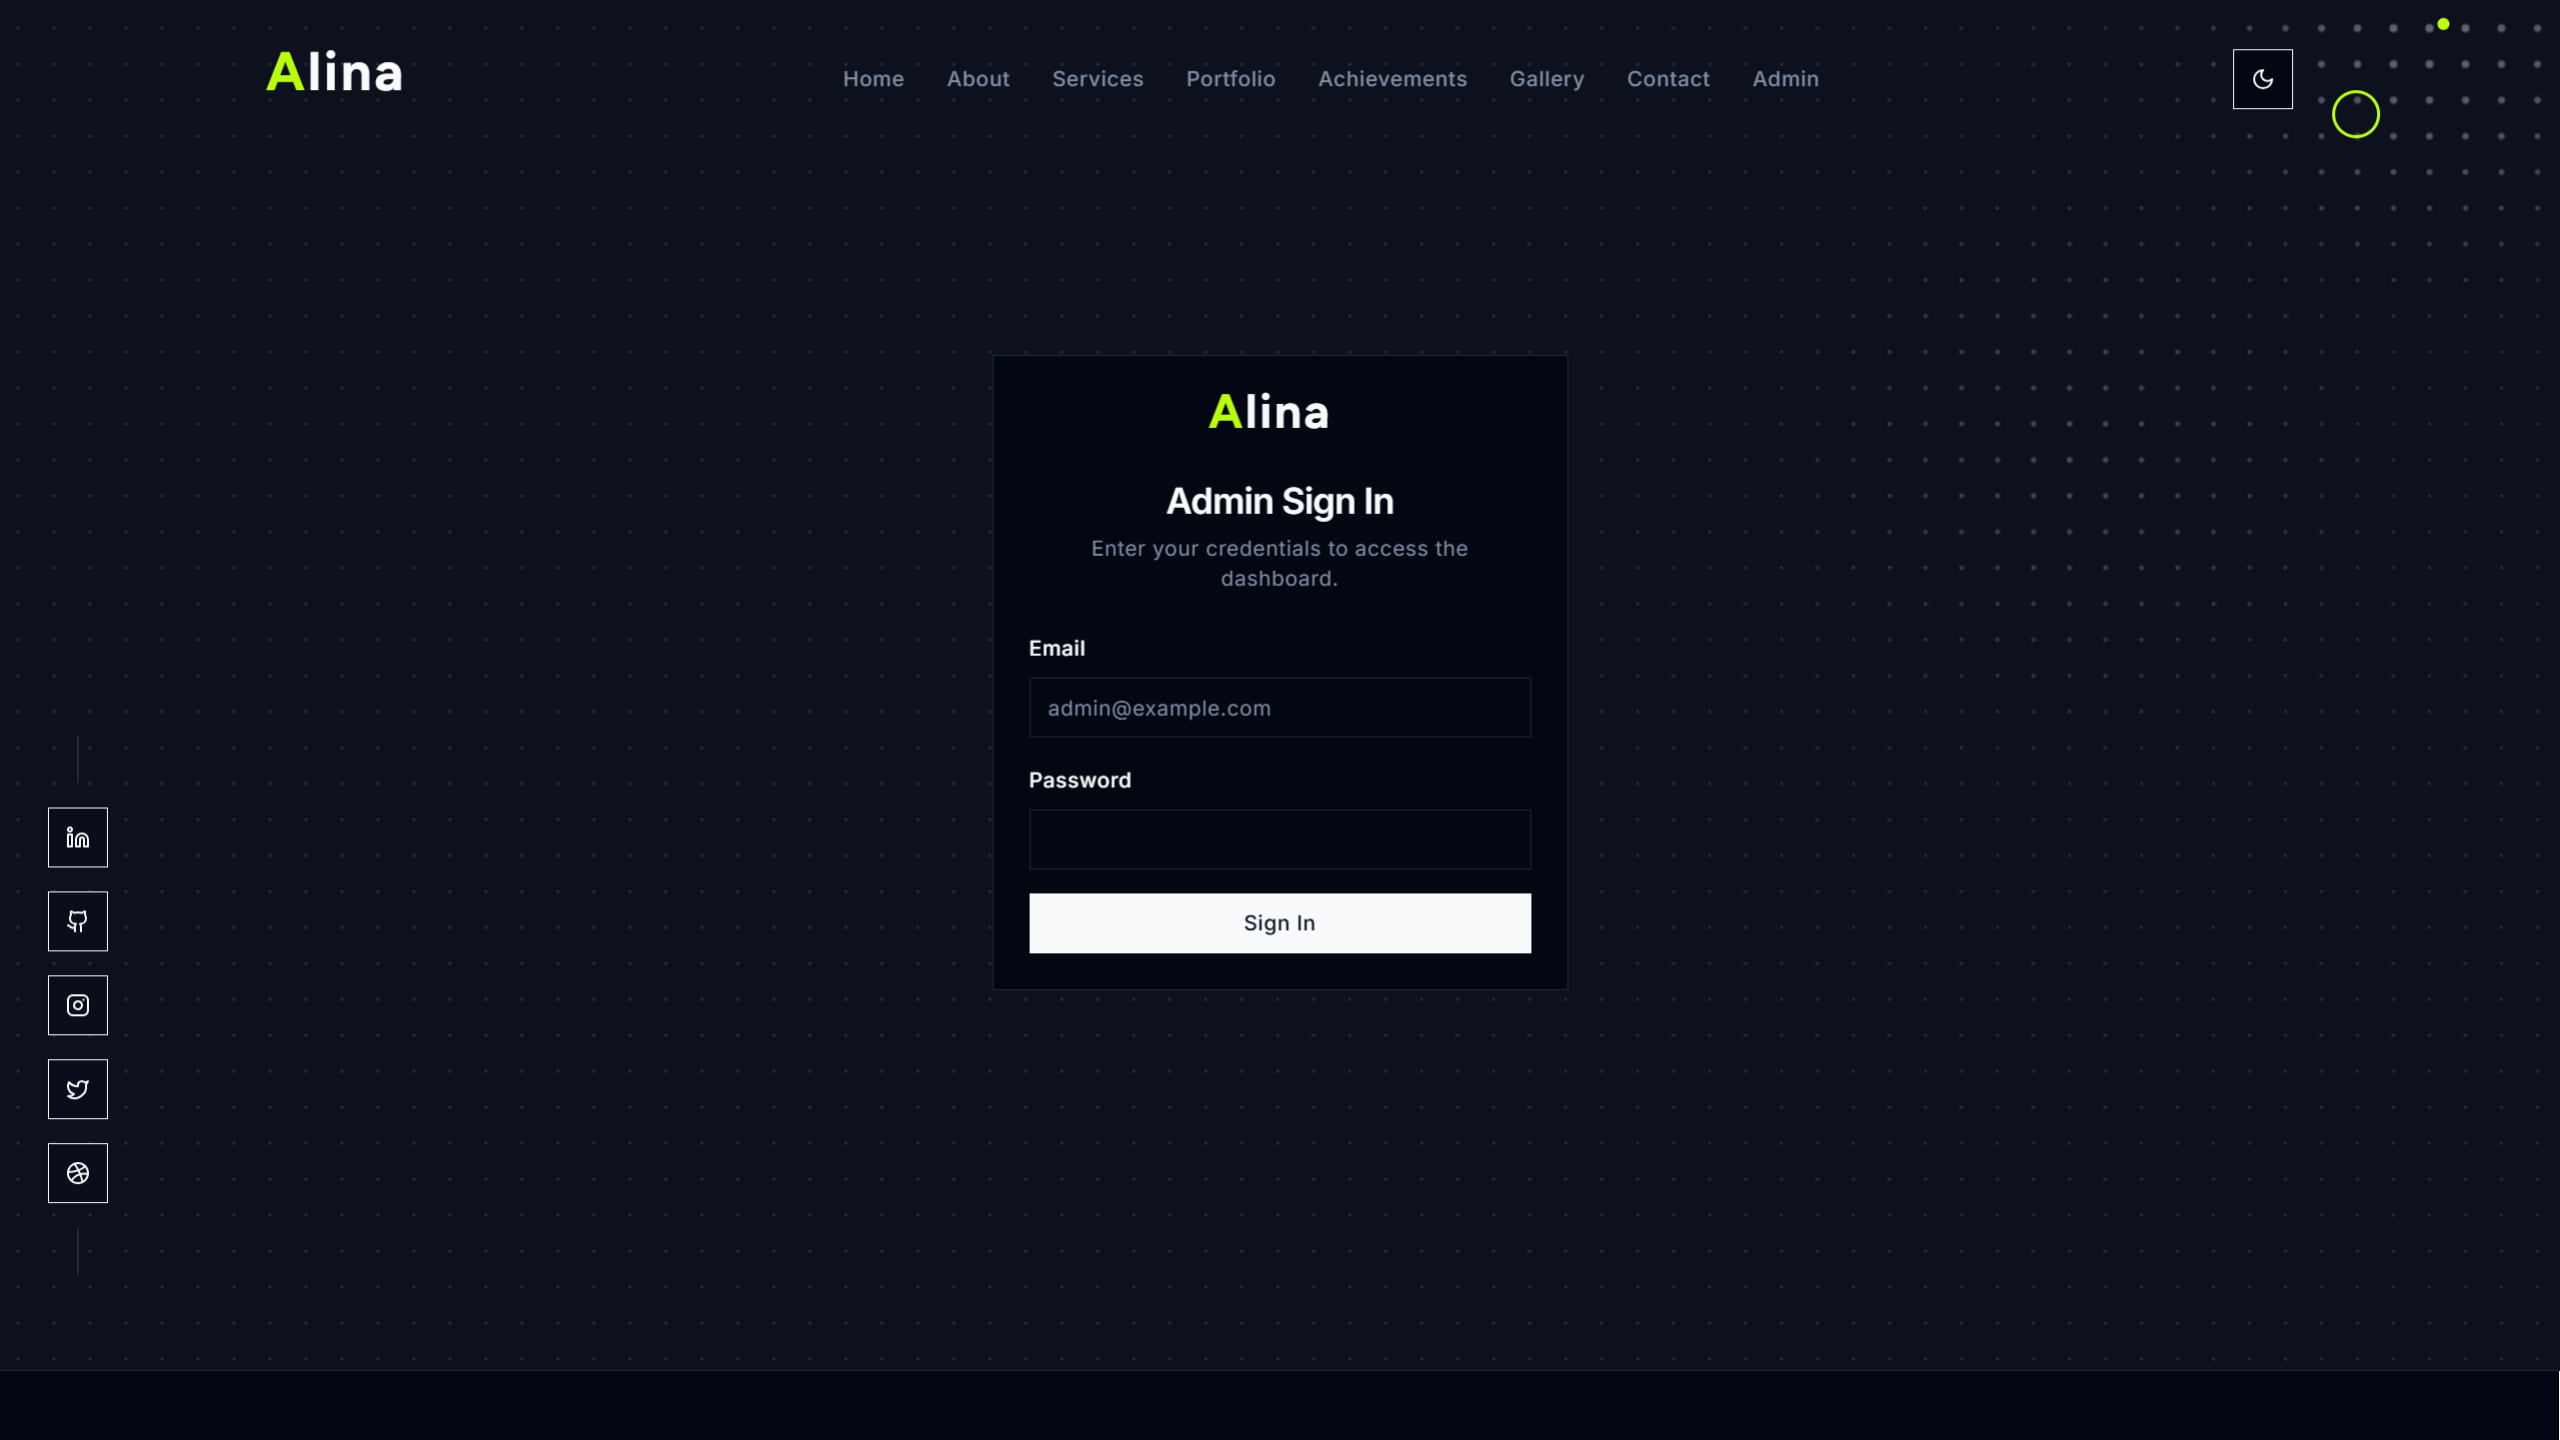
- You will be presented with a sign-in screen. Enter the administrator credentials (email and password) that you configured in your '.env` file.
- Upon successful sign-in, you will be automatically redirected to the main dashboard interface.
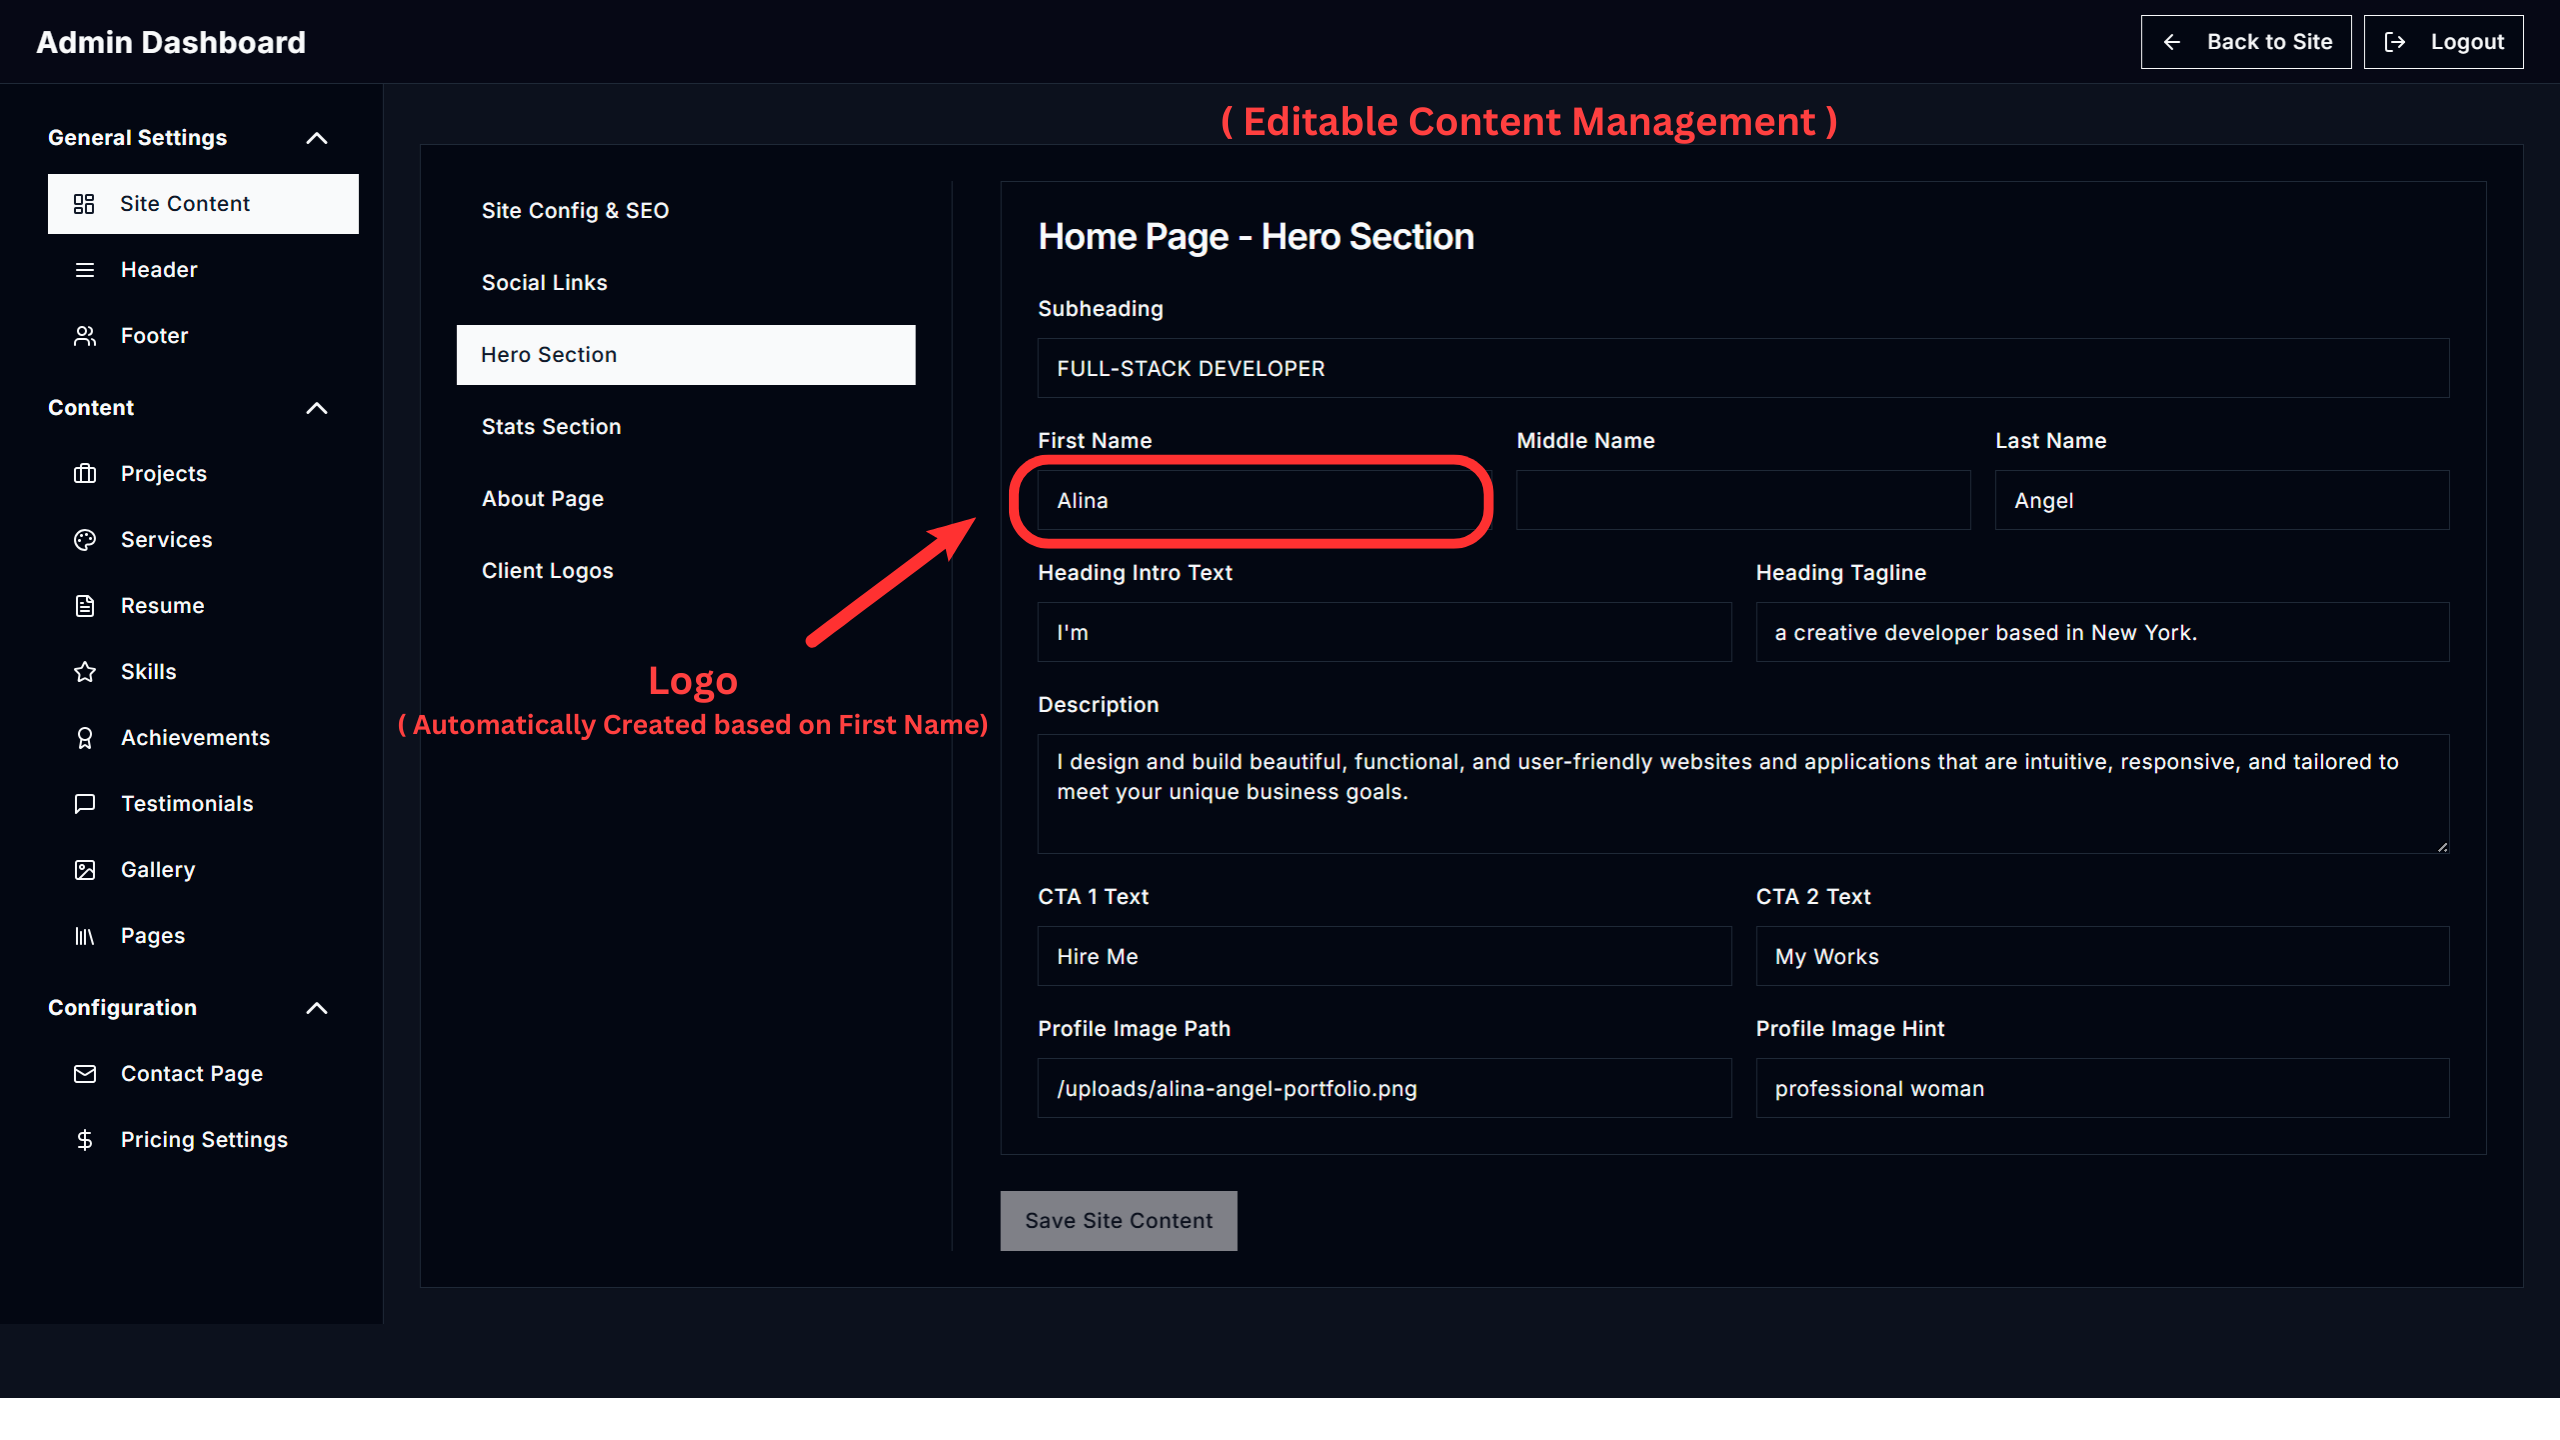
Admin Dashboard Overview & Editing Options
The Alina Portfolio Admin Dashboard provides a centralized, user-friendly interface to manage virtually all your website's content and settings. The dashboard is organized with a sidebar menu that categorizes different content types and configurations.
Here's a breakdown of the key sections and what you can edit within them:
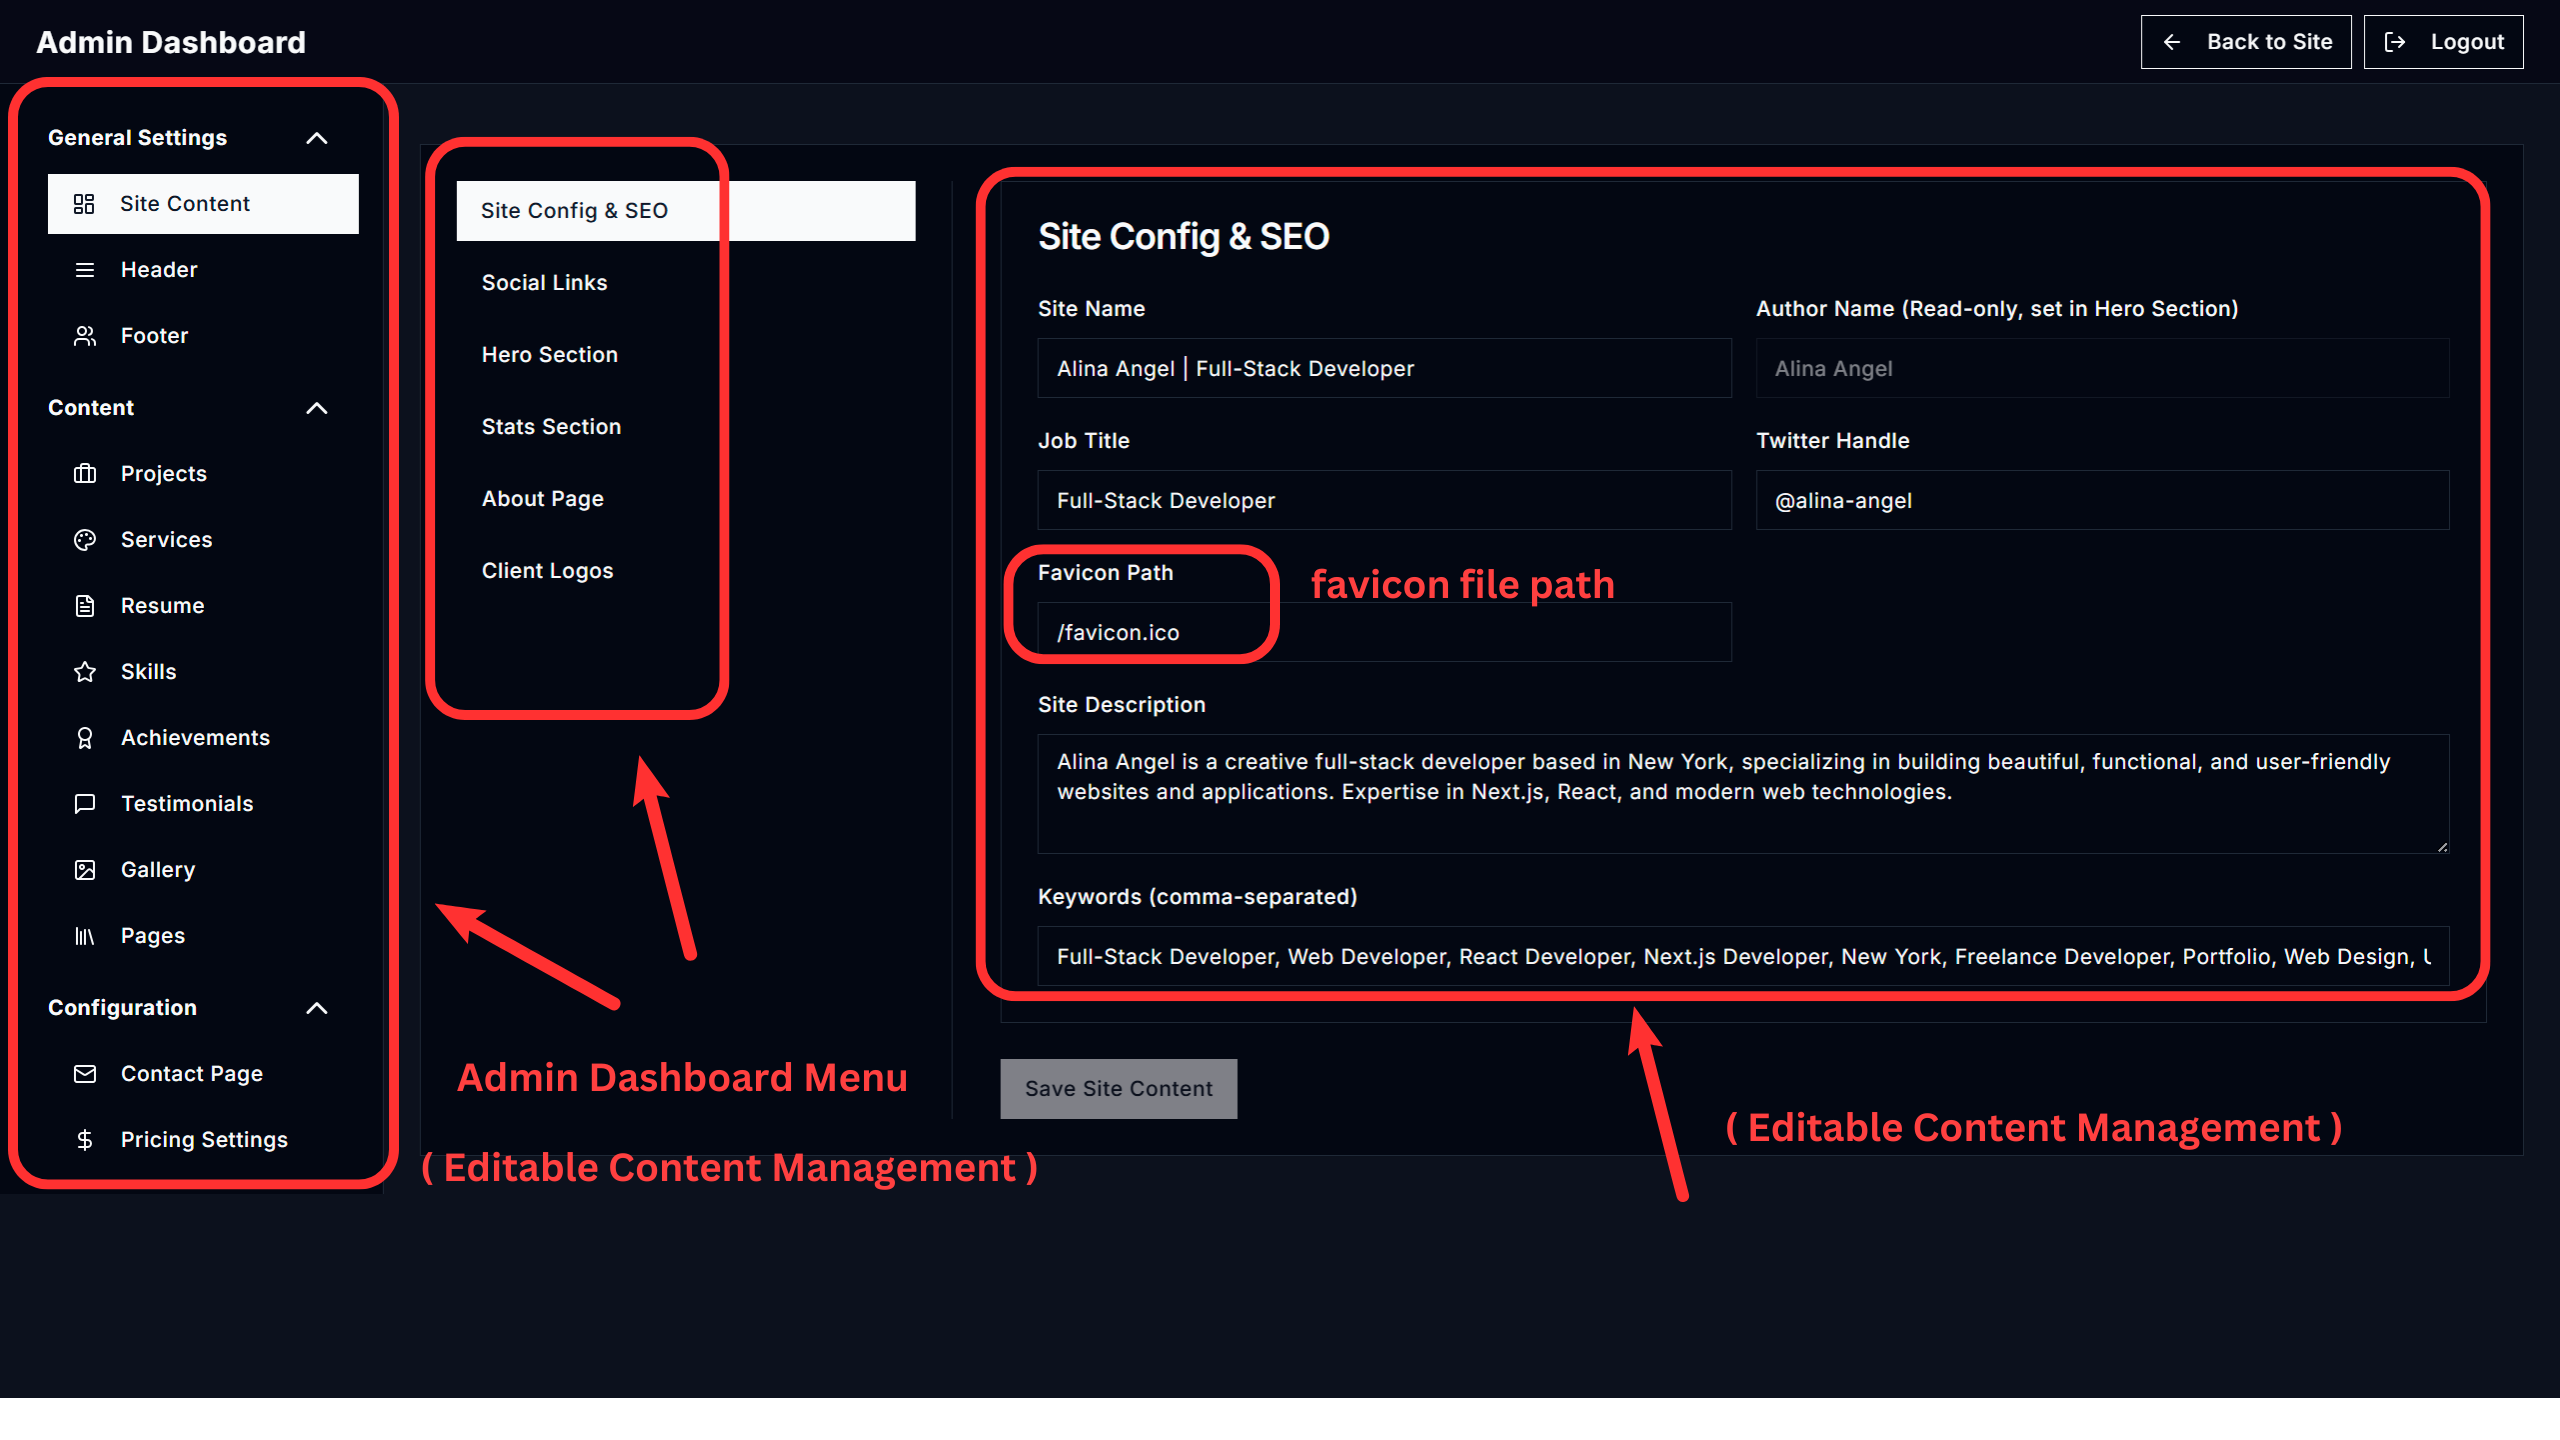
- Site Content: This is your global settings hub.
- Edit Your Identity: Update your name, job title, and other core personal information.
- Hero Section: Customize the main introductory text and calls-to-action on your homepage. The logo is automatically generated based on your first name.
- Favicon:Manage and update the favicon.ico file directly from the "File Directory" section in the Admin Dashboard..
- Stats Section: Edit homepage stats (e.g., Projects Completed).
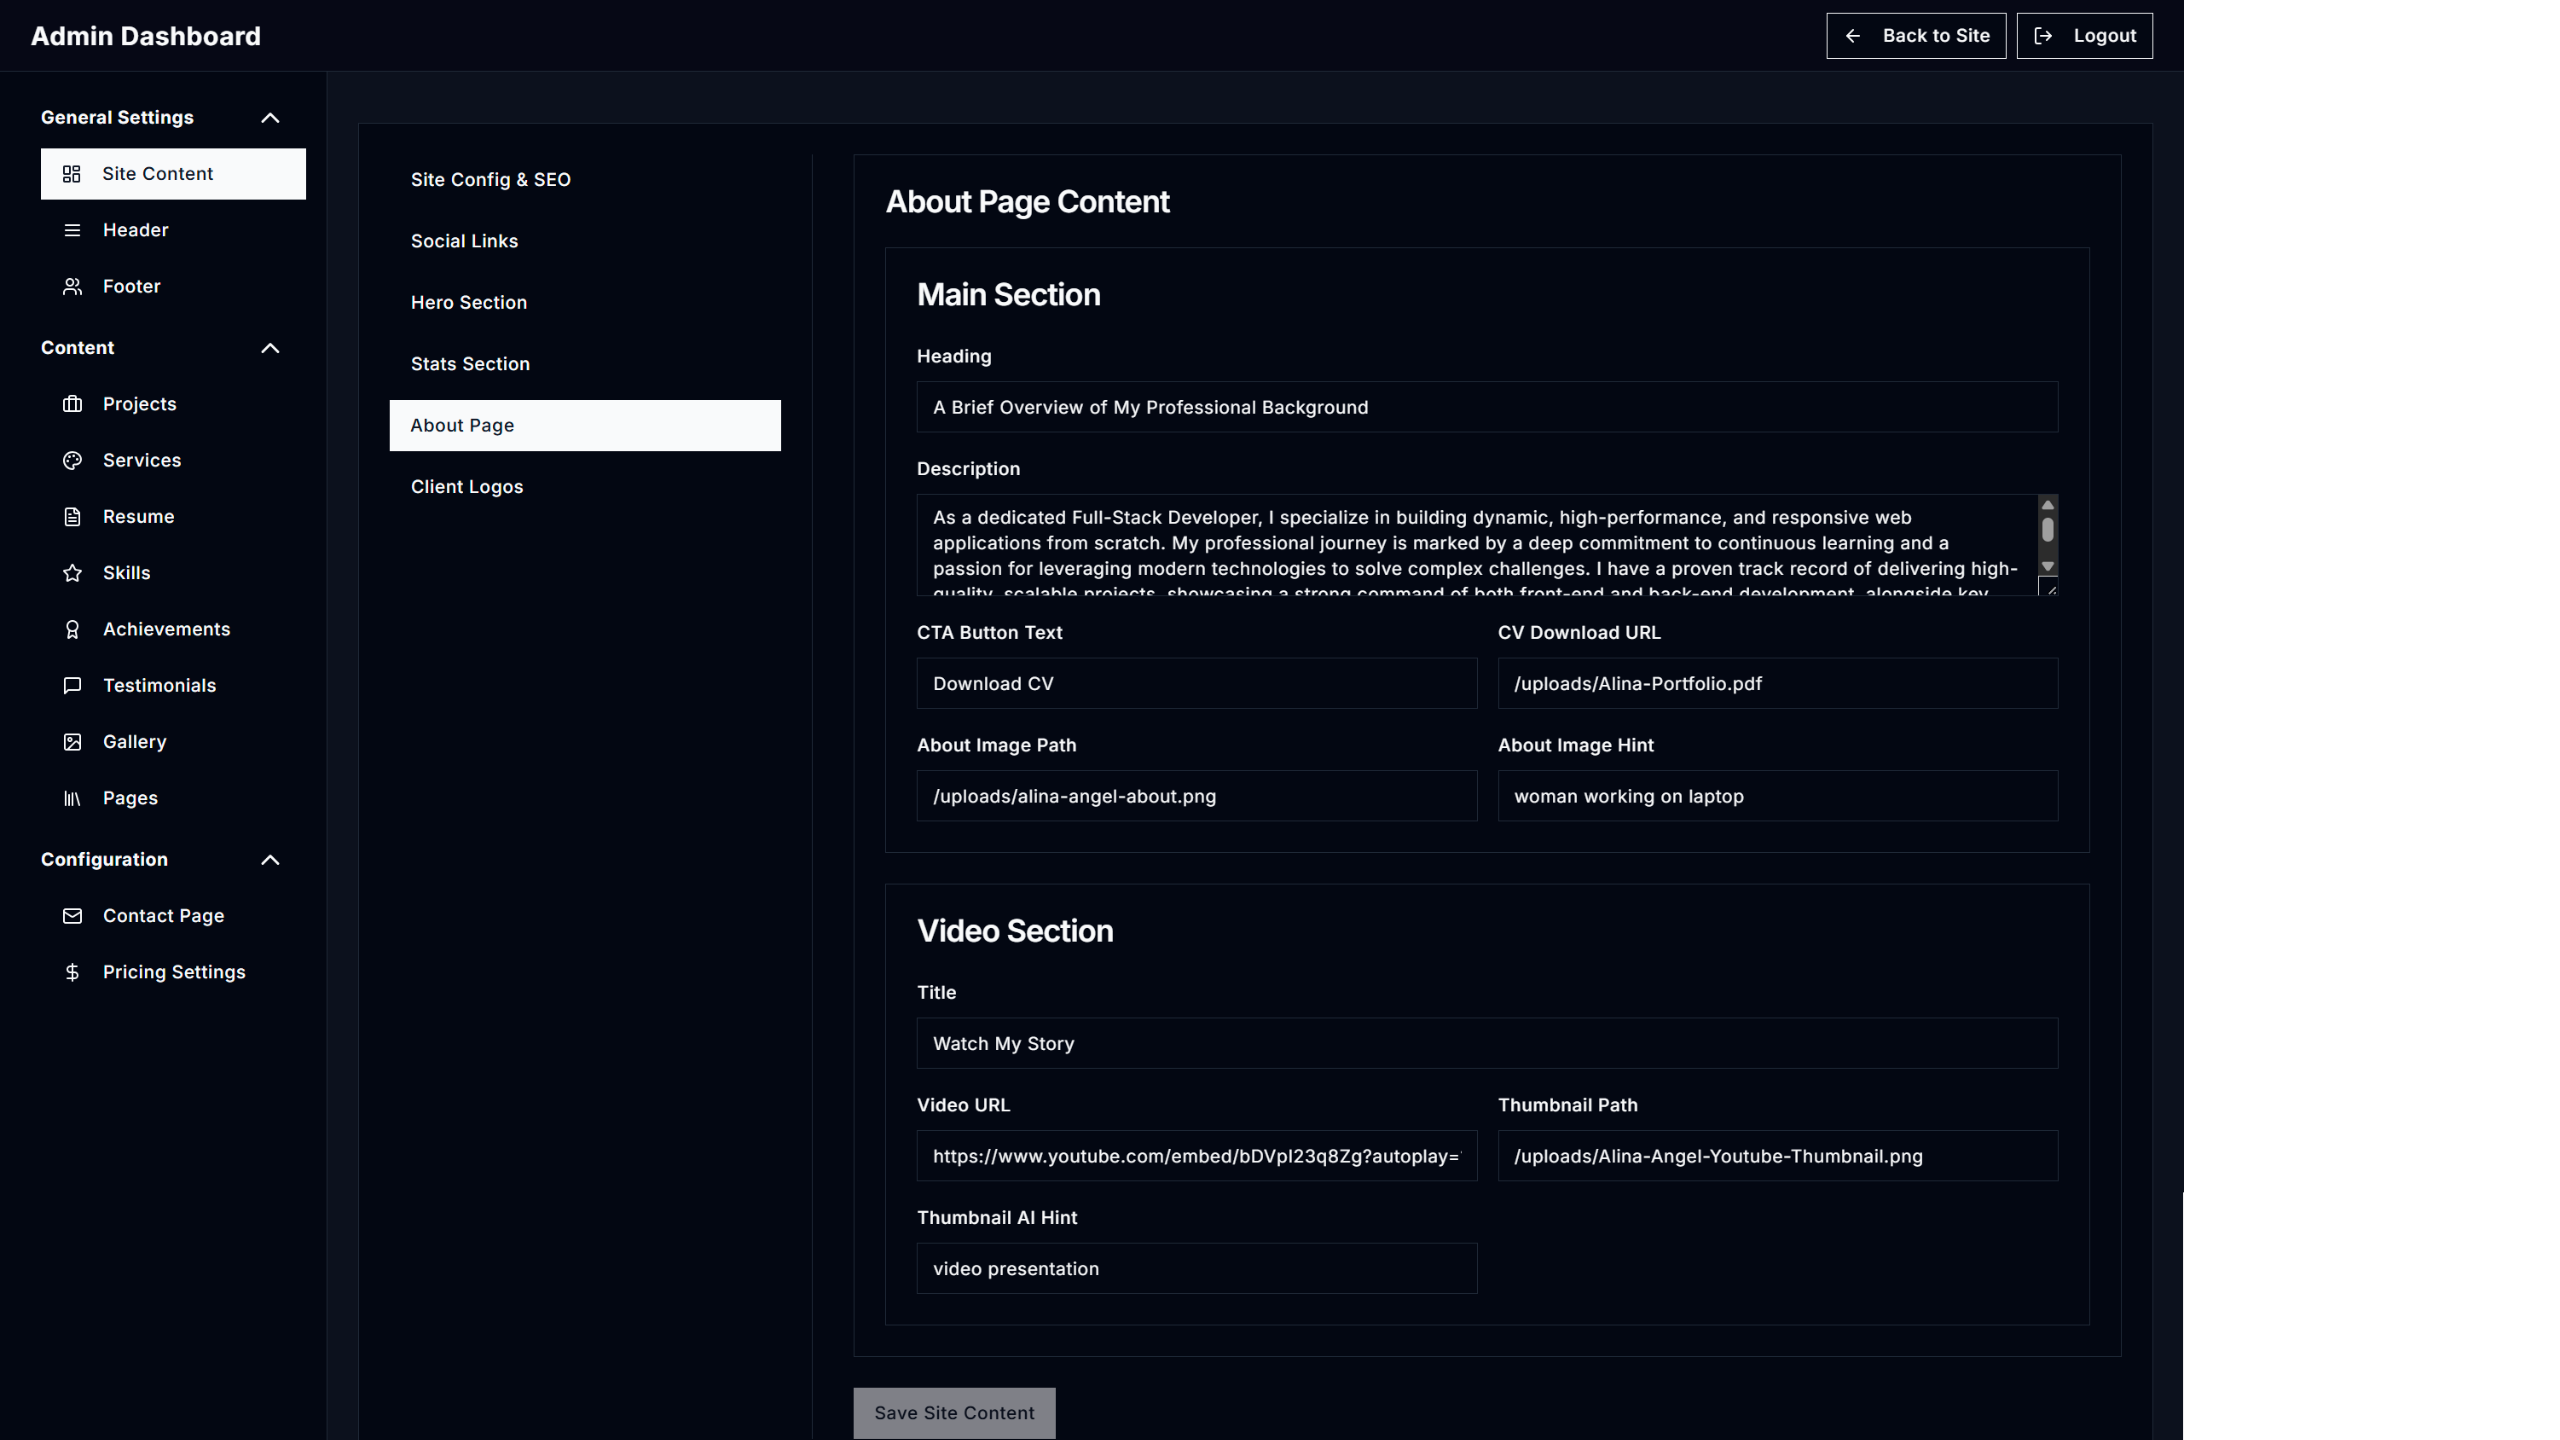
- About Page: Modify the detailed content of your "About Me" or "About Us" page.
- Social Media Links: Manage links to your social profiles.

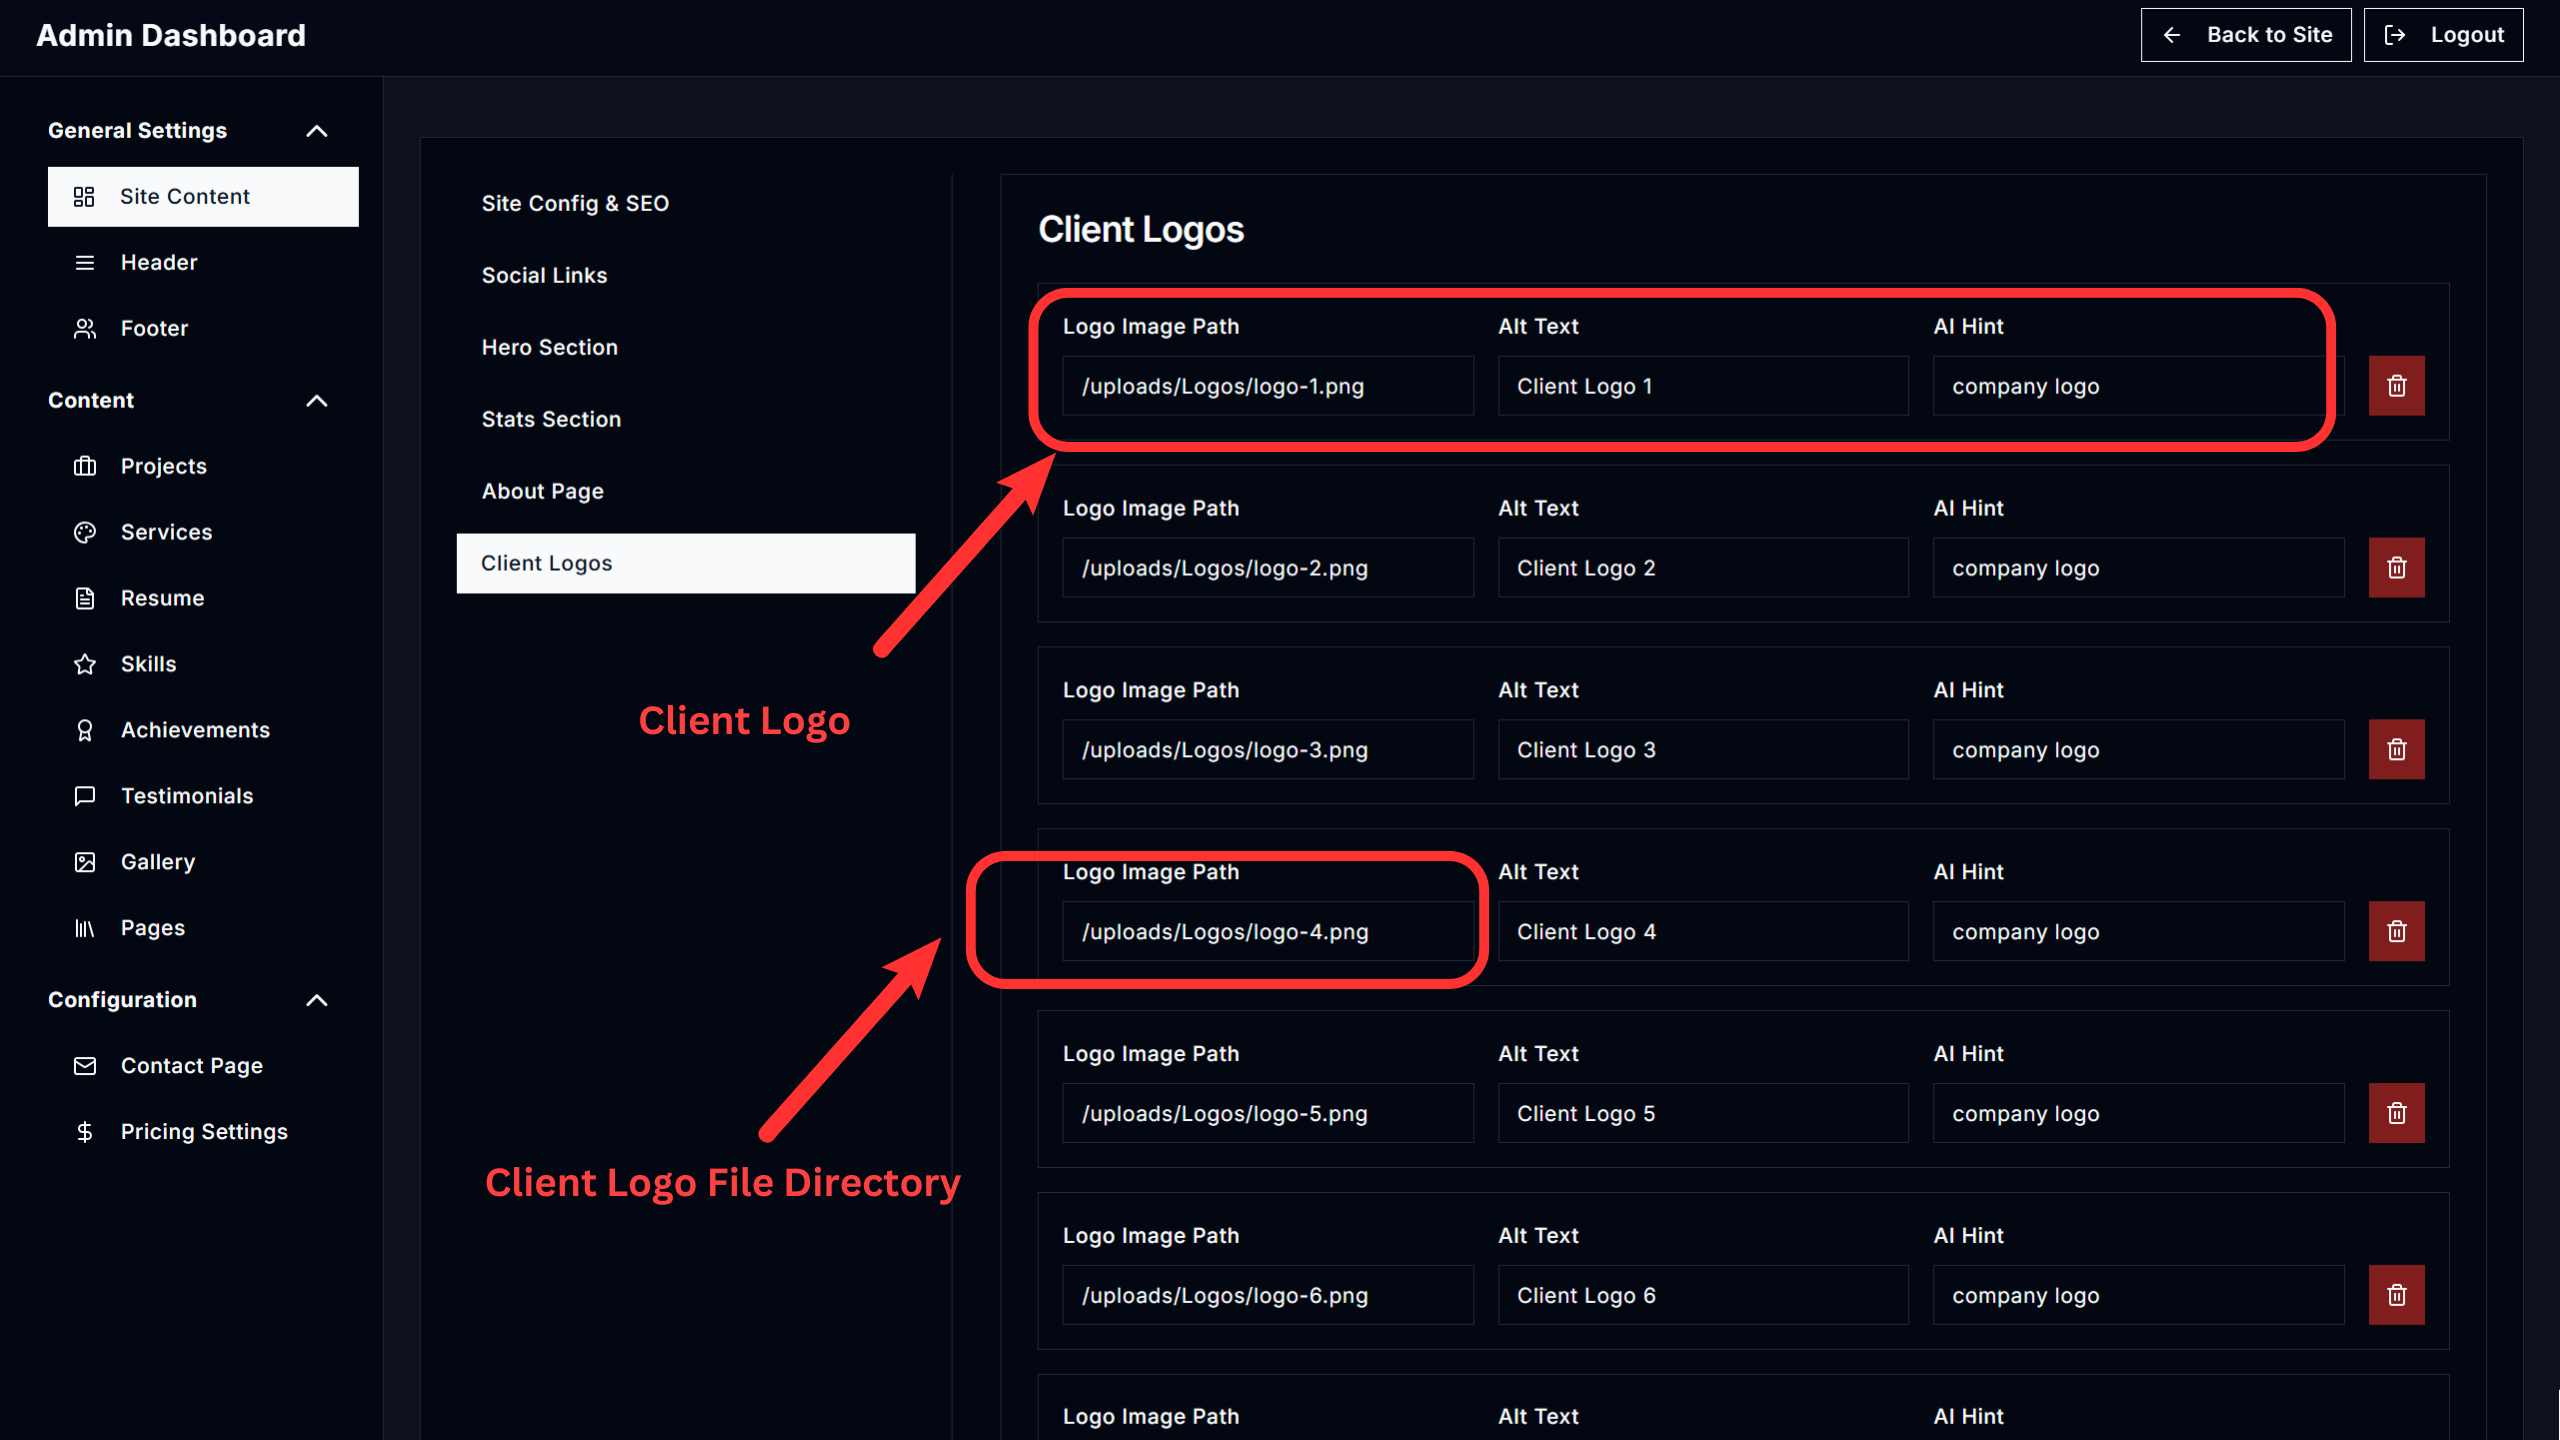
- Client Logos: Add or remove logos of clients you've worked with.
- Site-Wide SEO: Control general site metadata like default descriptions and keywords.
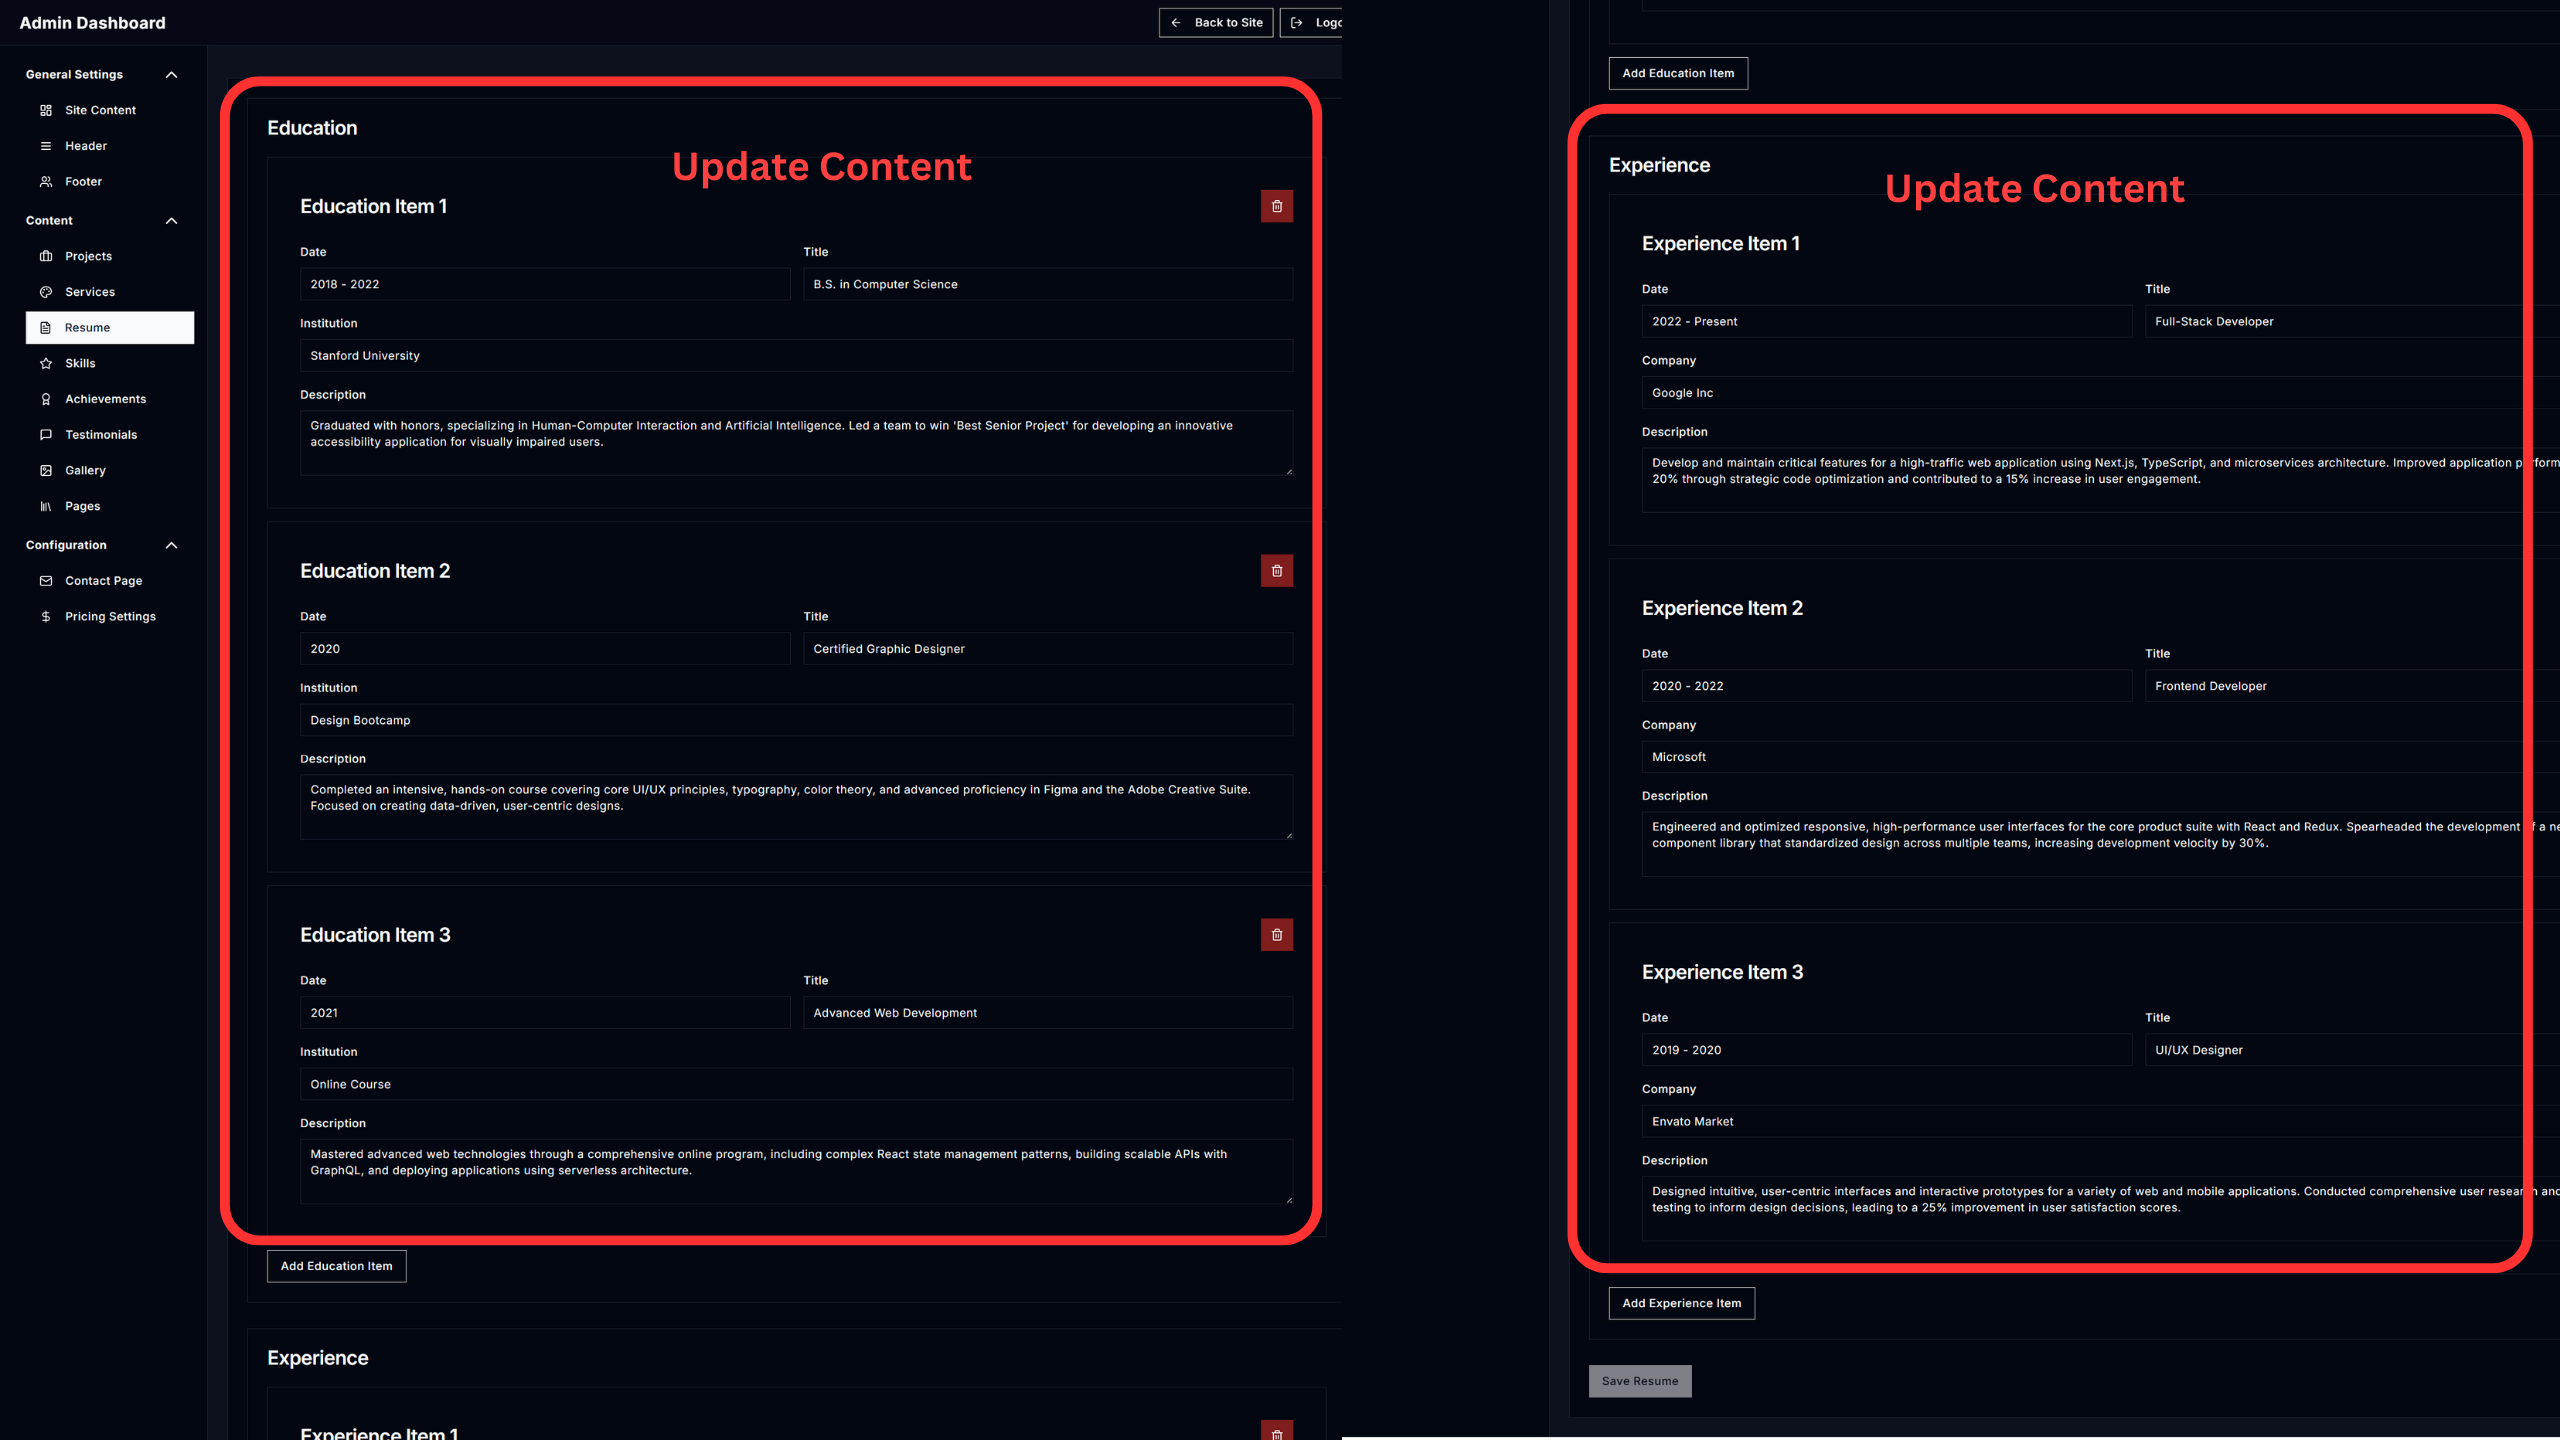
- Resume
- Education: Add or update your academic background.
- Work Experience: Keep your job history current.
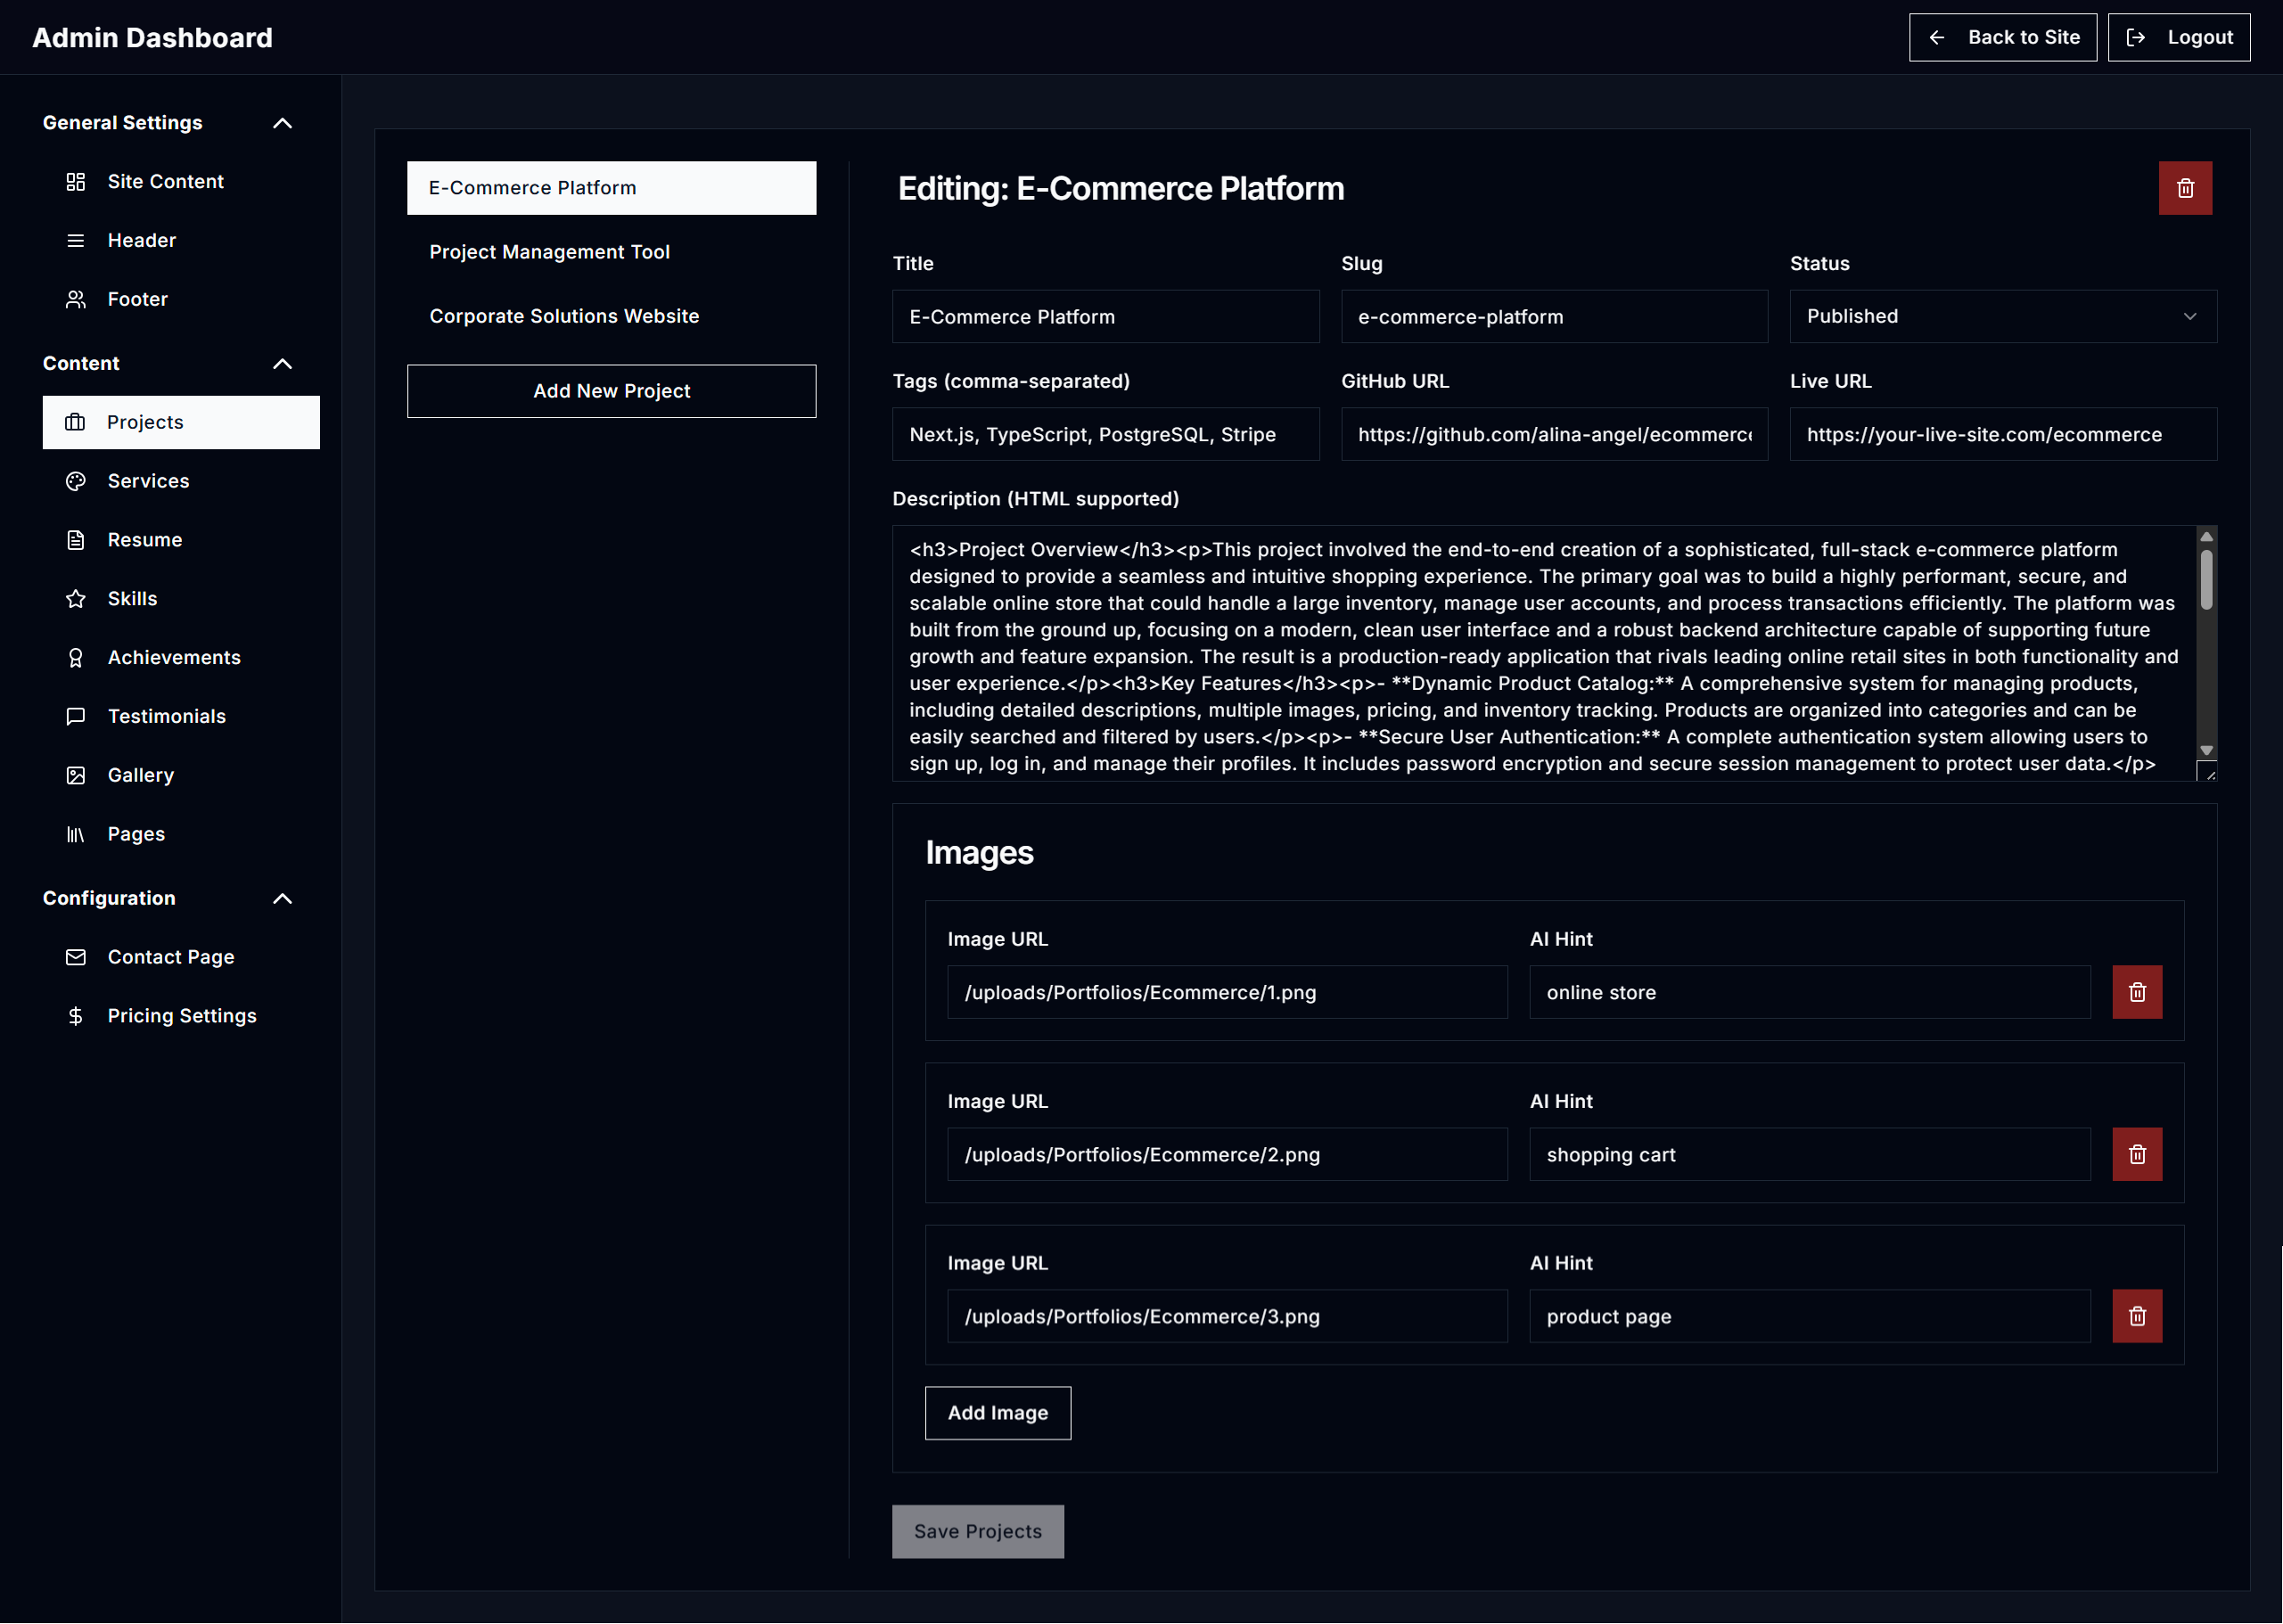
Projects
Your portfolio showcase.
- Add/Remove Projects: Easily add new projects you've completed or remove old ones.
- Edit Project Details: Update titles, descriptions, images, technologies used, and project links for each entry.
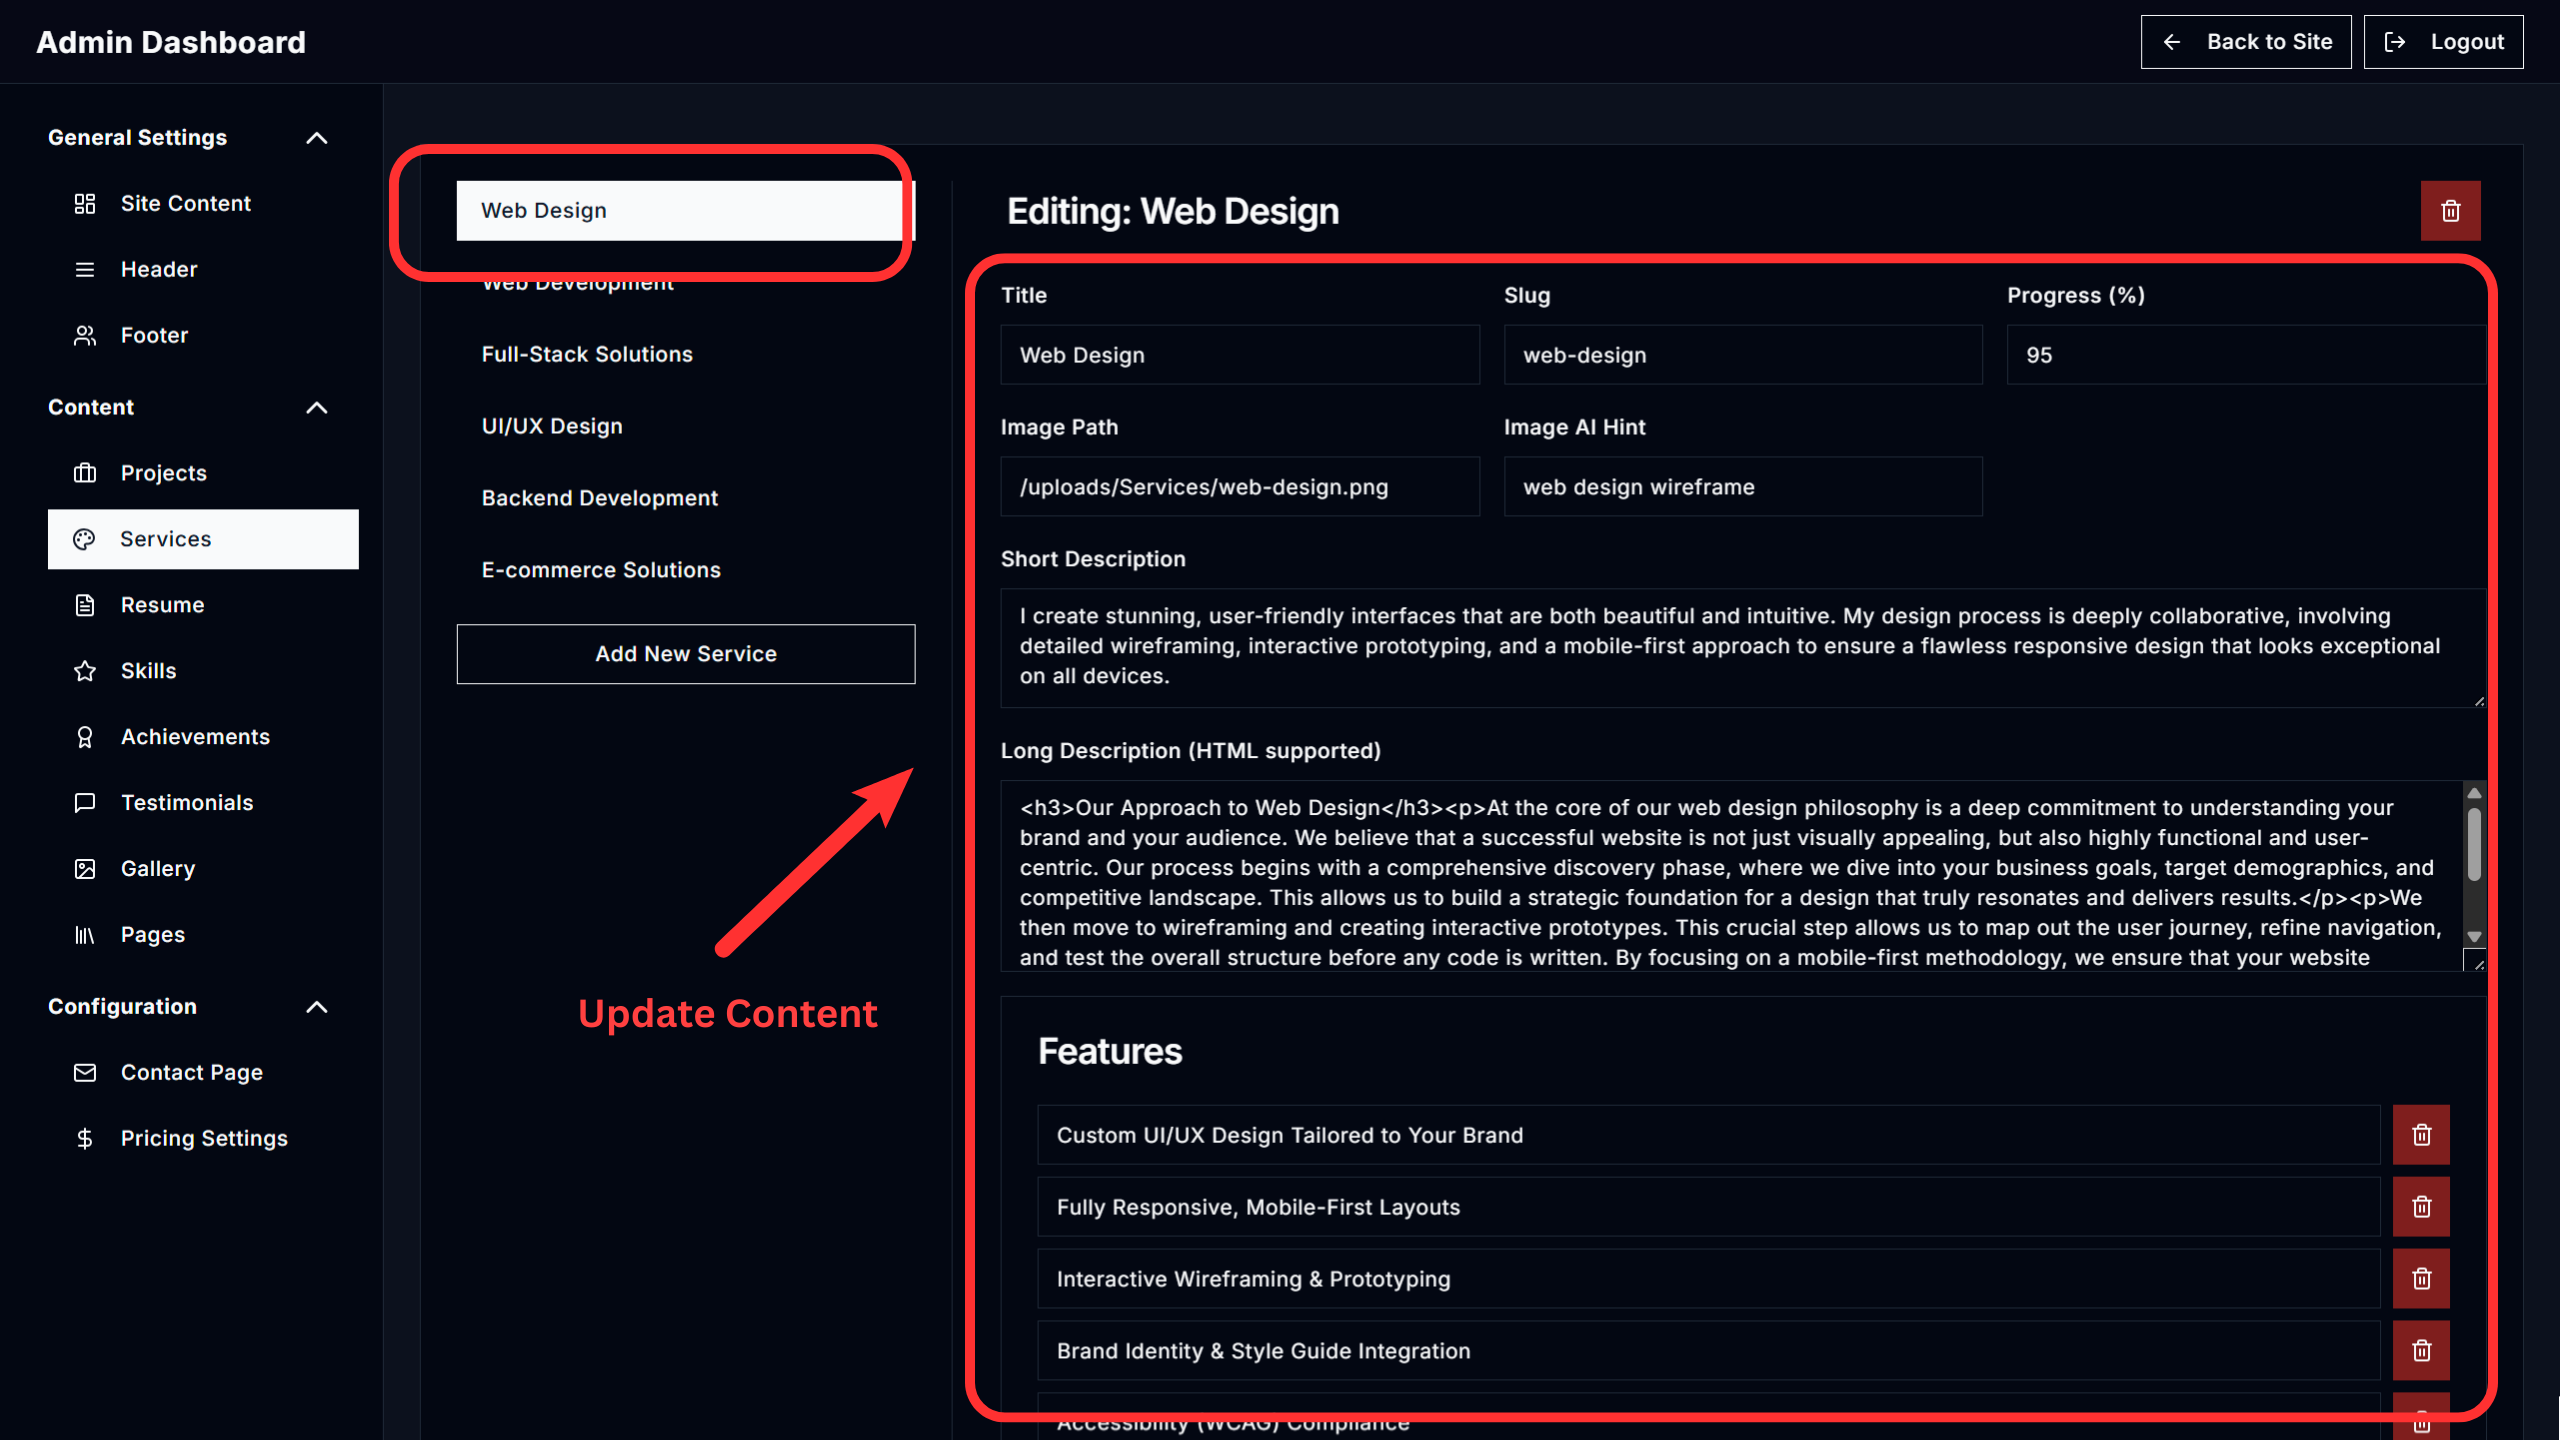
Services
List and edit the services you offer with descriptions, features, and images.
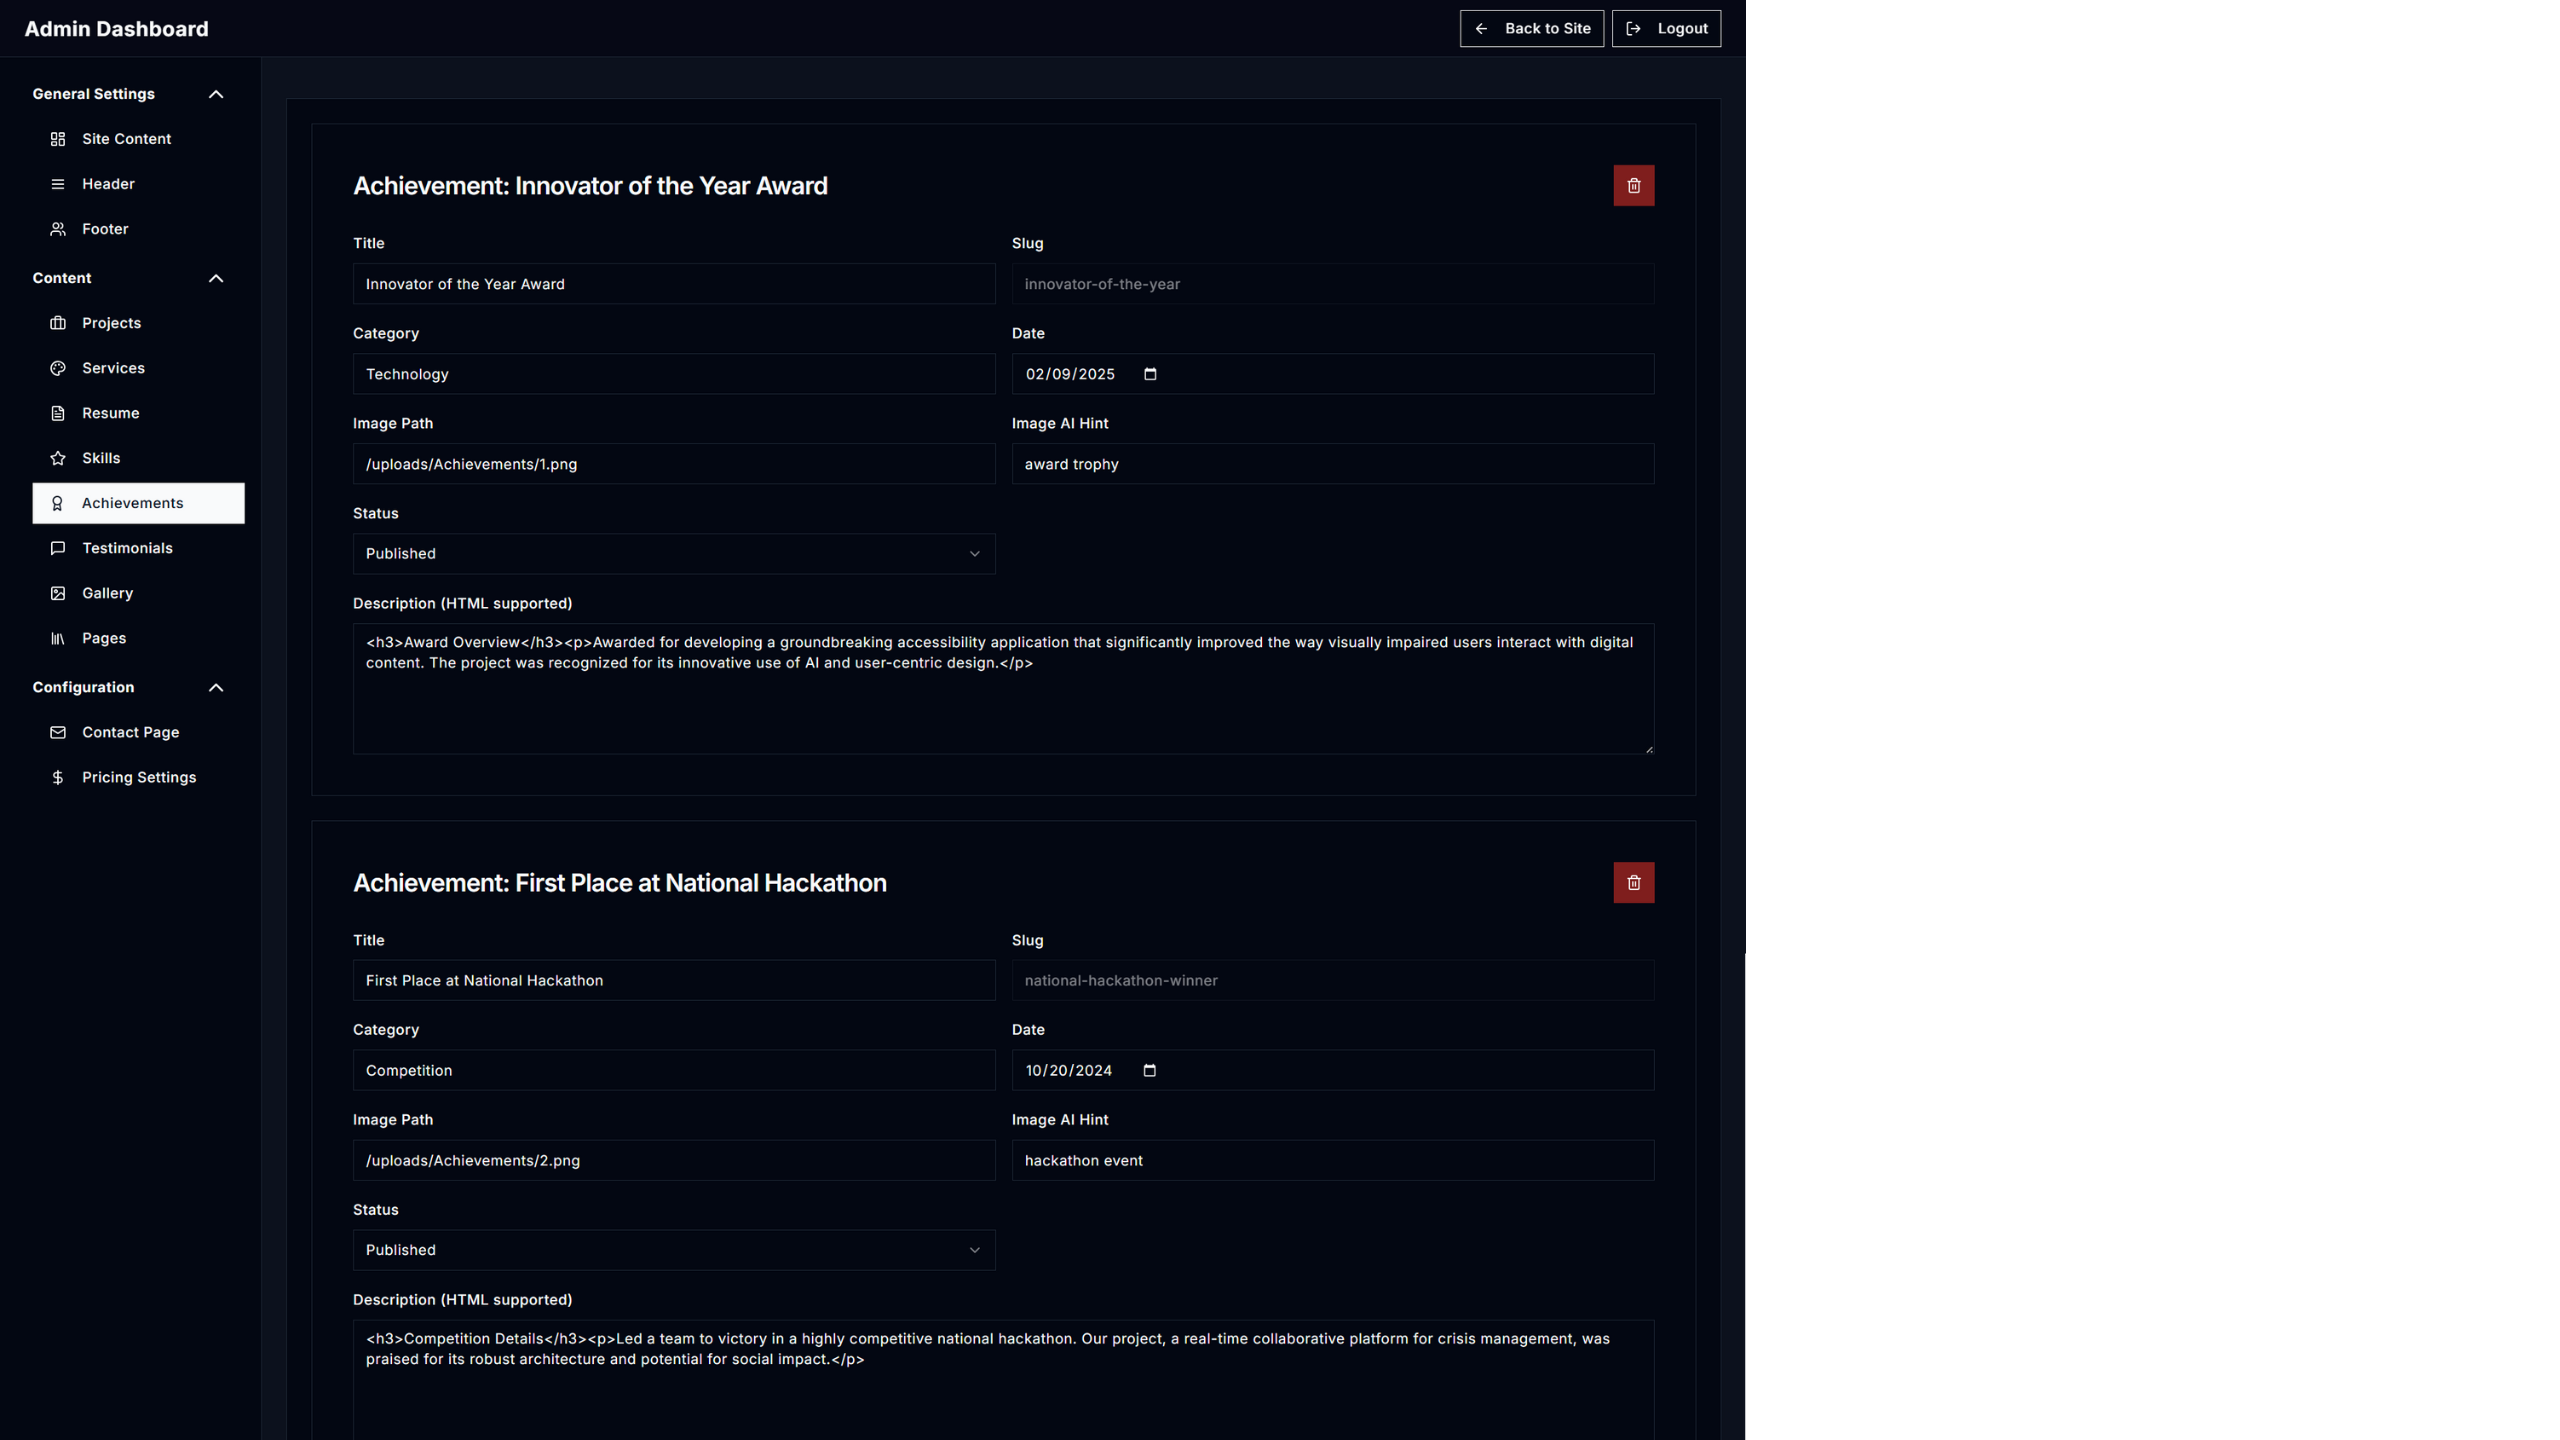
Achievements
Highlight awards and milestones with title, image, and date.
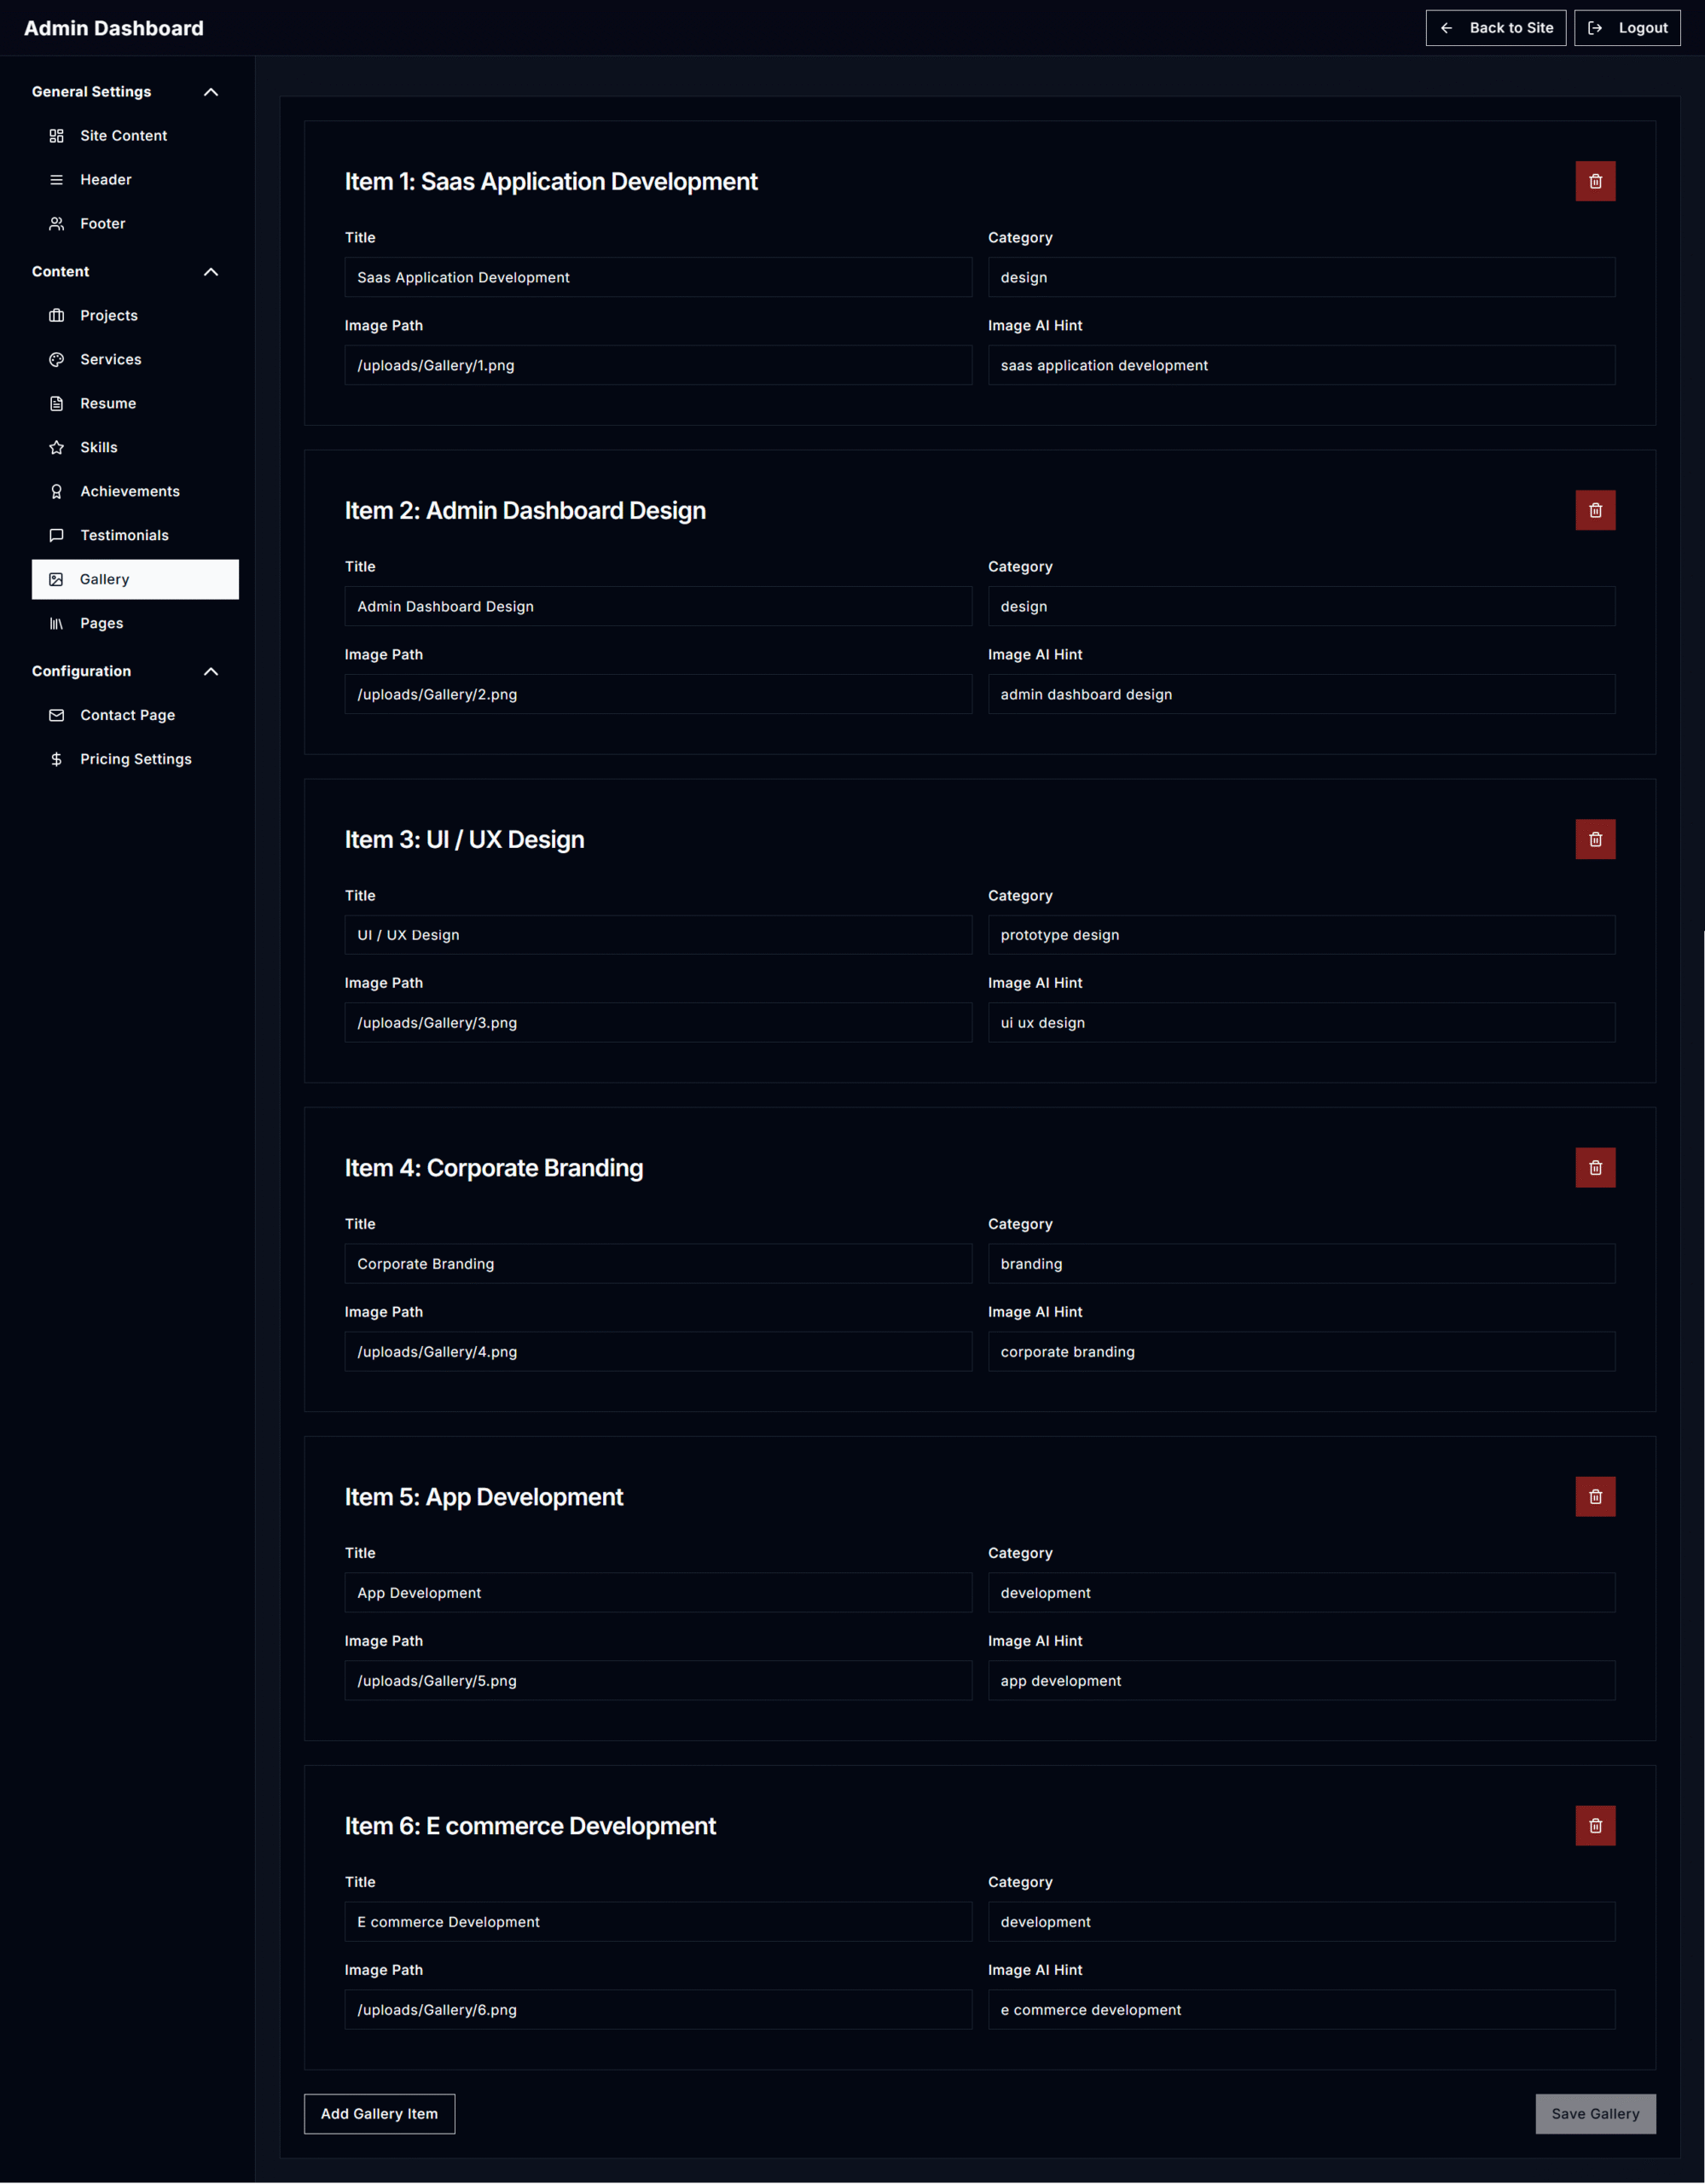
Gallery
Add or remove images showcasing your work.
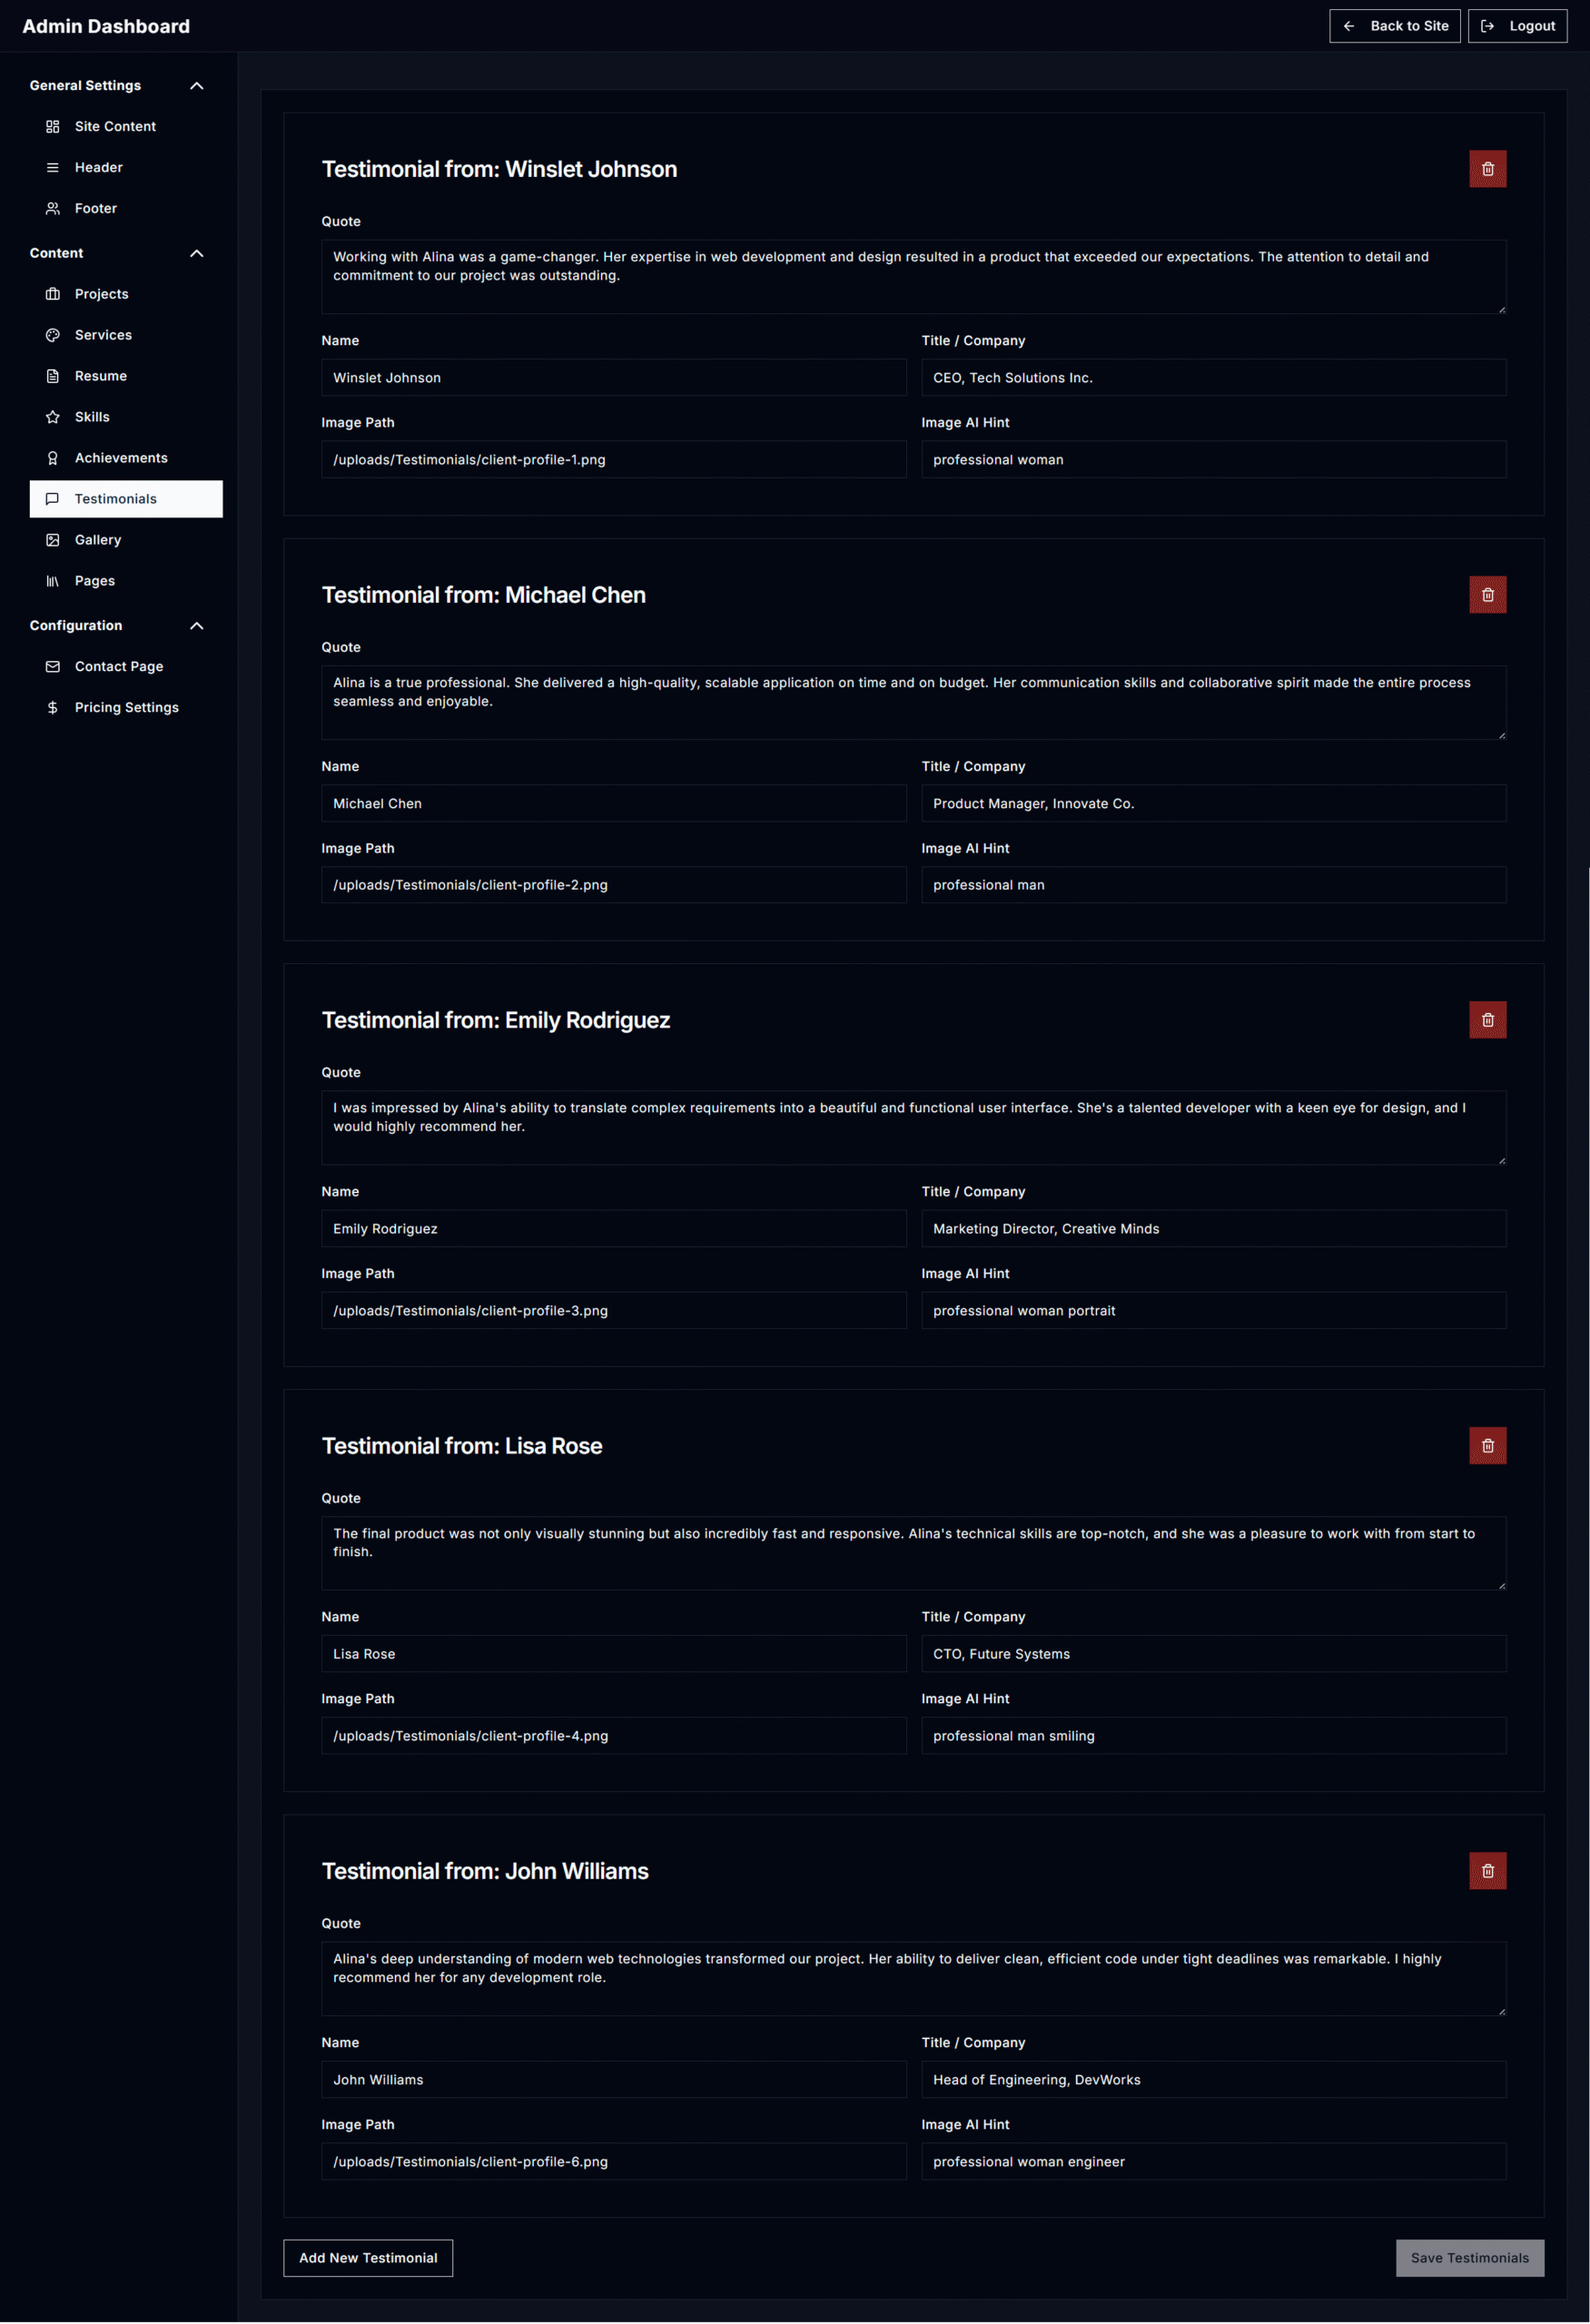
Testimonials
Add reviews from clients including their name, title, and photo.
Pages (Aditional)
Add reviews from clients including their name, title, and photo.
- Create and manage static pages like Privacy Policy or Terms.
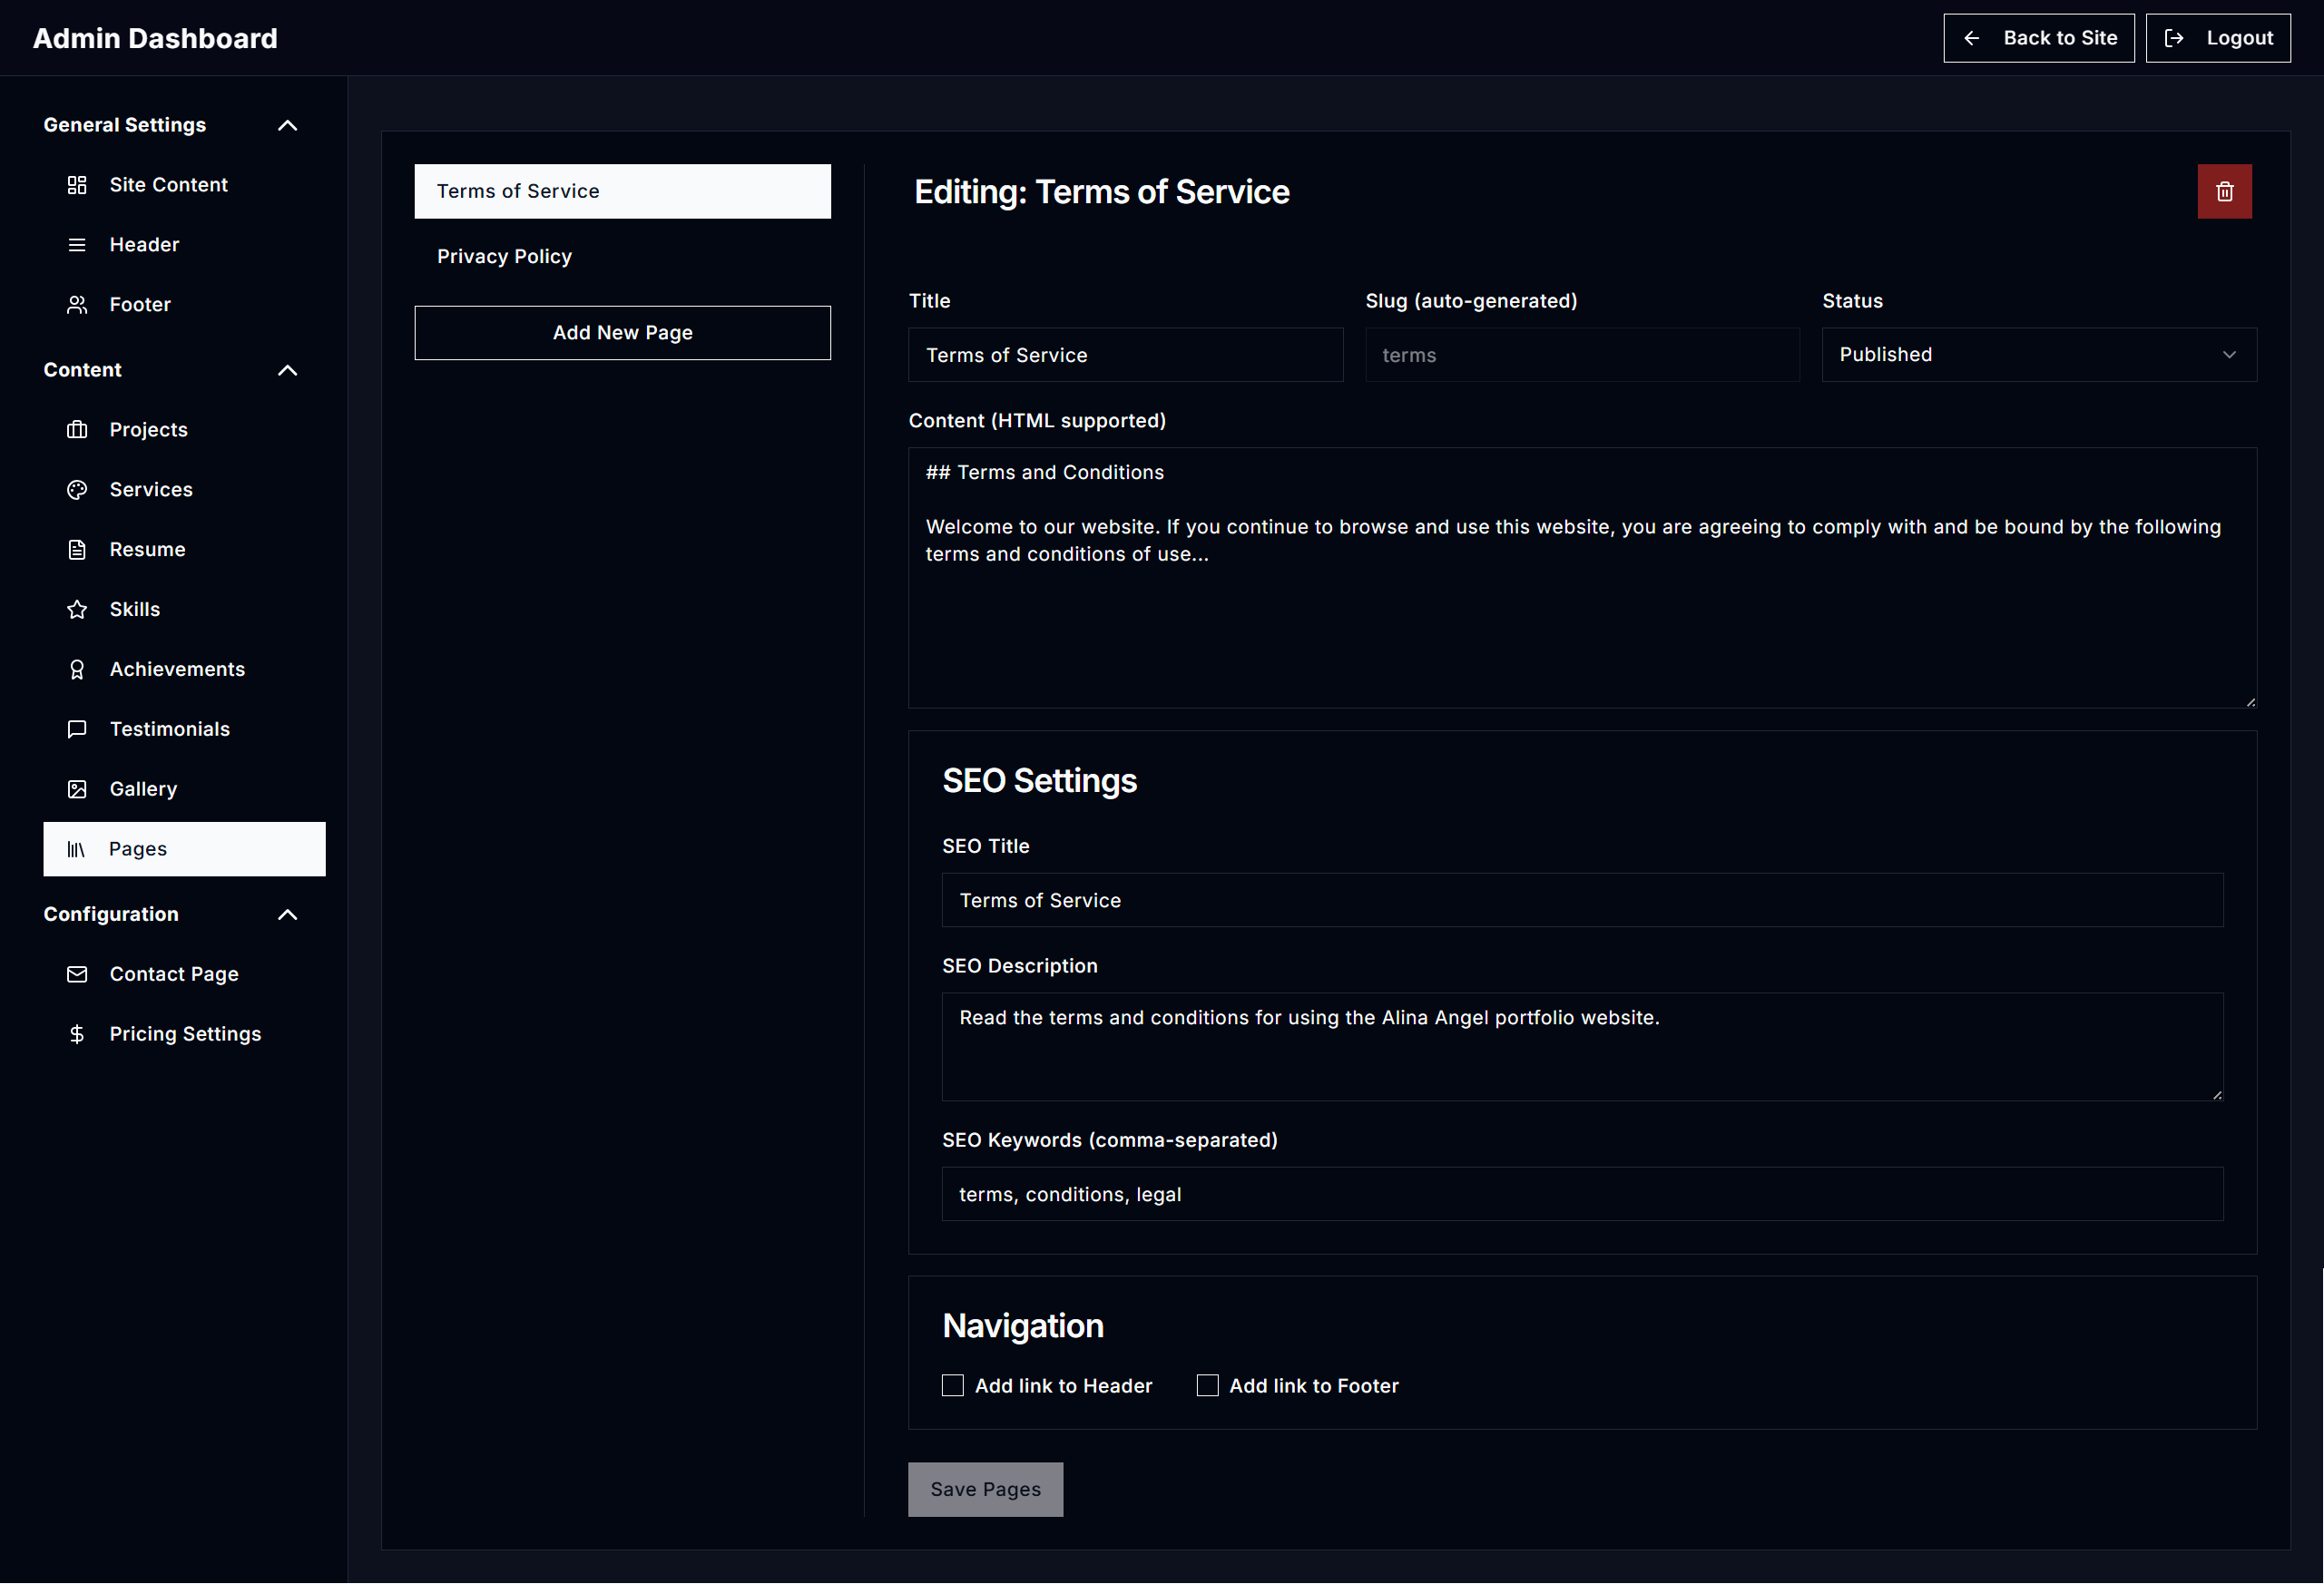
- Edit title, content (supports HTML), and SEO settings.
- Optionally show links in the header or footer (menu).
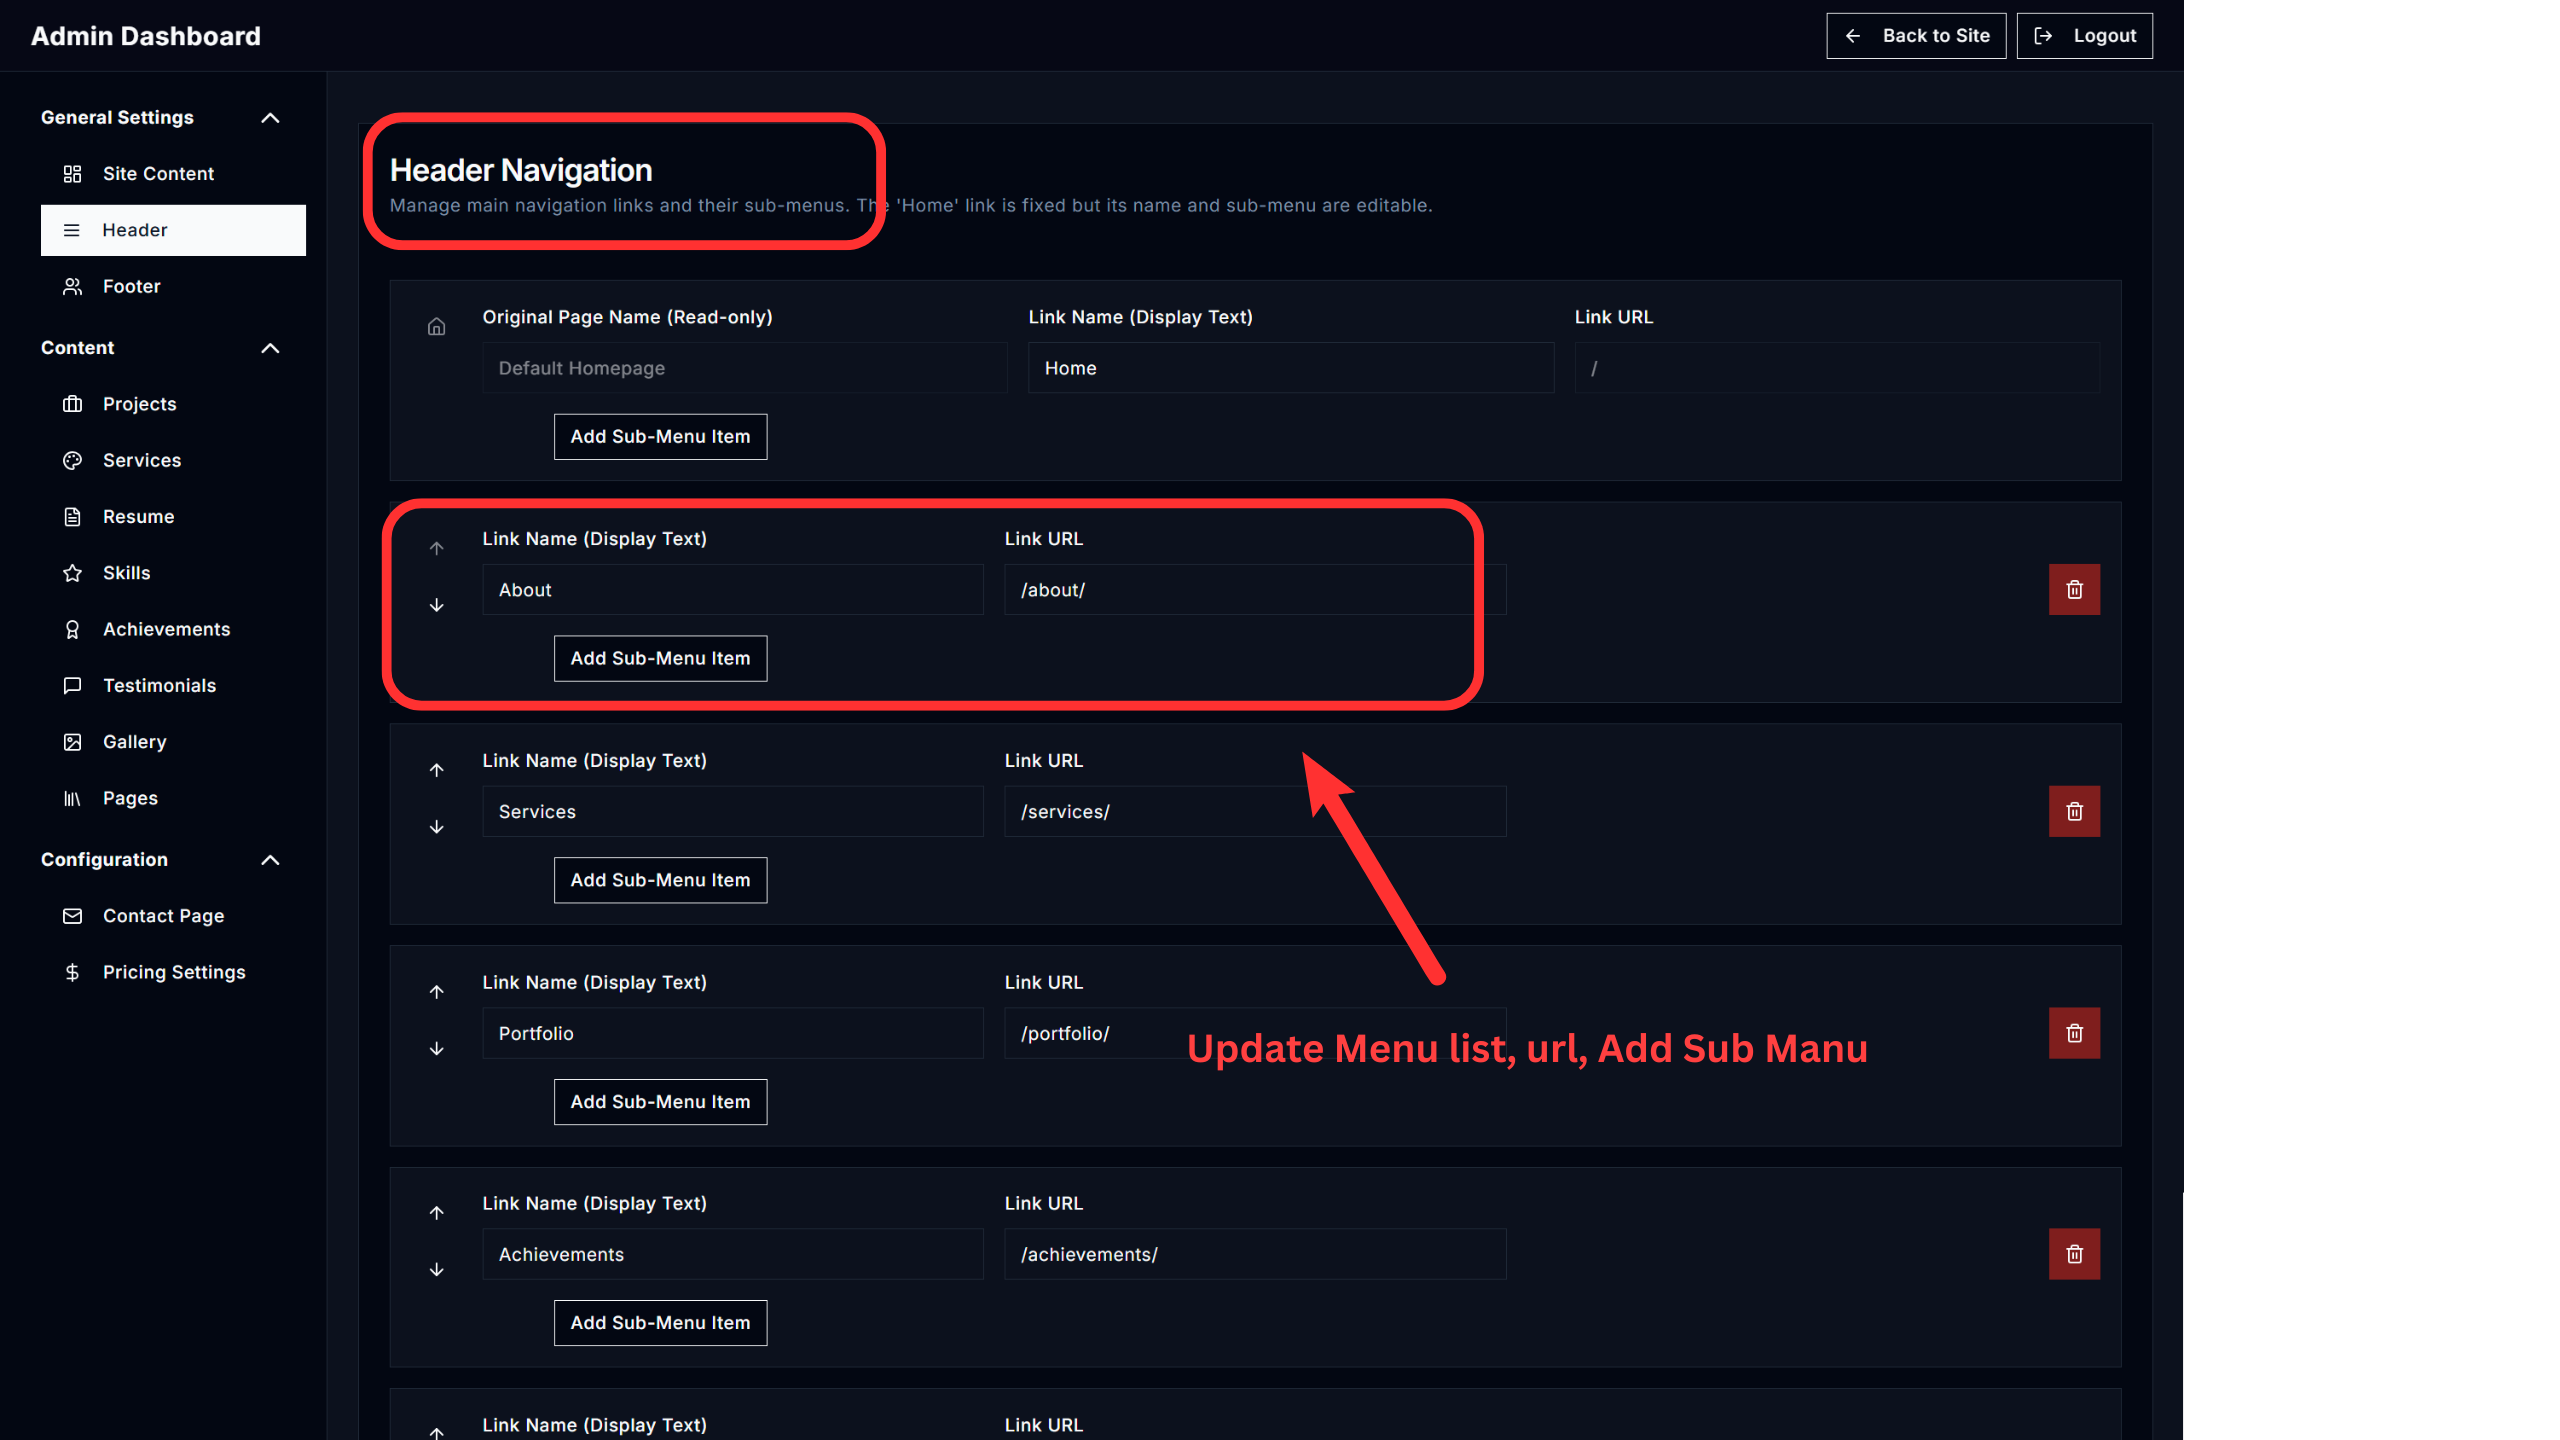
Header
This section gives you full control over the website’s main navigation menu.
- Add/Remove Links: Easily add new links to the main menu or remove existing ones.
- Reorder Links: Use the up and down arrows to change the order of menu items.
- Create Sub-Menus: Add dropdown sub-menus under any main navigation link.
Footer Management
Alina Portfolio - website's footer is fully manageable from the Admin Dashboard. You can easily update the description, links, and copyright text without touching any code.
Accessing the Footer Editor
- Sign in to your Admin Dashboard.
- In the left-hand sidebar menu, under the "General Settings" category, click on "Footer".
- This will open the Footer Editor, where you can customize all elements of the footer.
Footer Editor Sections
1. Footer Description
- This is the main introductory text about your brand that appears in the footer.
- Simply edit the text in the "Footer Description" text box to update it.
2. Copyright Text
- This is the copyright notice at the very bottom of the page (e.g., "Copyright 2024 Your Name. All rights reserved.").
- The
{year}and{author}placeholders will be filled in automatically by the system. - You only need to change the format if desired.
3. Quick Links
- These are the main navigation links that appear in the footer.
- To edit a link: Change the "Name" (what the user sees) and the "URL" (where the link points).
- To add a new link: Click the "Add Quick Link" button to create a new entry.
- To remove a link: Click the red trash can icon next to the link.

4. Legal Links
- These are typically used for pages like "Privacy Policy" or "Terms of Service."
- The editing process is the same as Quick Links—you can edit, add, or remove them as needed.
After making your desired changes, scroll to the bottom of the page and click the "Save Footer Content" button. Your changes will be applied to the live website instantly.
Removing Design & Development Credit
You have full control over the footer content, including the design and development credit line.
While we would be grateful if you choose to retain the credit as a small gesture of support, it is completely optional.
If you decide to remove it, no problem at all — we respect your choice and have provided clear guidance to help you do so.
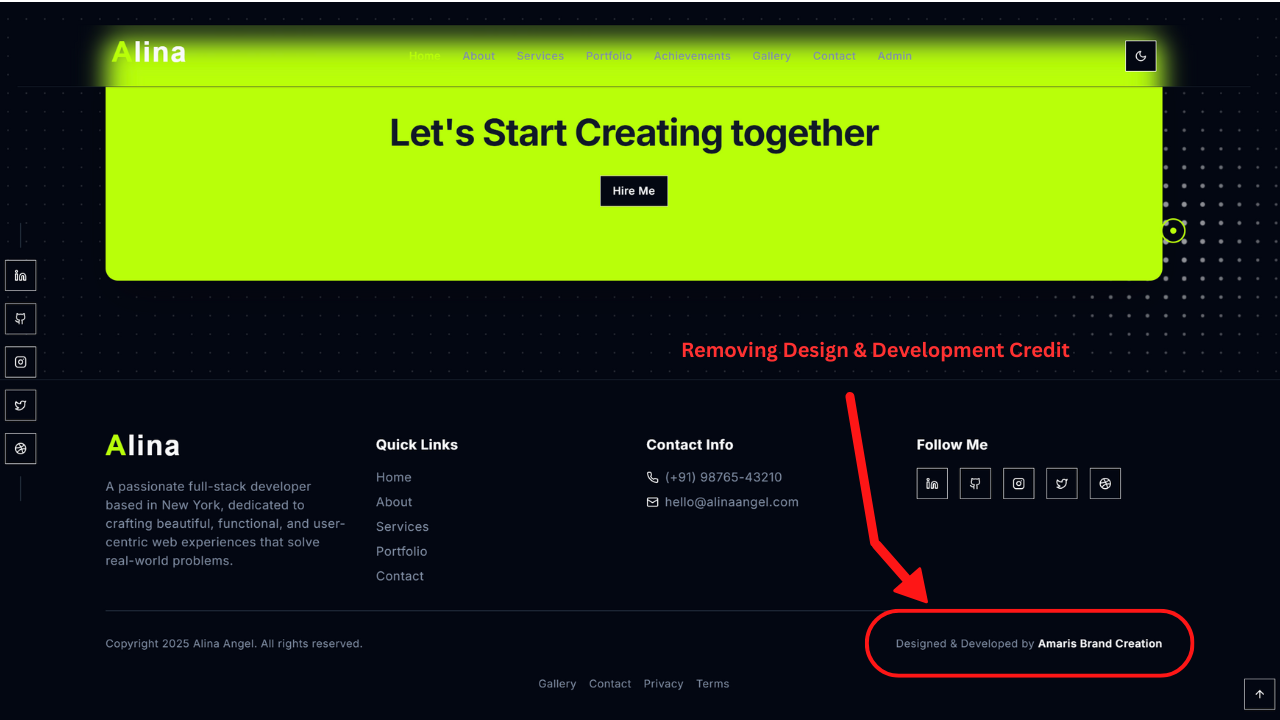
You may keep our credit if you'd like to support us. However, it's not mandatory. The decision is yours, and we’ve included a step-by-step guide to help you remove it if you choose.
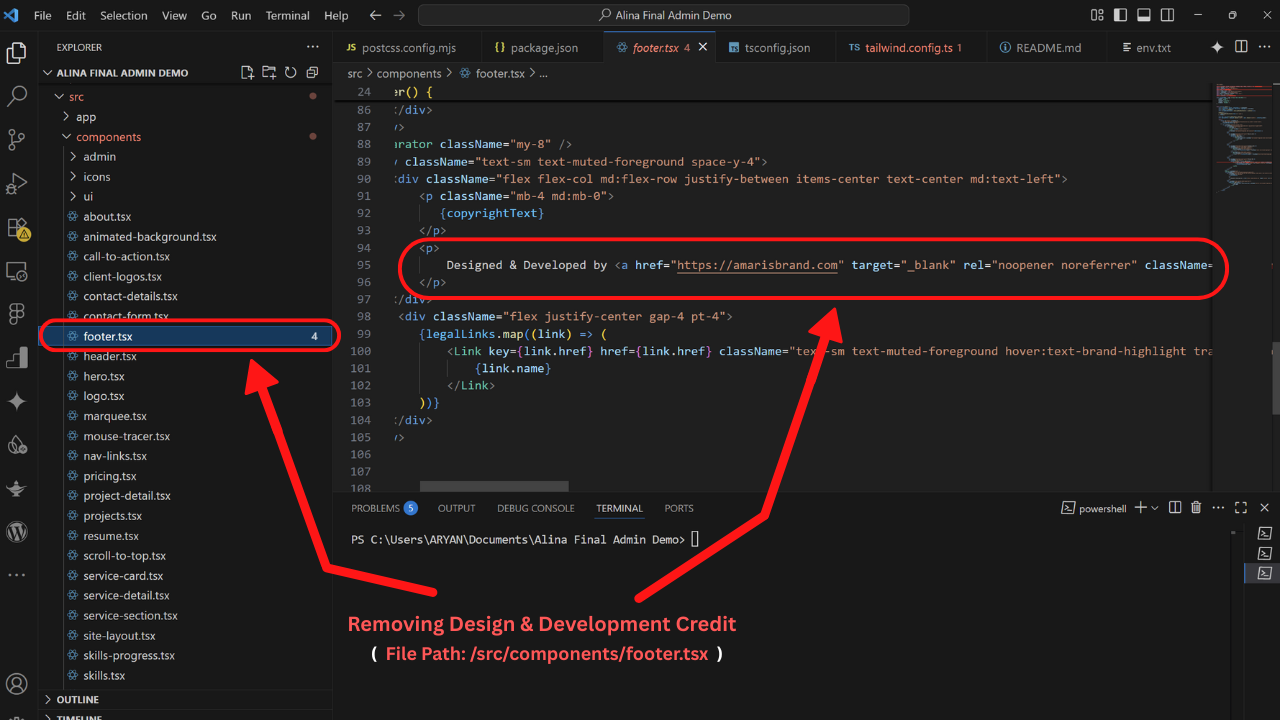
Steps for Removing:
- File Path:
src/components/footer.tsx - Open the file in your code editor.
- Locate the following block of code, usually near the end of the file (around line 70):
<p> Designed & Developed by <a href="https://amarisbrand.com" target="_blank" rel="noopener noreferrer" className="font-semibold text-foreground hover:text-brand-highlight transition-colors">Amaris Brand Creation</a> </p>- Delete this entire
<p>...</p>block. - Save the file to apply changes.
5. Building for Production
This section details how to prepare your Alina Portfolio for production deployment, ensuring it's optimized for performance and efficiency.
When you're ready to deploy your site, you'll need to create a production-ready build. This process compiles and optimizes all your code, assets, and content into static files that can be served efficiently by any web server.
Build Command
Navigate to your project's root directory in your terminal and run the following command:
pnpm run build # or npm run build # or yarn buildThis command will perform several actions:
- Transpile Code: Converts modern JavaScript/TypeScript into compatible versions for wider browser support.
- Optimize Assets: Minifies CSS, JavaScript, and other assets to reduce file sizes.
- Static Site Generation (SSG): Next.js will pre-render your pages into static HTML files.
- Output Directory: The optimized static files will be placed in the `out/` directory at the root of your project.
Deployment
Once the build process is complete, the `out/` directory contains all the necessary static files for your website. You can now deploy these files to any static hosting provider.
For most recommended platforms (Vercel, Netlify, GitHub Pages), you can simply link your Git repository, and they will automatically detect the Next.js project and run the build command for you. After the build, they will serve the content from the `out/` directory.
If you're deploying to a traditional web server (like Apache or Nginx) or a simple static file host, simply upload the *entire contents* of the `out/` directory to your web server's public root (e.g., `public_html`, `www`).
6. External Features and Integrations
Alina Portfolio is designed to be highly extensible and integrates seamlessly with various external services to enhance its functionality. This section covers some of the key integrations.
Google Maps Integration
If you wish to display an interactive Google Map on your contact page or elsewhere, Alina Portfolio provides a structure to easily embed it.
- Embedding Google Maps: You can embed a Google Map using either the Google Maps Embed API (requires an API key) or by using a direct latitude/longitude link (no API key needed).
- Embed the Map:
- For the Contact Page (Admin Dashboard): If your admin dashboard supports it, look for a field under "Site Content" or "Contact" where you can paste a Google Maps iframe embed link.
- Manual Embedding (Developers): You can also manually insert the iframe into your HTML or component file (e.g.,
src/components/ContactMap.tsx).
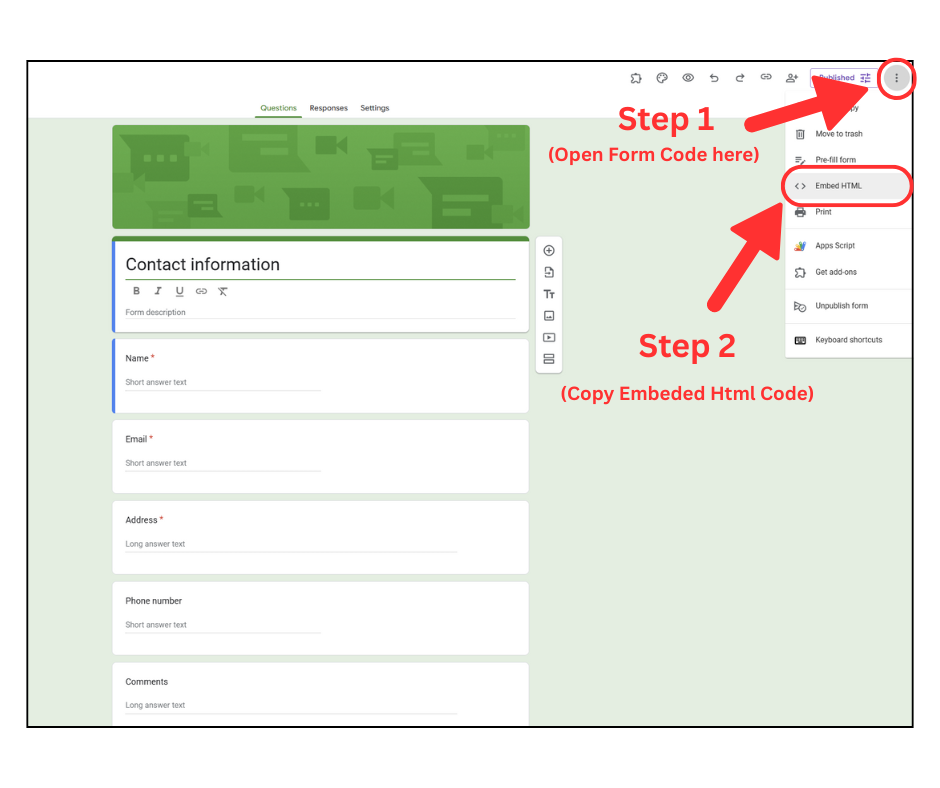
- Create a Google Form: Go to Google Forms and create your desired contact form.
- Get Embed Code:
- Once your form is created, click on the "Send" button (top right).
- Select the "Embed HTML" tab (`<>`).
- Copy the provided `iframe` code.
- Integrate into Your Site:
- Admin Dashboard: Similar to Google Maps, your Admin Dashboard might have a dedicated field for embedding custom form HTML. Look for a "Contact Form" or "Custom HTML" section.
- Manual Integration (Developers): You can paste the `iframe` code directly into the relevant page component (e.g., `src/app/contact/page.tsx`).
Example using a Place Name (with API Key):
<iframe width="100%" height="400" frameborder="0" style="border:0" loading="lazy" allowfullscreen referrerpolicy="no-referrer-when-downgrade" src="https://www.google.com/maps/embed/v1/place?key=YOUR_API_KEY&q=Googleplex,+Mountain+View,+CA"> </iframe>Replace YOUR_API_KEY with your actual Google Maps Embed API key.
Example using Latitude and Longitude (No API Key):
<iframe width="100%" height="400" style="border:0" loading="lazy" allowfullscreen referrerpolicy="no-referrer-when-downgrade" src="https://www.google.com/maps?q=37.4221,-122.0841&output=embed"> </iframe>This example centers the map using latitude: 37.4221, longitude: -122.0841 (Googleplex, CA).
Google Forms for Contact
While Alina Portfolio primarily uses EmailJS for its built-in contact form, for more advanced data collection or if you prefer a Google-native solution, you can integrate a Google Form.
<iframe src="https://docs.google.com/forms/d/e/YOUR_FORM_ID/viewform?embedded=true" width="640" height="700" frameborder="0" marginheight="0" marginwidth="0">Loading…</iframe>7. Site Information and Guidelines
This section provides crucial information and best practices for managing content, optimizing for search engines, and understanding the underlying technology of your Alina Portfolio.
Image and Asset Management
Efficient management of images and other assets is vital for website performance and visual quality.
- Optimization: Always optimize your images before uploading them. Large image files can significantly slow down your website. Use tools like TinyPNG or ImageOptim to compress images without losing too much quality.
- Formats: Use modern image formats like WebP where possible, as they offer better compression than JPEG or PNG. Next.js's `
` component automatically optimizes images. - Naming Conventions: Use clear, descriptive, and lowercase file names for your images (e.g., `my-project-screenshot.jpg` instead of `IMG_1234.JPG`). This helps with SEO and organization.
- Alt Text: Always provide descriptive `alt` text for all images. This is crucial for accessibility (screen readers) and SEO.
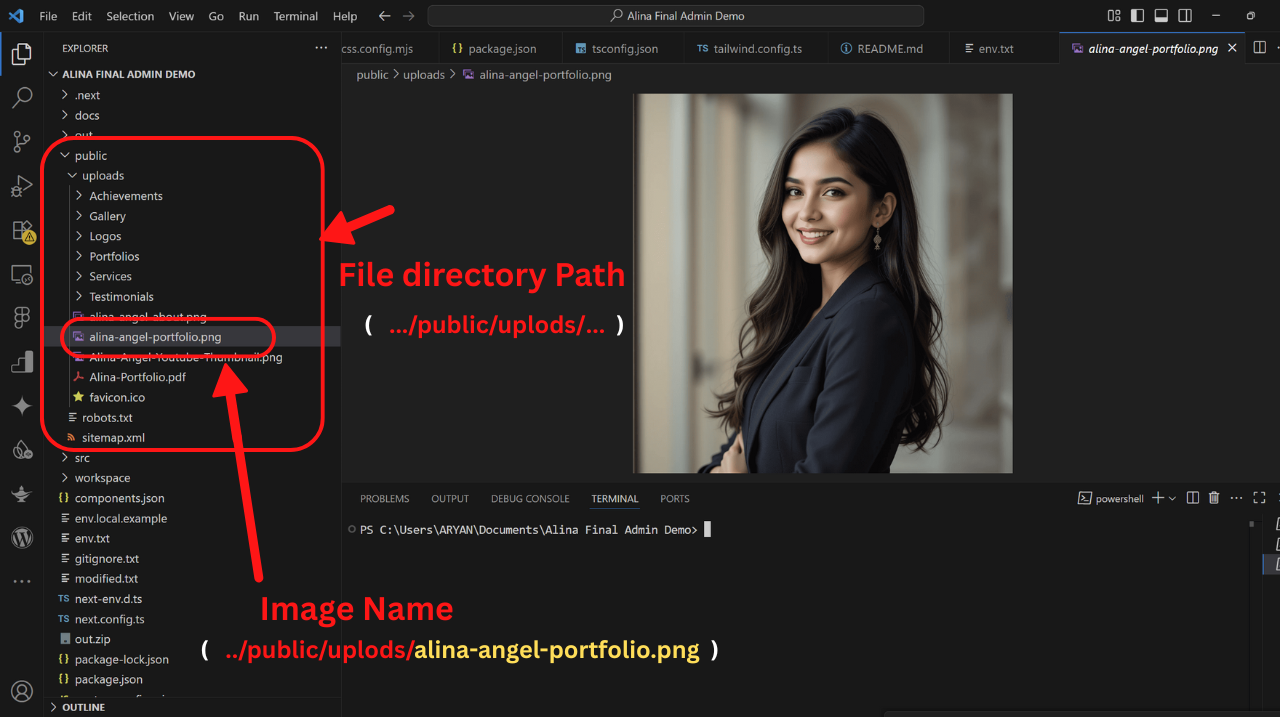
- Asset Location:
- Step 1: For manually added images (developers): Place static assets in the `public/` directory in your Next.js project. These will be served directly at the root. For example, `public/images/logo.png` can be accessed at `/images/logo.png`.
- Step 2: For dashboard-managed images: Upload them directly through the admin dashboard, and the system will handle their storage and display.

Manually added images (developers)
SEO Guidelines
Search Engine Optimization (SEO) is about making your website more visible to search engines like Google. Alina Portfolio is built with SEO in mind through Static Site Generation.
- Keywords: Incorporate relevant keywords naturally into your content, headings, and descriptions.
- Meta Titles & Descriptions: Each page and project in your portfolio should have a unique, descriptive meta title and description. The admin dashboard provides fields for these.
- Clean URLs: Next.js generates clean, readable URLs by default, which is good for SEO.
- Headings (H1, H2, H3): Use headings hierarchically to structure your content. Your main page title should be `H1`, sub-sections `H2`, and so on.
- Mobile-Friendliness: Your template is fully responsive, which is a major SEO factor.
- Fast Loading Speed: Being an SSG application, Alina Portfolio is inherently fast, contributing positively to SEO.
- Schema Markup (Optional): For advanced SEO, consider adding structured data (Schema Markup) to your pages (e.g., for "Person," "Portfolio," or "Project" types) to help search engines understand your content better. This usually requires manual implementation for developers.
Static vs. Dynamic Content in Next.js
Understanding the difference between static and dynamic content in the context of Next.js is key to managing your Alina Portfolio.
- Static Content (SSG - Static Site Generation):
- Definition: Content that is rendered into HTML at build time. This means the HTML file for a page is generated once when you run `pnpm run build`, and then served as-is to every user.
- Alina Portfolio Usage: Most of your portfolio content (hero section, about page, project details, services, etc.) is designed to be static. When you update content through the admin dashboard, you typically need to re-run the build process (`pnpm run build`) to generate new static files with the updated content.
- Benefits: Extremely fast load times, excellent SEO, high security (no server-side vulnerabilities for rendered content), and low hosting costs.
- Dynamic Content / Client-Side Interactivity:
- Definition: Content or functionality that changes based on user interaction or real-time data, often fetched or rendered on the client-side (in the user's browser) after the initial HTML is loaded.
- Alina Portfolio Usage: While the content itself is largely static, the admin dashboard, the contact form (via EmailJS), and any interactive UI elements (like animations if GSAP is used with client components) rely on client-side JavaScript to function dynamically.
- Limitations (without JS): Without JavaScript, the rich dynamic behavior of features like the in-browser admin dashboard and potentially interactive components would not work. The site would be purely static.
Customization and Development
For developers, Alina Portfolio offers a robust foundation for further customization.
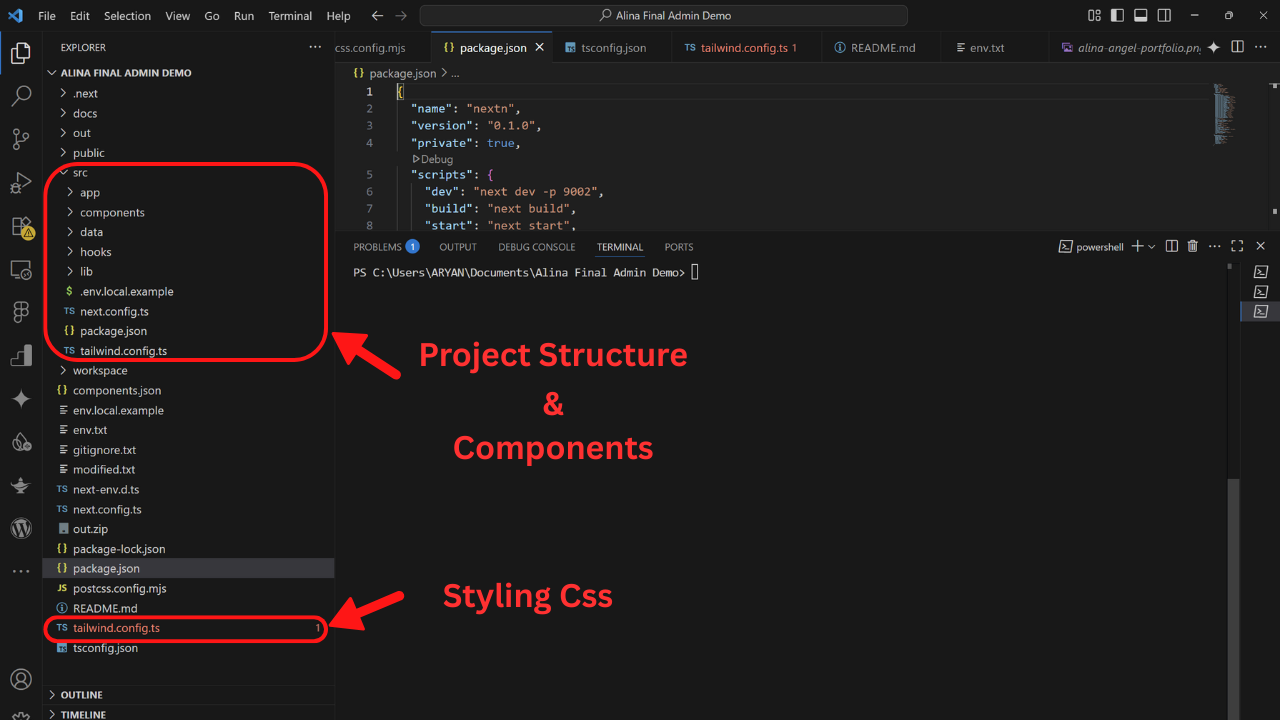
- Project Structure: Familiarize yourself with the Next.js App Router structure (`src/app`, `src/components`, `src/lib`, etc.).
- Styling: Leverage Tailwind CSS for rapid styling. Understand how to extend Tailwind's configuration (`tailwind.config.ts`).
- Components: Modify or create new React components in `src/components`. Utilize ShadCN UI components for consistent styling.
- Data Handling: For advanced customizations that require more dynamic data, you might explore connecting to a headless CMS (like Strapi, Sanity, Contentful) or a database, which would introduce server-side logic and require Next.js's API Routes or server components.
- Version Control: Always use Git for version control. Create branches for new features or major changes.
8. Updating Your Alina Portfolio
Periodically, updates to the Alina Portfolio template might be released, bringing new features, bug fixes, or performance improvements. This section guides you through the process of updating your existing project.
Before You Update (Important!)
Updating any project involves risk. Follow these critical steps to ensure a smooth and safe update process:
- Backup Your Project:
- Git Repository: Ensure all your current changes are committed and pushed to your Git repository (e.g., GitHub, GitLab, Bitbucket). This is your primary backup.
- Local Copy: Create a complete backup of your entire project directory on your local machine. Simply copy the project folder to a safe location.
- Note Your Customizations: If you've made any direct modifications to the template's core files (beyond content updates via the dashboard or `.env` settings), make a detailed list of these changes. This includes:
- Changes to `package.json` (new dependencies).
- Modifications in `tailwind.config.ts`.
- Custom components or utility functions.
- Direct edits to page or layout files.
Why this is crucial: Merging updates can overwrite your custom code. Having a clear record allows you to re-apply them after the update. - Read Release Notes: Always review the release notes or changelog for the new version. This will highlight any breaking changes, new features, or specific migration steps required.
How to Update Alina Portfolio
The update process typically involves fetching the latest changes from the original template repository and merging them into your project.
This process assumes you initially cloned the template or set up an "upstream" remote for the original repository.
- Ensure a Clean Working Directory:
- Make sure you have no uncommitted changes in your local Git repository.
If there are changes, `git stash` them or commit them.git status
- Make sure you have no uncommitted changes in your local Git repository.
- Add Upstream Remote (If not already done):
If you haven't already, add the original Alina Portfolio repository as an "upstream" remote:
git remote add upstream https://github.com/your-template-repo/alina-portfolio.gitNote: Replace `https://github.com/your-template-repo/alina-portfolio.git` with the actual URL of the original Alina Portfolio template repository. - Fetch Latest Changes:
git fetch upstreamThis command downloads the latest changes from the original template repository but doesn't merge them yet.
- Merge Changes:
Now, merge the changes from the upstream `main` (or `master`) branch into your local `main` (or `master`) branch:
git merge upstream/mainYou might encounter merge conflicts if you've modified the same lines of code that have been updated in the new version. Resolve these conflicts manually using your code editor's merge conflict tools.
- Install New Dependencies (if any):
After merging, there might be new or updated dependencies.
pnpm install # or npm install # or yarn install - Test Locally:
Run the development server to ensure everything is working as expected.
pnpm run dev # or npm run dev # or yarn devThoroughly test all parts of your website, including content editing in the dashboard.
- Re-build for Production and Deploy:
Once you're confident, create a new production build and deploy your updated site.
pnpm run buildThen deploy the contents of your `out/` directory.
9. Support
We are committed to providing comprehensive support for your Alina Portfolio template. If you encounter any issues, have questions, or need assistance, please refer to the following resources:
Documentation
You are currently reading the documentation! This guide covers installation, customization, content management, and common troubleshooting tips. Please make sure you've reviewed the relevant sections before reaching out for further assistance.
Frequently Asked Questions (FAQ)
Before contacting support, please check our FAQ section (if available—typically on the product page or a dedicated support page) for quick answers to common questions.
Contacting Support
If you cannot find a solution in the documentation or FAQ, feel free to contact our support team through the following methods:
- Email: Send a detailed message to support@amarisbrand.com.
- Support Portal / Ticketing System: Visit our support portal at https://amarisbrand.com/support to submit a ticket. This method allows us to track and respond to your request efficiently.
- ThemeForest / Creative Market Comments: If you purchased this template from a marketplace like ThemeForest, you may also post your question in the item's comments section. Please be aware that public comments may limit the amount of personal information you can share.
When Contacting Support, Please Include:
- Your Purchase Code / License Key: If applicable, for purchase verification.
- A Clear Description of the Issue: What you were trying to do, what went wrong, and what you expected.
- Steps to Reproduce the Issue: If applicable, provide a step-by-step explanation.
- Relevant Screenshots or Videos: Visual examples help us identify and resolve the issue faster.
- Browser and OS Info: For example, Chrome on Windows 11 or Safari on macOS Sonoma.
- Error Messages: Include any messages from the browser console (press F12 to open DevTools) or terminal.
Thank you for your patience and cooperation. We're here to ensure you have the best possible experience with our template!
10. Credits & License
This section acknowledges the technologies, libraries, and resources used in the development of the Alina Portfolio template and outlines its licensing terms.
Credits
Alina Portfolio is built upon the incredible work of the open-source community and various development tools. We extend our gratitude to the creators and maintainers of the following:
- Next.js: The React framework for production. (nextjs.org)
- React: A JavaScript library for building user interfaces. (react.dev)
- TypeScript: A strongly typed superset of JavaScript. (typescriptlang.org)
- Tailwind CSS: A utility-first CSS framework. (tailwindcss.com)
- ShadCN UI: Beautifully designed components that you can copy and paste into your apps. (ui.shadcn.com)
- GSAP (GreenSock Animation Platform): A robust JavaScript animation library. (greensock.com)
- Lucide Icons: A simply beautiful open-source icon set. (lucide.dev)
- EmailJS: Send emails directly from JavaScript, no server needed. (emailjs.com)
- Other Minor Libraries/Dependencies: Refer to the
package.jsonfile for a complete list of all dependencies.
Template Developed & Maintained by: Amaris Brand Creation (OPC) Pvt Ltd – Visakhapatnam, India. Visit us at www.amarisbrand.com
License
The Alina Portfolio template is sold exclusively through ThemeForest and is licensed under Envato’s official licensing terms. Depending on your purchase, the template is covered by either a Regular License or an Extended License.
- Regular License: Allows use in a single end product (e.g., one website for you or a client) where the end product is not sold or redistributed. You may customize the template to suit your project, but you may not resell or share the source files.
- Extended License: Allows use in a single end product that can be sold (e.g., a website builder, SaaS product, or commercial service). This license has fewer restrictions but still does not allow general redistribution of the source files.
For complete details, please refer to Envato’s official license documentation: